Help with turbocharging my SC400 1UZ-FE

The 1UZFE EGR Delete Kit is available for sale here.
Timig belt replacement

Finally the installation of the supercharger has begun.
I began by removing the front, the radiator and the hydraulic fan.
I thought that i might as well change the timing belt while i'm at it.
Here is what i've done so far:
work_begins.jpg

removed the old oil pump for the hydraulic fan
old_oil_pump.jpg

Here is the new LS400 fan bracket
ls400_fan_bracket.jpg


I also discovered that will need slightly longer screws for the fish bracket, at least 3cm.
fish.jpg


Anyways, the timing belt is now changed, next items on the agenda are:
  • change injectors
  • change ignition cables
  • mount fish bracket and move the fuse box 1 cm closer to the fender wall
  • manufacture a couple of spacers for the longer screws
  • manufacture a spacer for the belt tensioner
  • buy a 3"--3.5" 90 degree silicone adapter for the throttle body
  • buy a new radiator since i discovered that mine is almost gone

More to come in the next days
/Mike
 
It's progressing! I'd like to see the dyno number. :)

I need you a favor. Can you take the closer and detailed pictures of the connections around the canister, heater valve (circle) and the vaculum lines that go to the other side (circle)? I just want to make sure I got mine right.
 

Attachments

  • SC Engine.jpg
    SC Engine.jpg
    160.7 KB · Views: 8
Looking good. Small tip when it comes time to fabricate an intake for the blower: try and size the blower's intake pipe to be 1/4" to 1/2" larger than the blower inlet (inside diameter).

When I built my fish setup for my sc400 I used a 4" silicone 90 elbow and another 4" 90 aluminum pipe. It will fit great (need to cut 4.25" hole in sheet metal behind headlight) but it allows cold air to be drawn from the bumper openings.

Also, you might want to consider blocking off the EGR system if not already performed as its a very common place for boost leaks. In addition, if you have access to a smoke machine, its prob a good idea to test for any leaks before firing her up. This engine has a LOT of vacuum lines and connections at the intake manifold where boost can easily leak. Lastly, a thick layer of grey RTV around the MAF sensor will help the MAF seal properly.
 
Thx for the tips, i'll be working this saturday, we'll be 3 guys, hopefully we'll be almost done.
I'm expecting to receive a new radiator tomorrow, i bought a Supra TT radiator from England, it was the fastest shipping available. I wanted a 3-rows, aluminium one, but it was gone take too long to deliver.
In the picture below you can see that the blower inlet is 3.5". I'll try and get a larger elbow till Saturday.
mockup2.jpg

I emailed David P about the EGR block plates, but he didn't have any atm. I manufactured myself a couple, i'll try and see if they fit. Not sure what the MOT ppl will think about that, maybe with a gallon of ethanol and warm cats it will pass emissions test.
--> Steve C --> I'll take lots of pictures this saturday.
/Mike
 
Last edited:
use two relays. Mine failed with only one.

Thx, i'll do that. Here is a little update:

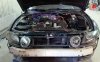
I did some work today, I installed the fish-bracket and did a mockup of the intercooler pipes, it always turns out you bought the wrong pipe or the wrong silicone tube.
I had to replace one of the screws holding the original fan-bracket with a longer one. It needed some additional threading too:
fish001.jpg

This is how the bracket is installed, not a permanent installation, more of a test:
fish002.jpg

Here is where the pipe for the intercooler comes out:
fish003.jpg

The fish-bracket was a bit too big and i had to cut a hole in the inner-fender wall to make room for it. I will solder a new patch later: I did not cut into the frame though.
fish004.jpg

I have to buy a few silicone tubes and some pipes, also i need to manufacture a few brackets for the intercooler, but i am beginning to think that this may work.
More to come in a few days
/Mike
 
I noticed that the fish bracket is hitting the frame rail. The bracket should not touch and should have a solid 1/2" clearance. If your motor mounts are old, they can sag resulting in bracket interference. If the bracket is an old version, then this would explain the clearance issues. Earlier versions had clearance issues.
 
Fish-bracket

The bracket did touch the frame initially just a little bit, the picture is taken only when we test-fitted. I had to cut a bit of the fender inner-wall, mainly because i want to have that 1/2" clearance.
Unfortunately i believe you are right about my motor mounts, maybe it's time i ordered new ones. :)
Thx for the tip
/Mike
 
This is how i connected the fans:
efans_2relays.jpg

looks good, if you want to improve upon that you could run the TRD thermostat (74c) and run say a 85c and 95c thermo switches so most of the time you only run one fan.

also if you're going to keep the aircon in a hot climate a small fan on the front as a pusher hooked up to the compressor clutch is a good idea.
 
Intercooler

Hello,
Today i installed the intercooler and the radiator. Here are some pictures:
intercooler001.jpg

intercooler002.jpg

intercooler003.jpg

intercooler004.jpg

intercooler005.jpg

intercooler006.jpg

intercooler007.jpg

intercooler008.jpg

intercooler009.jpg

intercooler010.jpg

intercooler011.jpg

intercooler012.jpg

intercooler014.jpg

intercooler015.jpg

intercooler016.jpg

intercooler017.jpg

intercooler018.jpg

intercooler019.jpg

intercooler020.jpg


Still missing 3 x 3.5" hose clamps and a few screws that need to be longer. Tomorrow i'll be changing the injectors to 315cc and changing the spark plug wires, also connect the fan relays.

I have a question regarding the old wiring from the temperature sensor. What do i do with those two wires? Just leave them or will they give some warning light?
I'm guessing they were connected to the ECU somehow.
More to come tomorrow
/Mike;)
 
Last edited:
Thx M for the fast reply.
About the low mounting, yeah, it kinda looked a little low to me too, i'll try and raise it a little tomorrow, its not too low though, but i could raise it a couple of inches.
More pictures tomorrow.

P.S. About the vacuum line that went to the power steering... I used a T-coupler and connected it to another vacuum line. I hope i did it right.
/Mike
 
Injectors and radiator

A few updates:
Today i changed the injectors, it was a lot of work, mainly because of all he stuff that was in the way :eek:
I also installed the electric fans with 2 relays. The fish takes a lot of space and the wires that were in front of the distributor on the drivers side had to be rerouted.
I also installed a PCV valve on the passenger side:
progress059.jpg

progress060.jpg

progress061.jpg

progress062.jpg

progress063.jpg

Here is the PCV valve inside the tube
progress064.jpg

progress065.jpg

progress066.jpg

progress067.jpg

progress068.jpg

progress069.jpg


I measured the length of the belt and it was 270cm, perhaps i should get one that is 267 or 268cm so that it can be stretched. What do you think? Does 268cm sound reasonable?
270 cm = 106.3 in
268 cm = 105.5 in

P.S. I got David C's letter and was very sorry to hear about his condition. Hope he gets well and returns to the forum.


/More to come next week
 
Last edited:


Top