remains. If you own a 1UZ from 1990-1997, you
for help with ordering or questions. This will probably be the last kits I have made.
All other parts are SOLD OUT and won't return, including the LS400 and SC400 turbo kit, rebuild kits, supercharger and performace torque converter. We're not an auto parts supplier and I can't respond to inquries for random Lexus and Toyota auto parts.
I am in the process of changing the oem mechanical fan to electrical fan. This will free up some horse power and this electrical fan will pull more air for greater cooling.
This is what I got. A 16 Inch,12 Volt High Performance Reversible Electric Cooling Fan Kit.
This Zirgo fan has ten blades, and is only 3-1/4 inches deep. Includes fan and four mounting brackets. This fan is configured as a puller from the factory; it mounts on the inside and pulls the air through the radiator.
However, the blades can be reversed along with the polarity of the wiring and it becomes a pusher mounted on the outside and pushing air through the radiator. These are great for OEM or High Performance applications. This kit is new in the box, so start cooling now!
| 16” Fan |
Specs |
| CFM Push |
2400-2700 |
| CFM Pull |
2200-2500 (4400 with 2 fans) |
| Dimensions |
16″ x 16.9″ x 3.2″ |
| Amps (push) |
8.5 +-0.5 AMP |
| Amps (pull) |
7.5 +-0.5 AMP |
| Volts |
12 |
The stock radiator and space available is 16″ Height x 31″ wide and about 6.5″ deep if you remove the fan clutch, 4″ without removing the aluminum fan clutch. When you remove the mechanical fan and shroud, you will have lots of room. By using the electric fan, you will free up some horse power. Second benefit I would say this modification would help is to save your fan clutch.
Fan clutch wear is one of the most common problem with the Lexus V8. Besides the power steering pump problem, the fan clutch would be next. How much hp are we saving? I am not sure, but I would save around 10 hp. No one know unless dynos are done with the pre and post electric fan. However, I am doing this space/room reasons.
With stock operation, one 16″ should be enough. However, if you are planning to go with forced induction, the I would suggest two 14″ without any modification. This will draw about 14 amps for two fans. The fan measured 16″ x 17″.
This one fan should be enough for N/A none mod engine. I tried and no over heating with normal driving. However, I do plan to put two in. The fit is perfect for two 16″.
Below is a pictorial step by step instruction. (sorry for the tiny pics)
|
|
 |
| |
|
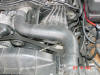
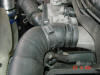
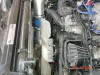
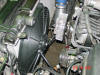
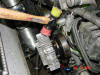
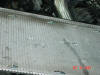
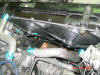
| Here is a OEM view of the engine bay. |
|
|
|
|
 |
| |
|
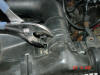
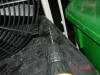
| Make sure the engine is cold and use a plier to loosen the radiator hose. |
|
|
|
|
 |
| |
|
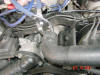
| Then move to the water pump connection. Using the same plier. |
|
|
|
|
 |
| |
|
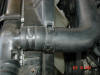
| Noticed the clamp is loosen and move away from the radiator outlet. |
|
|
|
|
 |
| |
|
| This is the water pump connection loosen. |
|
|
|
|
 |
| |
|
| Removal of the radiator hose. It might be easier if you use a screw driver and goes between the radiator outlet and the hose. |
|
|
|
|
 |
| |
|
| Removal of the water pump hose and fluid. |
|
|
|
|
 |
| |
|
| Loosen the fan shroud with few 12 mm screws on top. |
|
|
|
|
 |
| |
|
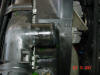
| This is how it look like when the shroud is removed. There are two pins on both side of the shroud. Make sure to remove those clips before removing the shroud. |
|
|
|
|
 |
| |
|
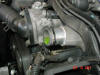
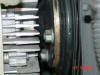
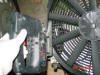
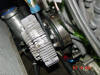
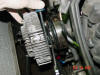
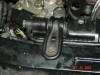
| Behind the fan is the fan clutch. The screws you see will be next. |
|
|
|
|
 |
| |
|
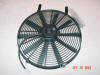
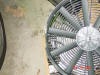
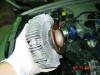
| Here is a picture of the 16″ electrical fan |
|
|
|
|
 |
| |
|
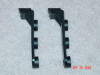
| These are mounting brackets. It comes with 4 brackets. |
|
|
|
|
 |
| |
|
| f you are using one, you do not have to do this. I cut the side so I fit two fans. |
|
|
|
|
 |
| |
|
| Cutting the edge with hand held jig saw. |
|
|
|
|
 |
| |
|
| Doing the same with the other side. This is only to be done with two or dual fans. Single electrical fan setup is not neccessary |
|
|
|
|
 |
| |
|
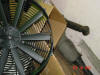
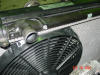
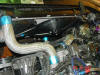
| A mock installation. Looks nice! |
|
|
|
|
 |
| |
|
| Slight different view. The brackets are not very useful in this project. |
|
|
|
|
 |
| |
|
| A clear view of the project. |
|
|
|
|
 |
| |
|
| The fan is placed all the way to the right or driver side. Prepare room for the second fan. |
|
|
|
|
 |
| |
|
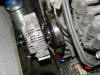
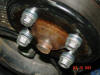
| The fan clutch is right behind the fan. |
|
|
|
|
 |
| |
|
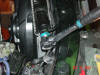
| The trick is to use a screw driver and a 12 mm wrench and apply forced to the different directions. |
|
|
|
|
 |
| |
|
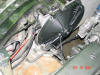
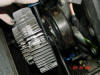
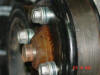
| This must be done. A closer look at the fan clutch. |
|
|
|
|
 |
| |
|
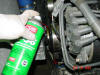
| After you loosen the screws (4@12mm). Spray some WD-40. |
|
|
|
|
 |
| |
|
| Well lubricated will come out easily. |
|
|
|
|
 |
| |
|
| Use soft hammer to knock it loose. |
|
|
|
|
 |
| |
|
| Its out. You can also use a flat screw driver and go between the pulley and the fan clutch. |
|
|
|
|
 |
| |
|
| Reinstall the screws with 3 spacers. Spacers are not provided. |
|
|
|
|
 |
| |
|
| A closer look at the spacers.. |
|
|
|
|
 |
| |
|
| Got a relay from a local audio shop. |
|
|
|
|
 |
| |
|
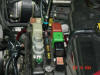
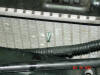
| The fuse box opened and two 10mm screws holds it down. |
|
|
|
|
 |
| |
|
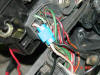
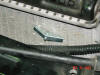
| Gettting power from the igintion. Best is to get power from the accessory wire, but cant find it. |
|
|
This project was not that hard. I would say it will take about 2 hours of work with proper basic tools. The power trigger wire is using the ignition wire located in the fuse box. The proper way would be using the accessory wire as a trigger. Save some amps while turning the engine. This is pretty easy modification and save some hp. Total cost for this project is about $65 dollars. With the second fan coming it, the total would be around $130.
After installing this fan, I found few things about this product. The Zirgo Fan comes with nothing but the four brackets. No relay, no connectors. Its a truly a DIY kit. the things I do not like about this product because the installation parts are incomplete. Mounting the bracket is very difficult especially at the lower mounts. For now I just use zip tie, but will fabricate something to hold it down. I am not disappointed with this product because any other product would be very similar. Therefore, with an universal electrical fan, you will expect to do some modifications. This is not bolt-on kit. I don’t think there are any bolt-on kit available for the LS400 or SC400. I will post more pictures and instructions with the second electric fan installation.
In the very near future, I will be installing the second electrical fan with proper mounting and electrical trigger. To mount the fans properly, I will be using 1/8″ diameter with 2″ long toggle bolts. The radiator is only 1″ thick and the fan mount site is about 1/2″ thick. The total length require would be around 1.5″. With 2″ toggle bolts, it will fit perfectly. The toggle bolts will goes between the fins of the radiator. The easiest way to mount the fan is to take the radiator out. Few screws and mounts on top of the radiator and the radiator is out. Use a small Philips screw driver to open up the holes for the toggle bolts.
There are 4 pre-drill holes already with the electrical fan, but those holes need to be enlarge to fit the 1/8″ toggle bolt. After those four bolts are in, the fan will no go anyway. Its will be very tight and stable. As far as the electrical control, currently I am using the accessory wire to trigger the whole process. I will be using a temperature dependent sensor to trigger the fan. In another word, the fan only comes on at a specific temperature and off at specific temperature. For example, the fans will come on at 180 degrees and off at 170 degrees. The fans will be on as need it, that way your will be little quite during start and idle and full blast during long driving. The temperature sender is about $32 and its worth money. I think the temperature control trigger will be most beneficial for couple of reasons.
- Save AMPS drawn from the fans
- Less noise during starts and cold engine temperature
- Save wear and tear of the fans
Round Two:
After driving my car for about 4 weeks with one fan, the car runs ok, but if I want to run high boost. Than I would need two fans. For dual fans installation, the 16″ is the biggest that fit into the oem radiator. The fans need to be modified in order to make it fit. The best way to install the dual fans is to take the radiator out. To hold the fans, I use 1/8″ x 2″ toggle bolts. When u take out the radiator, its much easier.
|
|
 |
| |
|
| I used a slightly larger drill bit to make 4 holes for the toggle bolts. There are 8 pre-drilled holes already, but just make them bigger. |
|
|
|
|
 |
| |
|
| Here is a picture of the phillips screw driver creating a hole in the radiator fins. |
|
|
|
|
 |
| |
|
| These bolts need to be removed. |
|
|
|
|
 |
| |
|
| You have to remove the banjo bolt to remove the radiator. This bolt is 18mm. |
|
|
|
|
 |
| |
|
| This is the 1/8″ x 2″ toggle bolt went through the fins. |
|
|
|
|
 |
| |
|
| The toggle end installed. |
|
|
|
|
 |
| |
|
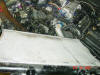
| The radiator flipped upside down and both fans are installed. |
|
|
|
|
 |
| |
|
| The radiator is out of the car. |
|
|
|
|
 |
| |
|
| You can see some toggle bolts and ends. |
|
|
|
|
 |
| |
|
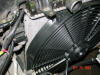
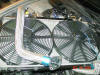
| Few pictures of the dual fan fully running. |
|
|
|
|
 |
| |
|
| Here are some pictures of the Dual fans. |
|
|
Uninstall Radiator:
There are two major hoses involved in our radiator. They can be remove by a pliers. There are two hold down brackets on top of the radiator stabilized by two 12mm bolts. Secondly, there is a return line with a 18 mm banjo bolt with two 10 mm attachment. There are two 1/2″ hoses and one radiator sensor. After they all removed, the radiator will come straight up.
Fan Mounts:
I used toggle bolts to hold down the fans. I drill a hole that is slightly larger than 1/8″ (there are pre-drill holes already, just making it larger to fit the bolt). I drilled 4 holes per fan. After the fans were drilled, I place them on the radiator and space them accordingly. After everything looks good, I used a small Phillips screw driver and create a small holes following the guide of the holes in the fans. I created the holes between the radiator gills or fins. After that is done, I installed the toggle screws to tighten them up. After you installed the screws, manually spin the fans make sure it does not hit anything. After all the screws are tighten, re-install the radiator back.
Fans Modifications:
16″ fans are TOO big for our car. Get 14″ – 15″ fans is the best. If you get 16″ fans, then you will to modify them. I need to cut the corners and part of the shroud. Its not advisable unless you are hardcore. If done right, they fit perfect without any space to spare. For an average Lexus LS400 owner, stick with 14-15″ fans.
Temperature Sender:
If you wish to active your fans with the radiator temperature, then you will need a temperature sender. This unit is around $26.00 and the one I have is 185 degree activation and 175 off. I want my fans to come on earlier to keep my forced induction engine cool. The unit will trigger the ground wire to active the fans. This is great for both hot and cold environment. For cold environment, the fans might not be on at all. This will save some energy and noise. If the temperature hit certain pre-set degree, then the fans kick in. To do this luxury modification, you will need a 20 mm male adapter with 3/8″ NPT female into the OEM radiator plug near the water pump.
Noise Factor:
From my personal experience comparing the two systems. I can not tell the different between the mechanical or the electrical fans. If subjectively, there is no different in noise level, there I highly recommend this modification.
Dual Fan Impression:
No doubt that two fans are better than one. Initially one fan, the engine bay was running pretty hot. After the second fan comes in, the engine bay was running cool. I test drove it for two hours none stop and open my hood the engine and my twin turbo intake felt cold. NO cool, but felt cold. Secondly, the right fan (driver side) felt hotter than the left fan. This has to do with the return hot radiator fluid.
After dealing with my fan supplier for few times. I get to know them pretty well. They are bunch of friendly people and easy to deal with. I highly recommend them to you. Here is where u can get the electric fan for your SC and LS conversion. This is a great price and great quality fan. Best bang for the buck on electric fan conversion.
Eric Swanson
Suzanne Swanson
PartzFinder Performance
507 Paul Morris Drive
Englewood, FL, 34223
941-460-0667


Hello I’m Venus D. I have a 90LexusLS400 V8 , here’s the thing, I need a radiator , ok do I have to have a fan cover shroud in order to have the radiator put on successfully ? I was told if it’s put on without cover a new radiator will still run hot, is this true? It just sounds like a bunch of bull.. Please give me your expertise it’s needed and appreciated. Thanks Ms. Venus D. 3139555890 ph . to reach me immediately.