You are using an out of date browser. It may not display this or other websites correctly.
You should upgrade or use an alternative browser.
You should upgrade or use an alternative browser.
Engine build up
- Thread starter elliotaw
- Start date
The 1UZFE EGR Delete Kit is available for sale here.


I picked up the block and rotating assembly from the machine shop today. The block has been bored and honed to suit the new race forged pistons, the decks have been machined, the crank has been polished and balanced with the rods and pistons and flywheel. Rods have been reworked and new small end bushes pressed into place and reamed to suit the pins. Pistons have been deburred and finally......... the rings have been gapped.
Heres a picture of the bare block. I've just fitted a few brackets and bolts for the water pump. It took quite some time fishing through all the nuts, bolts etc to find the right ones from the measurements I took when stripping the motor.
I've considered painting the block black, but decided against it in the end. Once the engine is in the Capri, you can barely see the block anyway. I will paint the valley black though as it gets full of grit over time and you can see into the valley from some angles.... be easier to use compressed air to blow grit from a painted surface than from the rough cast aluminium.
Elliot
Oh...forgot to mention. When I removed the conrods, I labelled them with tape. Now theyve been down the machine shop, they've kindly removed the tape so I have no idea which one goes where. However, now theyve been cleaned up, I can see they have been stamped 1 to 8 on them back at the toyota factory. Can someone enlighten me as to what order they go in ? is it 1 to 8 starting at the front of the engine ? or does it go 1 to 4 left bank then 5 to 8 right bank ? or something else?
Help !
Elliot
Help !
Elliot
Done a bit more today. I'm not trying to do too much at the moment, the engine bearings are still in the post so not too much I can do till they turn up. Anyhow, I bought some black brush on engine enamel and painted the valley with 2 coats. The starter motor I rebuilt is now bolted in place, the knock sensors refitted, new water pump sealed and bolted up along with the bypass pipe and brackets.
Elliot
Elliot
Jake Breyck
New Member
wow those sleves are thick, is that stock or are those aftermarket sleves?
Not sure where the bypass pipe hooks upto the other end...I'll tell you when I get that far...hehe.
Got the engine bearings delivered today. Thought they were going to be federal mogal brand, but got clevite 77 instead....bit of a bonus as that was my first choice anyway.
Just spent an hour or two removing the mains studs from the block, cleaning the mains machined mating faces on the block and refitting the studs and torquing them down to 10Nm. Also checked the stud diameters to make sure they were within spec. My spec sheet says they should be within 0.2953 - 0.2992. All 20 of mine measure 0.2997. I cant imagine they've gained size, so I'm assuming they are fine...not undersize at least.
Also checked the bore diameter against the new forged pistons. All 8 bores appear to be 4 thou clearance which is spot on to Ross's design recommendation. Just checking the machine shop did the job right as I dont trust anyone these days.
I'll be fitting the rotating parts soon. I know where each rod goes now. Ther is a small cutout on each rod so you know which way round they go in each bore. The only info I can find on that says that the cutout goes to the 'outside' !!!! The outside of what ?How does that work ? Can anyone enlighten me?
Elliot
Got the crankshaft fitted today. Took quite a long time. Everything was cleaned, then cleaned and cleaned again till everything was spotless. New clevite half mains bearings were installed into the block, then the crankshaft carefully lowered into position. The mains caps had the other half bearings fitted and all 5 mains caps were torqued down with a short length of plastiguage on each. The mains caps were then removed again and the plastiguage measurements checked. All mains clearances are 1.5 thou. Spec sheet says between 1 and 1.8 thou so I'm happy to assemble it all permanently. The crankshaft was once again removed to allow some nulon engine assembly paste to be smeared onto all the bearing surfaces. Crankshaft offered to the block once more, this time with the thrust bearings. Mains caps were refitted and torqued down to 20Nm, then 90 degrees in order. Mains side bolts were then reinstalled with new dowty seals and torqued to 50Nm.
Elliot
Elliot
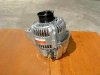
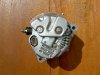
Got a bit more done this morning. Its all going together in a weird order, I should be fitting the pistons and rods now, but I'm waiting on some tools I bought on ebay to make the job easier, so for now I've started on the front end. Fitted a brand new oil pump supplied by lextreme, nearly forgot to replace the o ring on the block, but rememebered at the last minute. I've discovered some slight differences in the castings from the original oil pump and the new one. Nothing that will affect the engine in anyway, just minor changes.....
The bolt hole on the very bottom left is drilled through on the old and tapped on the new.
The No2 Idler mounting point does not have the steel round top hat washer, instead there is more alloy casting to make up the space and has been machined.
Looks like a new mould for the casting too, as there are also other casting changes.
Anyway, it appears to fit fine. I've fitted brand new idler pulleys and they all seem to line up correctly with each other and the water pump pulley. Also pressed in a new crankshaft seal and fitted the toothed belt drive wheel.
Elliot
Ok...got all 8 pistons, rings and rods fitted up......
The rods have been chemically cleaned and polished and the machine shop has already pressed in new small end bearings and reamed them to suit the new piston pins. The piston pins are held in place with 4 spiroloks on each piston.....what a pain in the knackers they are to fit. The rings were fitted and rotated into position, new big end bearings fitted and everything lubed up with nulon extreme. The big end caps have only been torqued upto 20Nm at the mo as I cant find the right sized socket for my torque wrench. When I find it I'll do the final torque then.
Also had time to fit the thermostat housing, cam belt, serpentine belt tensioner and the alternator.
Elliot
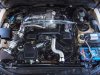
Got both heads fitted yesterday, all meticulously cleaned with 100% hydrocarbon cleaner. All torqued down to 60NM in about 12 steps with a new ARP head stud kit. Also managed to bolt down some of the head to head cast pieces, power steering pump and a pile of brackets. The plenum and inlet manifold are just resting in position for the photo. I am going to paint the inlet manifold black....too much work involved in polishing it....
No such thing as too much chrome !
Elliot
No such thing as too much chrome !
Elliot
Attachments
A pic like that just sorta gets the juices going doesn't it? I'll bet you spend a few hours a day just looking at it.
After I'd finished assembling my 2JZ-GTE motor, I almost didn't want to drop it into the Supra and get it dirty!
That's really some nice work Elliott; you can certainly be proud of it.
After I'd finished assembling my 2JZ-GTE motor, I almost didn't want to drop it into the Supra and get it dirty!
That's really some nice work Elliott; you can certainly be proud of it.