The following information is given in good faith and is by no way intended to be the definitive guide for street tuning your vehicle.
The writer of this article has no affiliation with Adaptronic and takes no responsibility for the accuracy or results obtained by the information given. Altering any engine management control from the original equipment manufacturer should be done with caution and a full understanding of any consequences. If you don’t understand the consequences don’t do it.
Sorting out the basics and become familiar with how things work.
Download the installation manual from the Adaptronic website for the e420c and read it. Don’t just skim over it, I said read it. All of this stuff was new to me so it took me 3 reads on the manual before it all started to click. A good tip is to print off the manual and read it while you have the latest e420c WARI software open it makes a lot more sense.
This guide will assume you have wired up your Adaptronic as a stand alone ecu to control your engine, and that you have set up all of the temperature sensors, MAP sensor and throttle position sensor etc. All the information on how to do this is in the manual and is easy to do and follow.
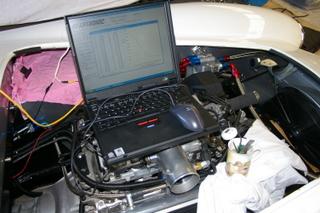
Below is a picture of the coolant temp sensor being calibrated with a cup coolant I placed in the freezer, it’s a simple case of pressing learn at the relevant temp as it warms up to ambient. The higher temps were done with cooking oil that was heated up on the stove and calibrated as it cooled. Don’t forget to press apply when you have made the changes. The OEM Toyota two wire temperate sensor was used.
A couple of examples of sensor calibration below
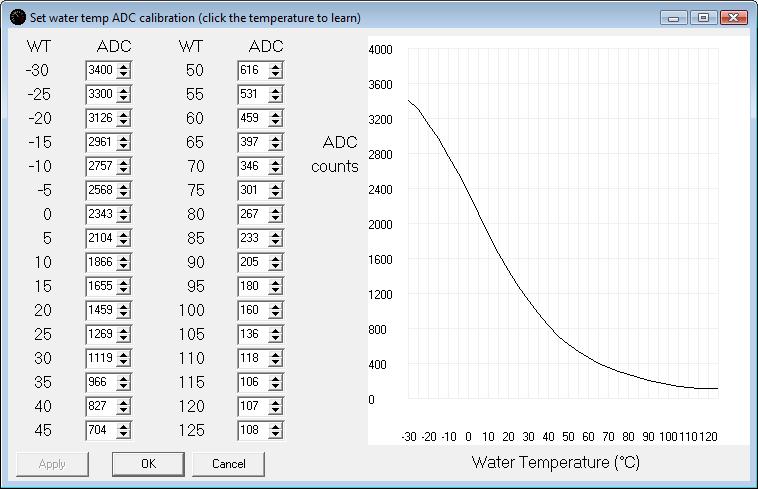
Coolant temp
Air temperature
The Air temperature sensor I used is a fast response GM unit available cheaply from most auto stores part no 25036751, don’t forget to get the plug as well. It is important to put the air temperature sensor in the air flow path that is going into the engine for the best results. The sensor will (should) come with resistance v temperate chart. You will need to calculate the ADC value from the temperature v’s resistance chart to put in the air temp graph . The below chart is what I calculated out for the above air temp sensor. Enter the ADC value in the air temp chart and press apply. I have set up two air temperature sensors one pre supercharger (aux temp) and the main air temperature sensor is post supercharger.
ADC value = 4095 x (resistance)
(Resistance + 4700)
|
Temp |
Resistance OHMS |
ADCV |
|
-40 |
99326 |
3,910.0 |
|
-35 |
71332 |
3,841.9 |
|
-30 |
51791 |
3,754.3 |
|
-25 |
37994 |
3,644.2 |
|
-20 |
28146 |
3,509.0 |
|
-15 |
21044 |
3,347.4 |
|
-10 |
15873 |
3,159.5 |
|
-5 |
12073 |
2,947.5 |
|
0 |
9256 |
2,715.9 |
|
5 |
7153 |
2,471.2 |
|
10 |
5572 |
2,221.3 |
|
15 |
4373 |
1,973.7 |
|
20 |
3457 |
1,735.5 |
|
25 |
2752 |
1,512.3 |
|
30 |
2205 |
1,307.7 |
|
35 |
1778 |
1,123.9 |
|
40 |
1443 |
961.9 |
|
45 |
1177 |
820.1 |
|
50 |
965 |
697.6 |
|
55 |
796 |
593.1 |
|
60 |
660 |
504.2 |
|
65 |
551 |
429.7 |
|
70 |
462 |
366.5 |
|
75 |
389 |
313.0 |
|
80 |
329 |
267.9 |
|
85 |
279 |
229.5 |
|
90 |
238.1 |
197.4 |
|
95 |
203.9 |
170.3 |
|
100 |
175.3 |
147.2 |
|
105 |
151.3 |
127.7 |
|
110 |
131 |
111.0 |
|
115 |
113.9 |
96.9 |
|
120 |
99.4 |
84.8 |
|
125 |
87 |
74.4 |
|
130 |
76.4 |
65.5 |
Wide band O2 sensor.
Bottom line is if you don’t have a fast response wide band O2 sensor that communicates with the Adaptronic e420c you are pretty much wasting your time trying to street tune.
The Adaptronic e420c ecu has the option to use several wide band O2 sensors. I purchased an Innovative motorsports wide band sensor that seems to work very well and is plug and play via the serial port on the e420c and sells for around US $200. Follow the set up instructions for installing the wide band O2 sensor that you are going to use.
Fuel and ignition maps.
The fuel and ignition maps need to built up depending on what boost pressure you are running and what resolution you want to run, every 250 rpm or 500 rpm etc. It is important to note that the more load points you have the longer it will take to tune but the smoother it will drive.
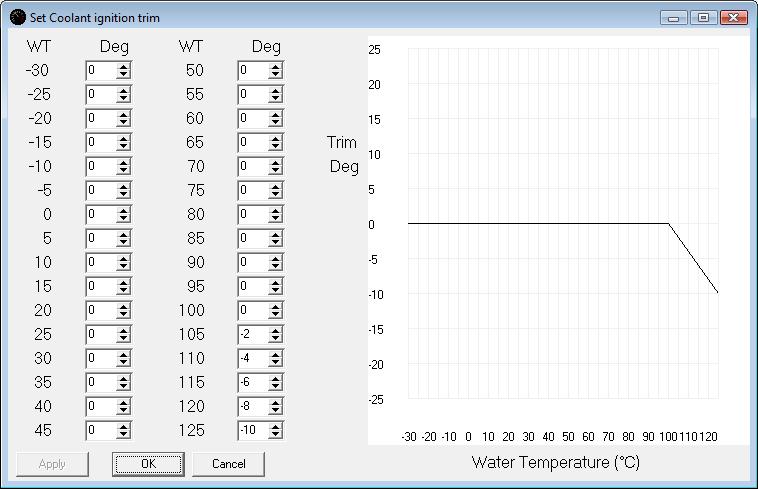
Ignition map and trims.
There are several maps that can be downloaded from the Adaptronic website to start you off and get you running. All engines are different so it is important to understand how your engine may be different to the map you have downloaded. Adjust the base maps as required. I built my own ignition map based on an application exactly the same as my set up that had been proven.
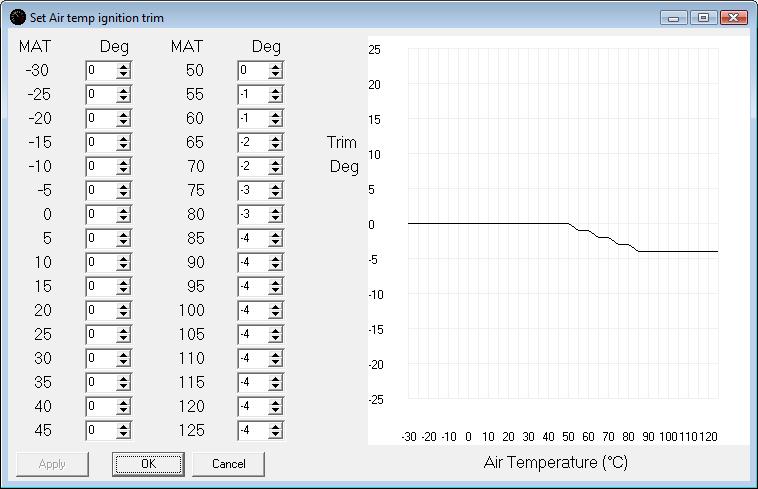
Under the corrections tab set the ignition trims to pull timing based on air or coolant temp. Set these up to pull the desired timing at the desired temps.
Knock sensor.
Under the corrections tab select closed loop parameters, set the knock retard values you want to use. The smaller the knock level the quicker it will pull timing.
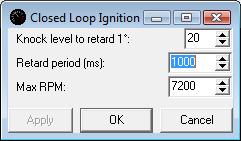
Set the ignition to closed loop.
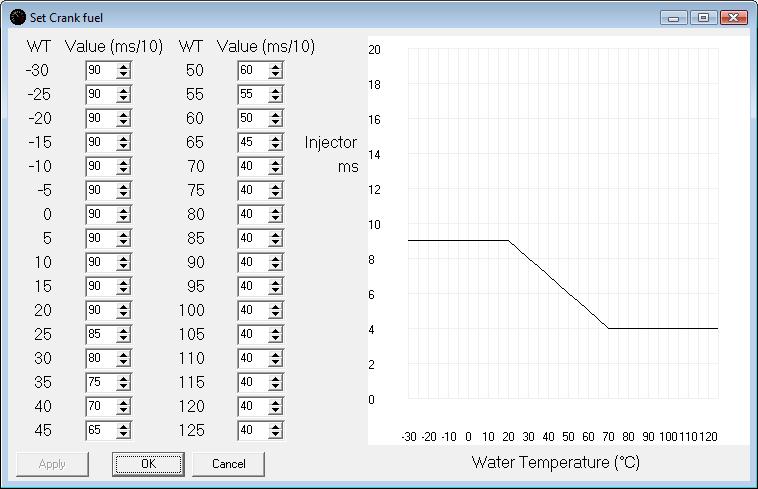
Cranking fuel
Set up the cranking fuel graph, this will depend on what size injectors you are running but I found this to be a good starting point.
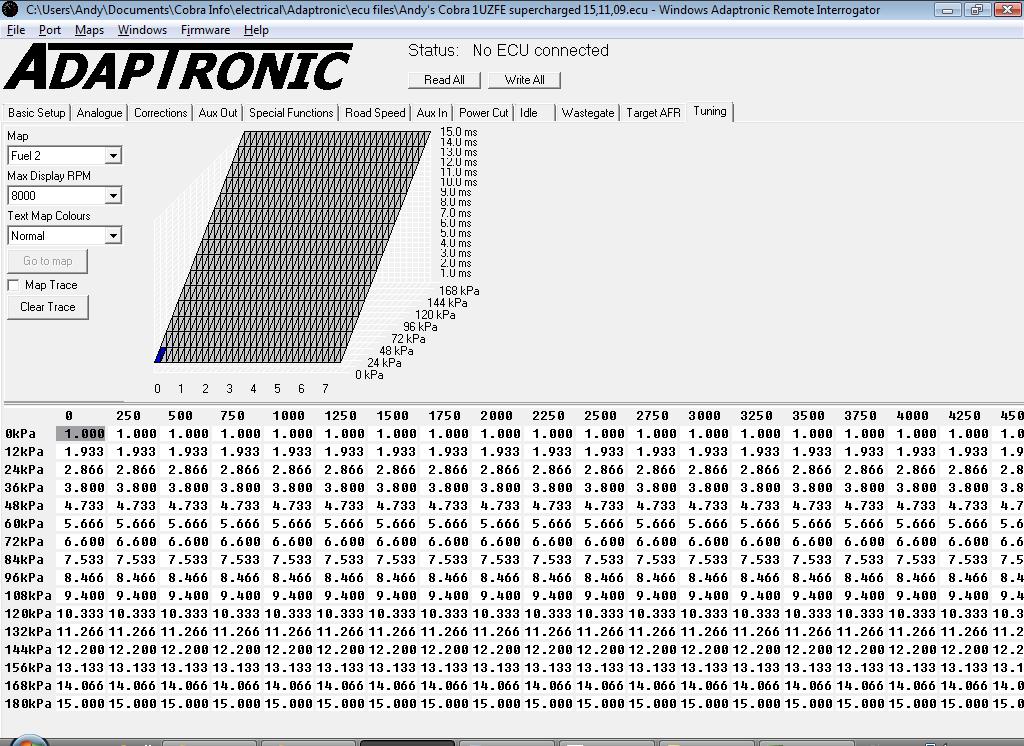
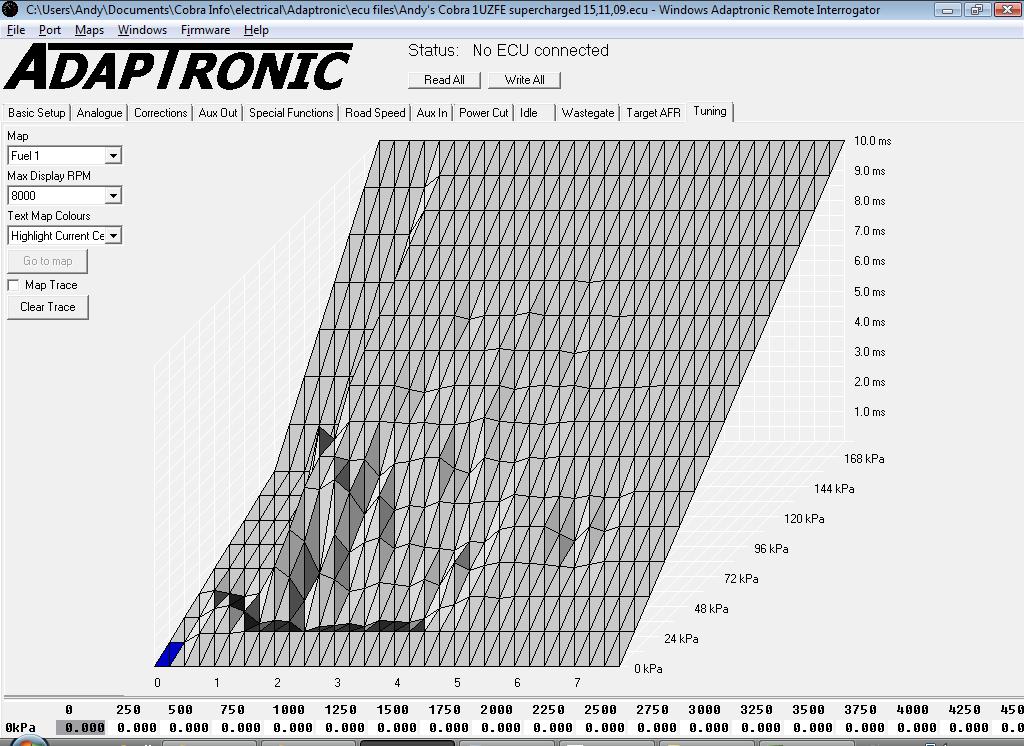
Fuel map.
I started with a base fuel map that I set up every 250 rpm and 0 – 180 kpa. Set the injector time to 1 ms at 0 kpa and 10ms at 180 kpa. Highlight the first column, right click and press interpolate column. Copy this to each column through the entire rpm range. Obviously the range will depend on boost level or NA.
Set Adaptive fuel learning
Under the fuel corrections box click on the set adaptive mode parameters, set up the slow converge and rapid learn. I found it best to manually adjust everything under 1,000 rpm. You can also select higher cells have more fuel and update other parts of the map if you like.
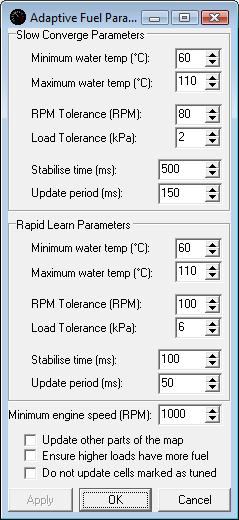
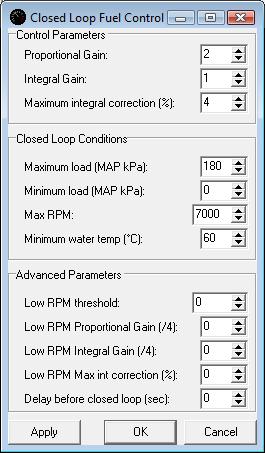
Set up the closed loop fuel control, for initial tuning set up as below.

Don’t forget to hit apply when changing values.
Set the fuel corrections in closed loop to rapid learning.
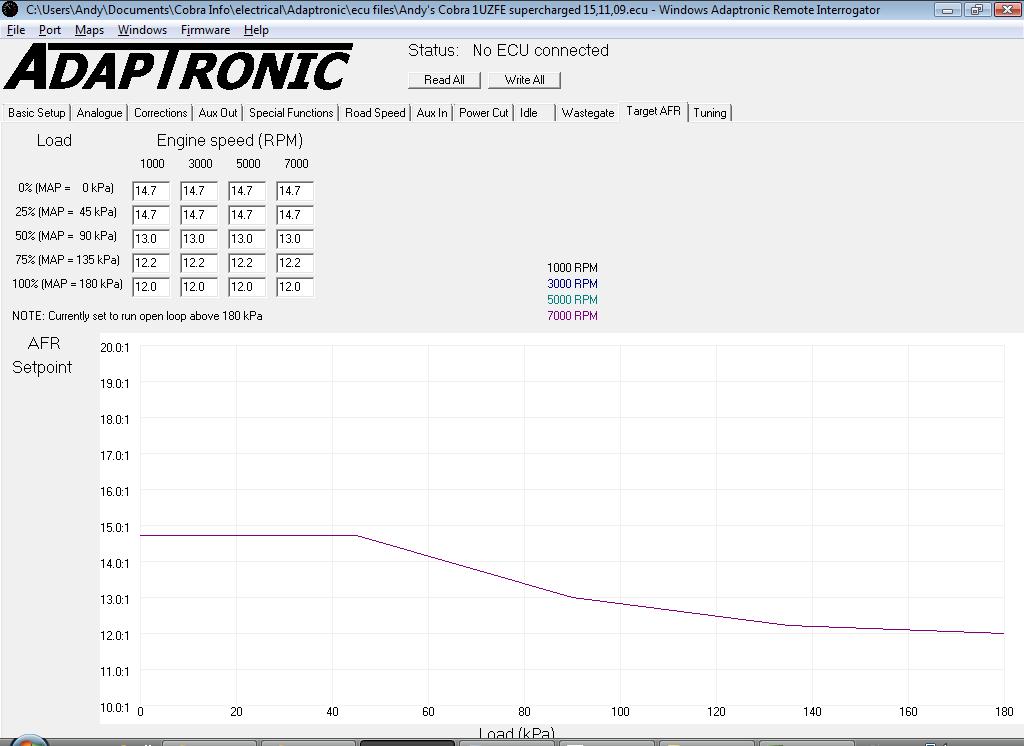
Air fuel ratio.
Set the air fuel ratios you desire to run at different RPM and loads.
System check.
Time to do some system and sanity checks to make sure all temperatures read as they should and that the idle speed control is responding as it should. The Adaptronic e420c will drive the idle speed control valve to fully open when it is first powered up so you need to un bolt the valve and make sure it is fully opening.
Time to start up.
Double check everything again and check again. Time to go for main engine start.
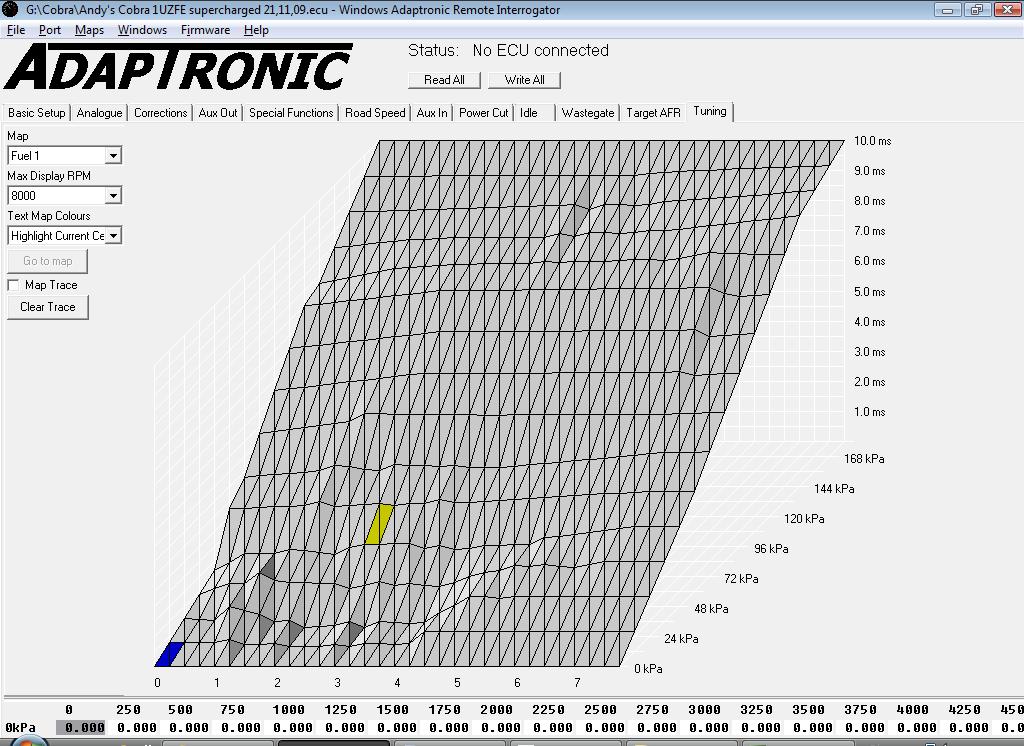
With a bit of luck the engine will start. In the tuning tab on the fuel map click on the text map colours box and select the “highlight current cell” option. This will indicate what cell you need to adjust. You can also use the space bar key to go the current cell. Adjust the fuel up or down to obtain a smooth idle state.
Use the page up and page down keys to increase or decrease the cell values by .1ms at a time. Ctrl and page up and page down will change the value by .01 ms at a time. Manually change the cells around the idle cells to around the same value for a smooth transition.
You may find it necessary to manually adjust the idle timing at this point also.
When you are happy and have as steady idle state, it’s time to go for a drive. A short drive round the block slowly increasing the rpm giving the ecu time to adjust.
When you get back you will see some of the cells have changed. Manually adjust the cells around them to smooth the map out. You can highlight a group of cells and interpolate row or column to make this task easier.
It’s now time for another drive. This time I like to use the brake to hold a steady state rpm and increase the load by gently accelerating. Obviously there is a limit to how far you can go with this method; I found 4,000 rpm to be the limit.
To tune the higher points I used the data log feature to monitor the fuel air ratios and adjusted as required.
Your fuel map should be starting to form now and the car become quite smooth and drivable.
At this point I spend some time to smooth out the map manually again.
You guessed it it’s time for another drive.
This time set the fuel adaptive mode to slow converge.
Find some hills and run up and down the gears to vary the rpm. You will see the map adjusting.
Setting the tolerances tighter on the slow converge and a longer stabilise time will fine tune the map even more. When the map is becoming smooth and all of you AFR are looking right change the proportional gain and integral gain to the values below.
At this point I also like to select do not update cells marked as tuned. This will highlight the cells green on the chart when they are tuned. At this point I leave it in this slow converge state for a couple of weeks while I drive around taking data logs from time to time to check AFR’s.
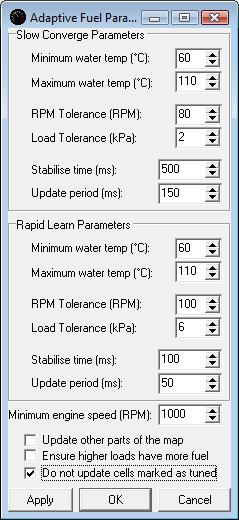
Do not update cells when marked as tuned
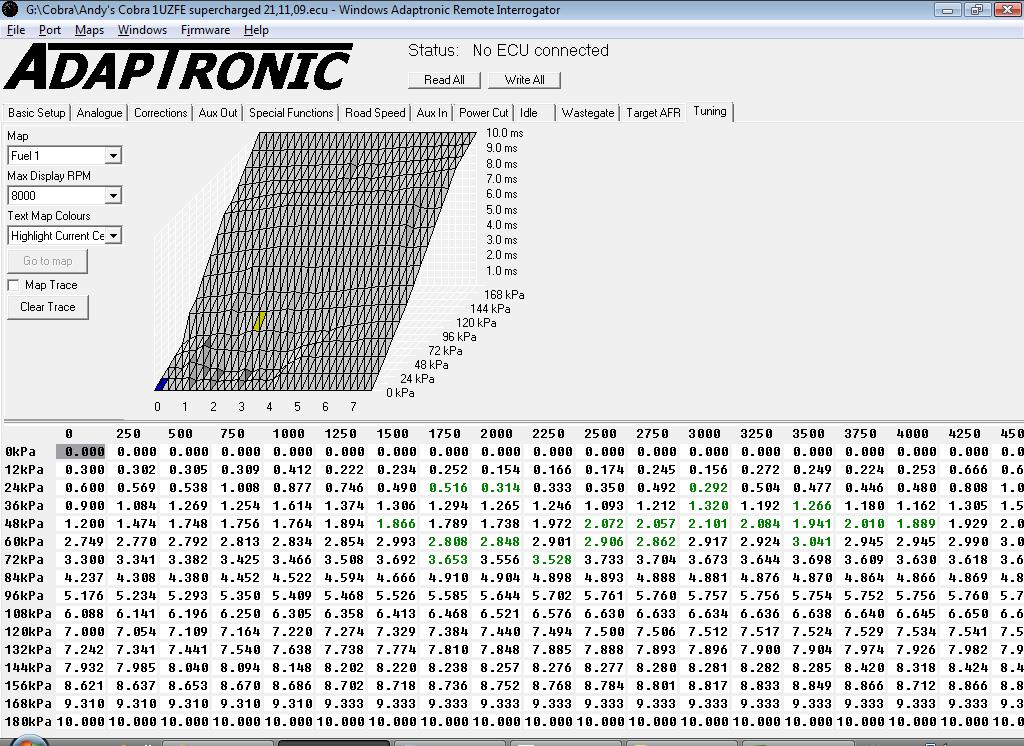
Green cells marked as tuned.
I hope this tutorial helped in understanding how to go about tuning your Adaptronic e420c.
This will get your car very drivable and if you wanted you could take it to a dyno to complete and verify the tune. Any tuner will be able to adjust the fuel and timing maps by using the page up and down functions to adjust the values.
If I can do it anyone can.
Cheers
Andy Flight