Since June 2003 I have wired ~20 1UZFE V8 conversions into a variety of vehicles, most of which have been 2 or 4WD Hilux, with a Hiace van, Triumph Stag, Supra and Landcruiser thrown in for variety. This tally includes four full-on competition 4WDs in addition to my own cheap and nasty Supra (to keep me amused whilst the Woodie slowly progresses).
The vans are hugely entertaining from a sleeper perspective, as no one expects a recycled courier hack or Batvan to have best part of 200 kW on tap. A lot of the conversions seem to suffer traction issues for some strange reason. The conversions have been a mix of manually shifted autos, full autos and 5-speed manuals.
So, in the past 2 years I have gone from knowing zip about the V8s (other than knowing I want one) to quite a bit about the realities of fitting one. My Partner in Crime (Jono) has installed a few engines, which I have wired roughly ½ of, so between us we have become intimately familiar with 30 or so conversions. I have drawn on his experience in this article also, hence the use of ‘we’ a lot.
Note that I live in New Zealand, therefore all prices are in $NZ. Also all our vehicles are right hand drive. Finally NZ has a fairly plentiful and cheap access to used Japanese parts, hence costs for other countries may be significantly higher.
Variants
Technically there are 3 main variants of the V8. These are as follows:
1UZFE: 3969cc all alloy quadcam found in Crown/Lexus/Celsior/Soarer and the odd Japanese domestic Hi Ace ambulance (I kid you not). They have 2mm thick cast iron cylinder sleeves with six bolt main bearing caps and make around 260 horse/200Kw at the flywheel.
They have sintered and forged connecting rods plus a forged steel crank, which probably explains why some people have apparently been getting away with revving them to 9000 rpm on stock internals (for a brief time at least!). They generally look like the one below, which is from a LS400/Celsior Sedan.

These engines were in production from 1989 until around ’94. These are far and away the most common available for conversions; most engines I have seen are 1992 or older. Usual story, age the engine by the writing on the plug leads.
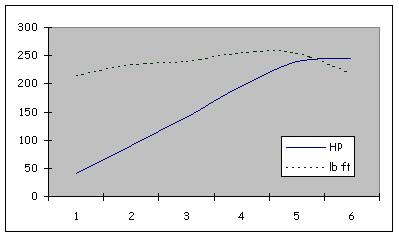
Be aware that some older engines get new leads – I can assure you there is no such thing as a 2001 Non-VVT 1UZ. The US spec engines made 250 horsepower @ 5600 rpm and 260 lbs ft of torque at 4400 rpm (see graph below). I suspect the Japanese engine’s output has a similar profile. Note how torque is above 200 lb ft from as little as 1000 rpm…
There is a facelift version that came out around 1996 that utilises a hot wire as opposed to Kaman Vortex Air Flow meter and makes around 300 horse from memory. These look similar to the early engines, except that they has a large plastic cover that fits over the top of the engine and the AFM is plastic bodied. These are also running sequential injection, as opposed to pairs.
In 1999 (I think) they went to a VVT-I variant of the 4 litre. This model was only produced for a couple of years I believe, before having the bore enlarged to get 4.3 litres of the current 3UZFE. The 4 litre variant is still called a 1UZFE, but it is markedly different from the earlier engines.
It has variable length inlet runners and the throttle body mounts on the front of the plenum chamber. Also the front engine covers over the cam gears are alloy. They look spectacular polished, but a lot of tedious smoothing is required of the castings first.
There is also a fulltime 4WD version of the Lexus and Crown…
2UZFE: This is the cast iron block 4.7 litre version fitted to top end Landcruisers/ Lexus 4WDs. It is apparently a torque-meister. It is more recent and not at all common used. I think it has VVT (Variable Valve Timing). I have never actually seen one. This engine is also fitted to the Tundra pickup in the US.
3UZFE: Current generation 4.3 litre VVT all alloy quadcam. Makes about 330 horsepower (I think – maybe a little more). Came out around 2001 I think. I have seen one so far as a used import motor, and prices are still very high. Externally it is largely identical to the 4-litre VVT-I.
I have some concerns over how well they would run on stock EFI without the auto to talk to, but more so over whether they need the original key and interface module due to the security coding. The only one I have seen transplanted so far is running an aftermarket ECU. Has a 5 speed Auto.
I am going to focus mainly on the early 1UZFE, as it is far and away the most common variant, and the only one I have any direct experience with (yet). There is also a 5-litre quadcam V12 (that I would love to throw into something) but alas they are rare and outrageously expensive, even in Japan. I hope Santa is listening. Note that all the V8s and V12s come backed with a 4 or 5 speed electronic auto from the factory. There is no such thing as a factory manual version.
There are 3 variants of the early engine, depending on which vehicle they were fitted to. These are Lexus LS400/Celsior (and probably Aristo), Soarer (Lexus Coupe) and Crown. The principle differences are detailed later in this article.
The good news is that they are all basically the same long engine with all alloy construction, 6 bolt mains etc etc; it is just the peripherals that vary. My best advice is to take the time to get the engine that best fits your need – although you can mix and match parts, it is quite hard to find someone selling the bits off one, and they command quite high prices.
Size
The Quadcam is a 90 degree DOHC V8 and as such not a small motor; it pretty much fills a box that is 700 mm in all dimensions and is quite literally about 30% bigger than a 350 Chev motor… The good news is that it is significantly lighter and makes very good, reliable horsepower.
You will most likely have to do some minor massaging to make it fit in most engine bays – as an example, Hilux/Surf need the under-dash handbrake mechanism relocating to inside the cab. The Supra needs the brake booster exchanging with a Hilux/Surf one (smaller diameter, mounted upside down) to clear the cylinder head.
The 1UZ has a scissor cam set up whereby the inlet cam is belt driven off the crank, and the exhaust cam is centre driven off the inlet cam via a gear drive. This decreases the width of the heads and engine overall, with the valve angle being a little over 21 degrees.
Because the V8 is so wide, you may well have to locate the motor slightly further forward than the original engine in order to clear the firewall – especially in Pickups etc, which requires modified engine mounts.
This can typically result in having to also relocate the gearbox slightly forward, which may in turn require tweaking gearbox mounts and driveshafts. The Supra firewall is wide enough to utilise the original gearbox mounts. VVT-I engines actually have less clutter in the cam/valve train and fit into engine bays a little easier – with improved rear clearance too.
Sumps
The easiest way to identify an engine is by the sump location. All engines feature an alloy sump that adds rigidity to the block with a bolt on pressed steel cap for the sump pan itself. LS400/Lexus/Celsior all have a front sump. I suspect the Aristo does too. These work best with Hiluxes/Surfs/4-Runners and Altezzas.
Crowns have a centre sump, whilst Soarers and ambulances have a rear sump (well, further rear than the centre one). Rear sumps work best with GA/MA/JZA-70 Supras. I had previously been led to believe that centre sumps were Soarers and Crowns were rear, but this information was incorrect.
Front sump engines need some minor modifications to the steel pan to clear the suspension/steering in Hiluxes etc; VVT-I engines have a clearance already built in.
Generally front or rear sumps are the most sought after. Rear sumps are the least common. If you have an engine with one of these and need the other, odds are you can swap it for the opposite with someone else (once you find them).
Centre sumps tend to be the least popular (as they invariably need modification to fit anything) yet most common, so being able to swap one for a front or rear is less likely. I actually managed to swap a front for a rear plus made $200 on the deal (I was quite happy just to do the swap, but when they offered money as well…)
Some people have fabricated new sumps complete, but I would be wary of losing the rigidity the alloy casting provides the block. Be aware that front and rear sumps both have fully external dipsticks; centre sump engines have a hole for the dipstick drilled into the top of the block, which becomes an issue if you swap a front or rear to centre – you will need to drill into the top of the block…
If you do decide to swap sumps make sure you get everything, as you need to replace everything including the alloy casting and steel pan below (which differ between the 3 sump locations).
Not only are the internal pick up tubes and windage trays different but the bolts are a different length also. Oil filters are either front or rear mounted, but the pump outlet remains at the front, so the centre sump engines have external hard lines going to effectively a remotely mounted filter. Don’t forget the dipstick either.
Be warned that IFS Hilux/Surf conversions will generally require an aftermarket remote mounted oil filter as there is no room for any of the factory set ups, although you could conceivably custom modify the factory set up if you are patient enough.
We have found it costs around $500-600 to remotely mount the filter using braided line and Aeroquip type fittings. Throw in even more money if you want to add an oil cooler. The good news is the VVT-I engines run a different set up that clears the chassis.
The oil filter mount on a rear sump engine fouls the sway bar on a Supra; the Crown remote type rear oil filter assembly fits but makes oil filter access a little difficult (depending on fuel line location). I ended up getting a custom sway bar made that cleared the factory oil filter mount.
Many conversions will still require the steel sump bowl to be modified to a minor extent to clear things that want to occupy the same space. Usual story – trial fit it and chop off anything in the way!
API SG, ECII 5W-30 or 10W-30 are the preferred oil grades according to my copy of the US service manual. I use 5W-30 Castrol Formula R full synthetic. Sumps hold around 4.5 litres (there is a slight variation between them)
Engine Mounts
Generally the LS400/SC400 has cast alloy mounts off the engine with a liquid filled rubber isolator, while Crown use fabricated steel brackets, normally with baby shock absorbers to boot. The rubber engine mounts are very prone to separating from their metal backers, so a careful inspection is wise and new ones may not be a bad idea.
Generally we use the recipient vehicle chassis mounts and make up adapter plates to relocate the mount against the block, as a lot of conversions almost line up. Once again, just do what works best for your application. Half the time we end up recycling the recipient vehicle rubber mounts if they are in good condition.
Exhaust Manifolds and Systems
All the V8 manifolds are absolute shockers. The Soarer and LS400 etc have runners around 75 mm long that terminate abruptly into a log type manifold. To make it worse, some of the intake runners are smaller in diameter than others where they leave the head.
The Crown is even worse – it has no runners at all, and the log is squashed on the RHS to clear part of the car, reducing down to a very small cross section. The good news is that Toyota compromised the exhaust manifolds and didn’t decrease the angle of the cylinder bank vee. They also still rev out very well despite the shocking exhaust system. The VVT-I motors have cast manifolds.
Generally the Crown manifolds are the most sought after (despite their shocking design) as they will fit into Hilux/Surf and most other conversions. You may need to shorten the LHS (it extends further rearwards than the RHS and fouls the firewall in some applications – notably Supras). The longer runners will fit in Landcruisers but not a lot else.
The Crown manifolds also have flanges that are well suited to re-use to build tubular extractors off. The reality is that most front engine applications will not have the room to let you build an efficient exhaust system.
All is not lost however, as the engines still make good power even with the terrible factory manifolds. The key is to put a decent system behind them. My advice is to use around a 2½-inch system from the manifolds, each with a large resonator, before combining into a 3-inch single tail pipe with a Cherry Bomb Vortex or similar muffler. Do it right, and it will sound like a full on race motor as you rev it. Run a twin pipe system and it will sound dull by comparison.
Fuel System
From the factory the V8 runs a two-speed turbine type electric fuel pump. Low speed is achieved by the ECU switching in a relay that brings a dropping resistor into the fuel pump power supply. Virtually all the conversions we have done utilise a single speed pump, i.e. it runs on high speed (no resistor) all the time. Bearing in mind we use stock engines and factory EFI we normally use in tank pumps from 3SGTE, 7MGTE, 1GGTE or similar engined vehicles.
Of course, you could use the factory V8 pump too. For external applications we have used Commodore V8 pumps. The fuel rail is regulated to 41 PSI above manifold pressure.
Ideally the external pump should be as close to the tank and as low as possible, but the van seems to survive quite well with the pump bolted on top of the engine next to the intake plenum, never mind that it has to suck from the fuel tank, which is about 3 metres away!
Many of the vehicles we have converted have been diesel. You can re-use the diesel tank, but be aware that they are often smaller than the petrol model equivalent (the stock V8 tank is 85 litres). You also have to very thoroughly flush it. I always recommend fitting an EFI tank from a similar model if it exists with a suitable capacity pump fitted.
If you have to use the diesel tank, then you can either externally mount a pump (with possible surge issues when the fuel level gets low), modify the tank for an in-tank pump (after you have flushed it enough so it won’t go bang when you weld it) or use a lift pump with an external surge tank and pressure pump.
Interestingly enough a 3-litre V6 petrol Surf became more economical once the V8 was fitted…
The engines themselves have a variety of fuel system inlet and outlet points. Have a close look before you install the engine – the LS400 supply and return points are right down by the sump and will generally need modifying before installation – you can’t get at them once the engine is in place. Also, check to ensure the lines haven’t been crushed. Don’t forget to fit a fuel filter either.
The V8 is fitted with a cold start injector that is operated by a thermostatic start injector time switch when the coolant temperature is less than 22 degrees Celsius.
Note that, like a lot of the Toyota EFI engines of a similar vintage, if you keep starting the motor for only a few seconds at a time, then it will eventually foul the spark plugs.
This happens because the cold start system is busy dumping additional fuel into the engine for the first 20-30 seconds of operation, and if you shut the motor down too soon the engine has not had the chance to burn this extra fuel off properly. End result is that the engine will get harder and harder to start (and will run poorly), until it won’t start at all.
The solution is to make sure you run the engine for a few minutes at a time, or else push the vehicle in and out of the garage as opposed to drive it only 20 metres at a time!
The VVT-I engines run a supply line only – no return. Presumably you would have to run a suitable matched fuel pump with internal relief. I have yet to see one of these.
Fuel Economy
Fuel economy is directly related to the use of your right foot, but to give you an example: My Supra was originally fitted with a 1JZGTE 2.5 litre twin turbo and auto. I live 55 km from Work, and my daily driving resulted in 7.5 km/litre fuel consumption on 96 octane.
With the V8 and 5-speed manual W-58 gearbox I get 8.5 km/litre, and occasionally 9.1 on the same trip. Note that the Supra is at a guess some 80 kg lighter with the V8 fitted. My early model (ST165) GT4 Celica (Alltrac) 2 litre 4WD turbo 5 speed used to get 10 km/litre on the same trip, but weighed 100-150kg less than the Supra. It also didn’t go as hard.
My friend’s Supra that is V8 Auto returns almost exactly the same economy as mine, but the manual is much more fun to drive.
Spark Plugs
From the factory the V8s come with platinum plugs; it is wise to change them before you install the engine (do it when you change the cam belt etc). Generally most platinum plugs fail due to leakage before they break down electrically. If you look closely at where the porcelain joins the plug body you will often find a brown ring.
Plugs with this should be replaced, as the seal between the porcelain and the plug body has failed, with the result that the cylinder will be down on compression. Over to you if you replace with more platinum or standard plugs in the same heat range. You may want to consider what the access will be like once the motor is installed before making a final decision. We use standard plugs; they are easily accessible in all the conversions we have done so far.
Check the plug valleys before you remove the plugs. The majority of engines end up being water blasted and the water accumulates in the plug valleys. You should make sure everything is dry before firing the vehicle up otherwise you can apparently damage the plug leads, which are very hard to come by.
Firing order is 1-8-4-3-6-5-7-2. Left bank is odd, numbered from the front.
Cam Belts
The V8 runs a very long cam belt that not only drives both banks of cams, but also the water pump. You need to remove a lot of covers to gain access, which uncover the spark plugs in the process, so you may as well change them at the same time.
If the loom has been snipped, leaving the various connectors and covers off will make it a lot easier for your Sparkie to trace the wires. Given a choice, I now prefer to wire most of the engine out of the vehicle. Be warned that a new cam belt is around $160 retail; see if you can wrangle a cheaper deal.
We had a cam belt break on one engine; the valves did not hit the pistons. If you replace the cambelt check to make sure you have got the pulleys aligned correctly; they can be a little confusing if you don’t know what the correct alignment marks look like.
Water Pump
It pays to check the water pump while you have the belt off, and also the idler pulleys. If they feel stiff, replace them. We have experienced one water pump failure a week after first start up, which ended up in the importer replacing the engine.
He remarked that it was the only water pump failure he had ever heard of. I would not recommend changing the water pump or idlers as a matter of course; I do not believe in general it is necessary, but I would certainly check them. Usual story, if you bought a 12-year-old Lexus would you expect to change the water pump on it? Factory Antifreeze is red in colour.
Power Steering
The 1UZ uses a very compact, integrated power steer pump and reservoir (apart from the rear sump SC400 Soarer engines that have an identical pump but a remote reservoir). We have tended to just plumb the V8 pump into the power steer box/rack on whatever vehicle the motor is being installed into (i.e. not try to mate the recipient vehicle pump to the V8).
The plumbing is very tight on a Hilux/Surf. The fitting of an oil cooler/cooling loop is recommended. I use the radiator cooling loop on the Supra originally fitted for the Auto Trans cooling.
The power steer runs on Dexron III type ATF fluid. The lower outside region of the pump body contains a idle speed control air bypass valve, with vacuum lines that run back up to either side of the throttle butterfly.
This unit often gets damaged in transit, and can be successfully blanked without any impact on idle speed in most applications. Note that ambulance engines run a completely different power steer pump set up with a remote reservoir that mounts low on the RH side.
Apparently virtually all power steer systems, irrespective of manufacture, run at similar pressures and flow rates. If this is indeed true, then you should just be able to plumb the 1UZ power steer pump into almost any vehicle.
Starter Motor
The starter motor is nestled in the valley between the two heads, underneath the inlet manifold. The motor is generally pretty reliable, but can be prone to failure in extreme 4WD situations as it is easy for the valley drain holes to get blocked with debris when fording, resulting in the starter motor being submerged in mud, which can tend to be terminal. Be aware that the valley drains into the bellhousing.
The starter motor also has very heavy-duty wire, generally 35 mm cross-section (as opposed to the 25 mm more commonly used in run of the mill Toyotas). Given that the starters are rated at 2 kW this is hardly surprising.
It pays to check the starter motor main power feed wiring before installing the engine – in some cases the main power wires have been cut in such a way that it is almost impossible to splice it once the engine is installed.
I will be wiring all future manual transmission conversion engines such that the clutch pedal must be depressed before the starter will engage, due to two vehicles starting in gear and taking off without a driver.
In both cases the vehicles suffered minor damage but they did a reasonable amount of damage to the far end of the garage/workshop they were in at the time…
This happens very easily when the engine is warm. And no, I was not the person to start them. Basically all you need to do is remove the bolt that adjusts the pedal height and replace it with a suitable stop light switch, placed in series between the starter trigger signal off the ignition and the relay that activates the starter motor solenoid.
Cruise Control
The majority of V8s come fitted with cruise control. Depending on the year, these tend to be either vacuum operated (earlier models up to around 1991) or else electric. Occasionally you will get the actuator unit with the engine.
I intend to install cruise control into my projects using the standard vacuum actuator, that I will operate via the control system (sensors and ECU) from a mid 80s Celica/Supra etc. Alternatively you could probably adapt an aftermarket system such as the type sold by Supercheap Auto etc.
Two of the Auto Surfs/4-Runners had factory vacuum cruise control; all we did was swap the V8 actuator into the Surf system and it worked fine.
Traction Control
Most (but not all) of the V8s are factory fitted with traction control. These models have a second butterfly in the inlet tract immediately upstream of the main throttle body. You can either remove the throttle butterfly, throttle position sensor and servo motor completely and plug the holes or leave the unit in place, as it is normally in the open position.
If you get lucky, you may find a LS400 unit without traction control fitted, in which case the casting is slightly different (but the same overall length) with the entire mechanism omitted.
You could conceivably hook it up to work, but where is the fun in that?
Air Flow Meter
All V8s prior to around 1994/95 use an Optical Kaman Vortex type of Air Flow Meter (AFM). These appear to be fairly reliable provided you don’t submerge them too often in your 4-wheel drive.
They frequently tend to be removed from the engine and the loom (which includes the twin igniters) often gets cut. Ensure you get the 5-pin plug that matches the AFM as it is quite unique and hard to find otherwise.
The AFM appears similar at a glance to those fitted to the 3 litre single turbo 7MGTE engines, but it is actually slightly larger, although I have my suspicions that both units share the same electronics.
If you are lucky you will get both the AFM and the factory elbow joint that connects it to the throttle body. If not, your best option is to buy either a 45- or 90-degree silicon bend. Unfortunately you need an 80 mm diameter bend, which tend to be pricey (around $150). CRC or WD40 helps when fitting the hose over the AFM (one of the few times that dri-glide Teflon spray doesn’t help). You will also need to plumb in the idle speed controller inlet hose somewhere between the AFM and throttle body.
We normally turf the intake air resonator that connects in front of the throttle body and mounts top rear on the RH cylinder head, especially in Utes etc. If the vehicle has McPherson Struts, then the factory plastic intake resonator comes in handy to help the induction pipe work clear the strut tower. I took this approach with the Supra.
Air Filter
We use K&N or similar pod type filters. The V8 responds very well to a cold air inlet; this is difficult to achieve in Utes due to the confines of the engine bay. For the Supras we found a cost effective solution through buying various plastic AFM adapters, thin wall silicone bends, aluminium tubing and flexible ducting from the likes of Supercheap Auto and Repco.
8 Throttle Bodies
There are a number of people out there who make 8-throttle body conversions for the V8. Generally these use 2 sets of Toyota 20 valve throttle bodies. There is no denying they look very sexy, but to be honest I can’t see the point. Generally you will pay around $5-6k by the time you get the components to do the conversion and the aftermarket ECU to drive them. I doubt you will get much horsepower over stock with the throttle bodies and no other mods.
We have spoken to some cam specialists and they reckon for a similar investment you could get 450 horsepower, and with some headwork 550, with the stock intake system. Personally, notwithstanding how sexy the 8 throttle bodies look, I would rather spend the money and turbo the motor – a friend in Oz is getting over 700 lbs ft of torque on about 8 PSI of boost.
End of the day, I would really prefer to put the money towards the next project!
Idle Speed Controller
Idle sped is controlled via an electrically operated unit located at the front of the inlet manifold plenum. The unit controls idle speed by progressively bleeding air past the throttle body. Ordinarily there is a length of roughly ½” diameter hose Tee’d into the flexible hose/resonance chamber between the AFM and throttle body.
If you do not have this hose you will need to make up some sort of connector. These units appear to get a little stiff if the engine has been sitting for a while; I have found that idle speed control appears to improve significantly after a few hours of running from first start up. Idle speed should be around 580 RPM with all accessories off.
Ignition System
The 1UZ is effectively operated as 2 x 4 cylinder engines that are ganged together. It utilises a RPM sensor located behind the bottom crank pulley, with a distributor mounted on the front of each cylinder head, directly driven off a camshaft.
The RPM sensor doesn’t really like getting submerged. Each distributor generates a cam angle signal and distributes the spark to four of the cylinders. Each distributor supplies spark to two cylinders on the opposite bank and has its own coil and igniter module.
The igniters are normally mounted together on the inner guard and their housings must be well earthed in order to operate correctly. The wiring for the igniters and AFM shares a common loom and is often cut when engines are removed from the parent vehicle.
The V8 utilises two main igniter types, which are readily identifiable by three large digits printed on a metallic sticker on the unit. The correct igniters are either marked ‘123′ or ‘201′ and are relatively common on Toyota 4 cylinder twin cam performance engines from the late 80s onwards such as 3SGEs, 4AGEs etc. Note that you need a pair of the same igniters and that the 123 series have different plugs to the 201s.
The VVT-I engines run a direct fire system with an individual coil directly on top of each sparkplug.
ECU
I have only wired the 1UZ with factory injection and ECU. Some people use a Link or similar and get a good result, provided their tuner isn’t a monkey; unfortunately a lot of them are. That said, I know of a stock 1UZ getting 186kW at the wheels with a 5-speed manual in a Supra running off a basic link…
Talking to my good friend Andre, who knows a thing or two about tuning, he reckons that knock sensing is not really required for an aftermarket installation that is not running boost, so a basic Link ECU or similar will suffice.
Usual story, I go for bang for buck. Note that getting an engine with ECU, AFM and Igniters etc will generally cost only around $300 more than a bare engine. I wire these generally for $1000 (assuming a cut loom and including instruments, alternator etc).
Conversely, supply, fitting and tuning an aftermarket ECU can easily cost up to $3500 by the time dyno tuning is catered for. And you will still have to sort out instruments, alternator etc. Over to you, however, stock EFI will limit you to pretty much stock horsepower – which means no hot cams or blowers…
My advice is to do an initial installation with stock EFI and consider upgrading later – it will most likely cost at least another $5000 to add a blower/twin turbos or to do heads and cams. Depends how much power you want from the outset, and how deep your pockets are. We are in the throws of building a budget blown truck at the moment.
Do not be put off by a cut wiring loom – I just grab a suitable other half loom from a car that has the right sort of plugs for the ECU and splice the wires. The key comes in knowing which 30 or so of the 80 odd wires in the loom you need to splice (if you are doing a manual trans conversion)… and being confident that you did it right before putting power on it!
To be honest, I would recommend ensuring any Sparky you intend using has either done the job before or has demonstrable suitable experience. Rule of thumb, tidy work is good, untidy is bad.
Last thing you need is to take someone on who sounds too cheap to be true, that ends up experimenting with your vehicle to figure out how to do it, with the risk that it never quite runs right (if at all). To say nothing of what ends up being an open ended chequebook…
Each variant (from both parent vehicle and generation perspective) of the 1UZ has its own ECU, which are not only physically different, but have different wiring configurations.
Generally the same vintage Soarer and LS400 ECUs are interchangeable, despite the difference in wiring colours. Then there are export Vs Japanese domestic market ECUs. The Crown ECU operates the engine only (but interfaces with a separate automatic transmission ECU) whilst the Soarer and LS400 ECU operate the transmission as well as engine.
For manual gearbox conversions (or operation with a manually shifted automatic transmission) the easiest option is to utilise a Crown ECU, as it will happily operate without the automatic transmission. There are three versions of this ECU with part numbers 89661-30430/431/432. These Crown ECUs have the same physical wiring and are directly interchangeable.
The 90-92 LS400/SC400 ECUs seem to be a problem child for some reason – these have 4 x two-row grey plugs and I have had about a 30% success rate with them so far. They all start and idle ok, but for some reason many won’t rev beyond about 2800 RPM.
I do not know why this is – it makes no difference whether the loom was cut or intact, whether the auto trans is there or not. I wonder if the missing traction control is part of the problem, but it doesn’t affect any other ECU.
Noting that this style of ECU was only used for ~2 years, I wonder if it is a design fault where they are prone to failure. Diagnostics has not been of any help either. Ironically reconfiguring the ECU pins to suit a Crown computer has resulted in a 100% success rate, without changing anything else.
Note that ordinarily redline is around 6500 RPM with the rev limiter cutting in at around 6750.
Diagnostics
The ECUs utilise standard Toyota 2-digit fault codes, and the Crown ECU will generally output fault codes for speed sensor and exhaust sensor if they are not connected (however, the engines run fine without these sensors) and codes 8-3, 8-4 and 8-5 if there is no automatic transmission attached. Again, the engine runs fine with these codes. All other faults should be investigated.
Wiring
The vast majority of engines have the wiring loom snipped at the firewall, and often as not where the AFM and igniter sub loom peels off towards the side/rear of the RH head as well. The main loom has around 80 wires in it; to run as a manual trans set up you need about 30 of these wires.
Provided you have the right diagram it becomes a case of tracing each wire on the engine and then splicing it to the patch loom correctly to suit the ECU. You must ensure you use screened wire for the cam angle, RPM, exhaust and knock sensors.
The good news is that the on-engine sensors are the same irrespective of the donor vehicle up to around 1994. The bad news is that the plug locking catches get very brittle and tend to break off, so try not to remove plugs unless you have to, to check continuity etc.
I normally use standard 30 amp accessory relays for EFI Main Relay, Injection Relay and Starter Solenoid Relay, plus a factory circuit open fuel pump control relay (normally liberated from a late 80’s Toyota). I tend not to run the fuel pump in 2-speed configuration.
I also use 5 fuses, which are EFI and Injection at 20 amps each, plus 7.5 Amps for Charge, start relay trigger and Ignition trigger for the Injection Relay.
By doing this my power feeds can all come directly from the battery, and all I need is some 5 amp rated 7-core trailer flex for ‘start’ and ‘run’ trigger signals from the ignition switch, alternator charge light, oil pressure/warning light, tacho and water temperature. Note that the oil pressure is in the vicinity of 100 PSI when cold, so a gauge that reads to 120 PSI is recommended.
The 1UZ water temperature sensor is compatible with the majority of Toyota temperature gauges. The RPM signal comes from one igniter hence it is effectively a 4 cylinder pulse, so use a 4 cylinder tacho. Again, standard Toyota 4 cylinder tachos work fine.
As I said earlier, I will be wiring all future 5 speed versions so they cannot start unless the clutch pedal is depressed to prevent the cars taking off without a driver – it has happened to two so far, as the engine starts very easily when warm. This is not a problem with autos as a neutral interlock it is part of the standard wiring.
To give you an indication of cost, I generally charge $1000 to wire one, which typically includes splicing the loom at the firewall and half the time having to splice the air flow meter and igniters as well.
Chuck in some relays and fuse holders, wiring the alternator and starter motor all the way back to the battery, plus gauges and ignition switch connection, and I think it is a realistic sum. If the loom is cut as above, then it will take me at least two long, solid days to wire a conversion (and I have got a lot faster at it than the first one I did).
Finding the correct diagram can be a bit of a challenge. I have now got a fairly comprehensive set, but it took a lot of effort to get them, and I have spent a significant amount of time subsequently refining my system for wiring the engines.
Alternator
The alternator is located low on the right hand side and they are generally of significantly higher output than what most recipient vehicles were fitted with, so it pays to replace all wiring between the alternator and battery with suitably rated cable. The exception is the ambulance engine, which mounts the alternator slightly higher on the RH side, approximately where the power steer unit is on all other engines.
The alternator is often very hard to get at after installing the motor, so it is wise to wire it as much as possible before installation. The LS400 alternator is of higher output than the rest, and is rated at 1200W. You could probably get away with wiring for 100 amps, but I tend to overkill and use 2 x 80 amp rated wires.
Apparently the alternators can be prone to failure as they sit under the power steering pump/reservoir and can suffer damage from power steering fluid leaking onto them. I have yet to witness this first hand. Again, they tend to get a hard time being dunked in 4WDs.
Apparently there is a slightly lower output unit with similar mounting configuration fitted to some Hondas, but I am unsure which model (Preludes?) or vintage. You can mage some generic Toyota alternators fit with a bit of clearancing, however, they won’t be as high an output.
Automatic Transmissions
I have now wired a bunch of automatic transmissions, in both manualised and full auto configurations (and one with a switch between the two). There are two basic auto trans fitted to the 1UZFE. One type is fitted to LS40/SC400s and the other is fitted to Crowns. The Crown type has a standard yoke; the others have a rubber donut.
The bad news is the tail portion of the trans is significantly different between the two output methods. If you are going to use a live rear end you must use a Crown transmission, as it is the only one that has a yoke that slides in and out to cater for varying driveshaft length. The donuts are good only for independent set ups.
All autos (at least up until the introduction of the VVTI motor, and maybe until the 4.3) are 4 speed; newer ones are 5 speed. The V8 auto is an evolution of the trans that debuted in the mid 80s on the larger Toyotas such as MA/GA 70 Supras (1986) etc.
Some housings etc are interchangeable: on my friend’s Auto Supra conversion we used the tail housing assembly off the Supra to get the gearbox mount and speedo drive in the right place. The various 4WD auto trans of similar vintage are also from the same basic family. I am also led to believe that the box is an Aisin version of a Borg-Warner and as such has related units in other Japanese branded vehicles.
Here’s where it gets complicated. If you are running 2WD, then my advice is to use the V8 auto (they have beefier internals to handle the extra torque). Generally the Crown Auto will be the best one for conversions as it caters for a live rear end, and most transplants into Auto 2WD Toyotas will have a similar trans overall, making it literally a bolt in fit. I don’t know about the Crown, but the LS/SC400 trans has a 0.70 4th gear (overdrive) ratio.
If you are going 4WD (I will ignore the factory Lexus 4WD sedans, as I have yet to see one in the flesh) then you can either generally use the recipient vehicle trans with the V8 torque converter and bellhousing attached, or you can build a hybrid trans using the V8 internals.
I have seen the end product but not the process, however, I understand you need to use a Crown trans as they has a longer output shaft, which suits the transfer case better. I would rate this as the best option as it will give you the beefiest internals and also work best with the factory ECU, but it is a fairly major undertaking.
If you want to use the 4WD trans with the V8 bellhousing and torque converter, then there are some things to consider. Generally all Toyota Autos from say mid 80s to mid 90s have 3-4 solenoids to control the trans itself.
Two are for the shift solenoids, which control the gear the trans is in. One is for torque converter lock up, and the other (which is not always fitted) is to control the hydraulic line pressure to reduce shift shock on gear change.
If you wish to run full auto, you basically have two options: use the V8 auto computer to shift the trans, or use the original trans computer. If you use the original trans computer you will basically find the trans shifting at the points that suit the original engine, not the V8. I have wired 2 x Surfs this way, that were V6 originally. These have worked out fairly well, with shift points being generally acceptable. This required wiring some of the V8 engine sensors to the trans ECU.
If you use the V8 ECU to drive the recipient trans, then you will quite possibly not be able to get the lock up to work, due to sensor incompatibility. The good news is the trans will shift OK.
Shift points are is dependent on load, engine/trans temp, power or economy mode and vehicle speed. Generally the V8 uses a sensor on the back of the trans as the primary speed signal, however, this signal is processed by the ABS system and then output to the ECU.
Therefore, if you don’t have the ABS system this will not work. Fortunately they have a back up from the speedo head speed sensor (4 pulses to earth per rev of the speedo cable via a reed switch on the back of the speedo head), which is used if the trans sensor fails. I have got several full autos running using the speedo head speed sensor signal only.
Note you will get a trans error code (via the overdrive off light) as a result of the main speed sensor (the one on the trans) not working, but the trans will shift fine. Note that the V8 trans in ‘power’ mode shifts just short of the engine redline.
Virtually any shifter from a mid-80s onwards larger size automatic Toyota will work with the transmission – we have used them from MA/GA-70 Supras. Make sure you grab the complete linkage mechanism, including the little arm that bolts onto the transmission, to ensure it all moves the correct amount.
Manual shifting the auto (i.e. no computer control) is achieved via hard wiring the selector switch so that it triggers the relevant shift solenoids to match the gear lever position. This is achieved as follows:
| Shifter Position | Solenoid 1 | Solenoid 2 |
| L | On | Off |
| 2 | On | On |
| D | Off | On |
| OD | Off | Off |
Note that some diodes are required. There are two other solenoids, which are utilised for torque converter lock up and pressure modulation. The latter is used to decrease shift shock, but the trans will work successfully without these two solenoids connected.
The full auto factory set up also results in the engine ignition advance being reduced during shifts to decrease torque and thus provide smoother shifting.
A decent sized transmission oil cooler is a must.
Manual Transmission Conversion
Fitting a 5 speed behind the 1UZ is a common and popular conversion. There are several ways of doing it, but I will stick to the one I know best. This will cost at least $1000 on top of buying the gearbox by the time you source a flywheel, clutch and adapter plate – and probably more like $1200. More on this later.
Firstly, there are two broad ranges of 2WD Toyota 5 speed gearboxes that are used. The most common is the so-called Supra 5 speed that is technically referred to as the W55-59 range of transmissions. These are good for around 300 horsepower and so are well suited to the 1UZ, although you can break them if you try hard enough (generally through abuse).
These typically start at around $300 for the more mundane variants, but prices are going up as they become less common. Note I do not have the ratios for a W-56, but it is also a diesel gearbox with short lower gears.
The ‘W’ series boxes have 4 different gear lever positions, depending on which parent vehicle they came from.
The other option is the ‘Supra Turbo’ box, called a R154. These are pretty rare in 2WD form and will typically cost well over $1000 to buy (I have seen them advertised for up to $2000…). To my mind, the extra strength (allegedly almost indestructible) is overkill for a standard engine and normal use.
Don’t waste your time with the old steel case Celica box (W-50).
| Type | 1st | 2nd | 3rd | 4th | 5th | 6th | Rev | Engine |
| A442F | 2.95 | 1.53 | 1 | 0.765 | 2.678 | |||
| FJ25 | 5.41 | 3.12 | 1.77 | 1 | 5.44 | |||
| G40 | 3.928 | 2.333 | 1.451 | 1 | 4.473 | 4.473 | ||
| G52 | 3.928 | 2.333 | 1.451 | 1 | 0.851 | 4.473 | 4.473 | |
| G54 | 4.452 | 2.398 | 1.414 | 1 | 0.802 | 4.743 | 4.743 | |
| G57 | 3.704 | 2.02 | 1.368 | 1 | 0.854 | 4.472 | 4.472 | |
| G58 | 3.928 | 2.142 | 1.397 | 1 | 0.851 | 4.743 | 4.743 | |
| H41 | 4.925 | 2.643 | 1.519 | 1 | 4.925 | 4.925 | ||
| H41 | 5.299 | 2.83 | 1.634 | 1 | 5.299 | 5.299 | ||
| H42 | 3.555 | 2.292 | 1.41 | 1 | 4.271 | |||
| H55F | 4.843 | 2.619 | 1.516 | 1 | 0.845 | 4.843 | 4.843 | |
| H150F | 4.259 | 2.464 | 1.49 | 1 | 0.881 | 4.313 | 4.313 | |
| H151F | 4.081 | 2.294 | 1.49 | 1 | 0.881 | 4.313 | 4.313 | |
| J30 | 2.757 | 1.691 | 1 | 3.676 | ||||
| L52 | 3.93 | 2.33 | 1.45 | 1 | 0.85 | 4.74 | ||
| R150 | 3.83 | 2.062 | 1.436 | 1 | 0.838 | 4.22 | ||
| R150F | 3.83 | 2.062 | 1.436 | 1 | 0.838 | 4.22 | ||
| R151 | 4.31 | 3.32 | 1.52 | 1 | 0.83 | N/A | ||
| R154 | 3.25 | 1.95 | 1.3 | 1 | 0.75 | N/A | 7MGTE
1JZGE |
|
| V160 | 3.83 | 2.36 | 1.68 | 1.31 | 1 | 0.79 | 2JZGTE | |
| T-50 | ||||||||
| W46 | 3.954 | 2.141 | 1.384 | 1 | 4.22 | |||
| W50 | 3.83 | 2.36 | 1.69 | 1.31 | 1 | 0.79 | N/A | |
| W55 | 3.566 | 2.056 | 1.384 | 1 | 0.85 | 4.091 | 4.091 | 3TGTE
1GGE 1GE |
| W56 | 3.954 | 2.141 | 1.384 | 1 | 0.85 | 4.22 | ||
| W57 | 3.28 | 1.89 | 1.27 | 1 | 0.86 | N/A | 1GE
1GGTE 6MGE 5MGE |
|
| W58 | 3.28 | 1.89 | 1.27 | 1 | 0.78 | N/A | 5MGE
1GGTE 7MGE |
|
| W59 | 3.95 | 2.14 | 1.27 | 1 | 0.85 | N/A |
I consider the W-58 to be far and away the best gearbox to use behind the V8, due to cost (compared to R154) and the evenly spaced ratios – running a 3.9 Diff with 235/45×17 tyres on the Supra I get approximately 60k in 1st, 110 in 2nd, 160 in 3rd, and an estimated 200 in 4th.
One of the 2WD Utes has hit rev limiter in 5th gear with the same gearbox, diff ratio and overall tyre size; this is theoretically around the 260+ k mark – which seem a little on the high side. I would certainly believe 240 k…
4WD Boxes
There are 3 different 4WD manual gearboxes used in Hiluxes and Surfs. The common ones are prefixed by either a ‘W or a ‘G’ on the chassis tag. These look fairly similar externally, but the ‘G’ series is not as strong as a ‘W’ and will eventually die if used behind a V8.
Generally these boxes are used behind the smaller petrol engines in early models. There is also a 2WD version used in vans with external gear linkages. Note the ‘G’ and ‘W’ series gearboxes use the same bellhousing adapter, with a minor modification.
The ‘W’ series gearbox is adequate for most use behind the V8, however, the ‘R’ series is fairly readily available for reasonable money, but still around twice what you would pay for a ‘W‘ series trans. The ‘R’ box is generally found behind the larger turbo diesels in Hiluxes etc and behind the V6. Some Prados and the like use it also.
Note that there is a variety of different transfer cases; the only complicated one is the type fitted to the ‘R’ series gearboxes, which uses an electric motor to engage the 4WD.
This is ordinarily controlled by a separate ECU, but can be made to work using a bunch of relays instead. I might be slow, but it took me quite a few hours to figure out how to do it, and it works fine. The different transfer cases often have different gearlever positions also.
Adapter Plates
We utilize an 8 mm thick CNC laser cut steel adapter plate (that took a lot of time to get right) to mate any of the above gearboxes to the standard V8 bell housing. We decided to make our own because all the ones we looked at were either far too expensive or appeared to lack concentricity (or both), to say nothing of their overall appearance.
Our adapters are concentric to within 0.1 mm (in theory they are exactly concentric, but 0.1 is the laser cutter’s tolerance), which should prevent the seal and bearing failures others have experienced.
The input shaft utilizes a standard Toyota spigot bearing that locates just inside the opening in the V8 crank.
Note that there are two different V8 bellhousings – U1 and U2. U2 are fitted to crown (centre sump) engines and U1 to Lexus and Soarer (front and rear sumps). The difference is that the bellhousings off Crown engines have the gearbox indexed relative to the motor by about 7 degrees; the others are in line.
Consequently we have had to make 4 different adapters: U1 for W/G, U1 for R, U2 for W/G and U2 for R. We sell these for $250 each.
The 2WD ‘R’ series gearbox has a much longer input shaft than any other, which needs to be removed and shortened to use with our adapters. This costs about $100 in machining (once you have pulled the gearbox apart).
The good news is that there is more than enough spline, so it doesn’t need to be re-cut. The 4WD ‘R’ series boxes don’t require the machining.
Flywheels
There are two options for flywheels: 3SGTE or custom made. The 3SGTE flywheel locates snugly onto the crank but needs the pitch circle diameter of the flywheel bolts changing by slotting them slightly. The 3SGTE flywheel is preferred as it takes a larger clutch than the 3SGE.
The best thing to do here is to machine down the outer spacer ring fitted to the automatic transmission flexplate and use it as a washer under the flywheel bolt heads. You need to buy new high tensile bolts as the original V8 flexplate bolts will not be long enough.
Note that although the ring gear is the correct diameter and pitch for the V8 starter, the 3SGTE starter motor engages from the opposite side, hence you need to cut a bevel onto the front face of the ring gear.
Failure to do so will result in the starter pinion not engaging correctly, and chewing out the ring gear. As crude as it sounds, carefully chamfering the face with a 1 mm cut off disc on an angle grinder works perfectly well. Use the V8 ring gear as a guide for how much to take off.
The 3SGTE flywheel works out to be quite light for the V8 and gives excellent response. Note that the spacer disc normally fitted between the torque converter flex plate and the crank will need to be used with the 3SGTE flywheel in order to place the ring gear in the correct plane for the starter.
Alternatively you can get a flywheel custom made, with or without the ring gear. The ones we use are billet steel with integral ring gear and work really well. I run a lightened one in the Supra and it is excellent.
Clutch
We use an aftermarket heavy duty Hilux clutch set up that has around 2100 lb clamping pressure. We use this clutch set up with all gearboxes, and have found it works very well. It is good for building up leg muscles too!
The 3SGTE clutch has too large an opening to mate correctly with the release bearing, which can lead to premature failure.
Mounting the clutch slave cylinder and pivot arm etc is the most challenging aspect of converting to a manual gearbox. There are two types of V8 bell housing, identified by having ‘U1′ or ‘U2′ cast into it on the top and bottom. The U2 bell housing has a boss with one threaded hole on the right hand side about where you would mount a clutch slave cylinder.
We used to use this boss after drilling and tapping a second hole, however, this location interferes with the factory exhaust system manifolds. Note also that the angle for the clutch fork can be quite extreme when using this position.
We are now mounting the slave cylinders onto a bush that a lengthened bellhousing to engine bolt passes through. Irrespective of where you mount the slave cylinder, you have to cut a hole in the side of the bell housing for the standard clutch fork that came with your gearbox to fit through.
You will also need to mount the pivot for the fork; on most gearboxes this pivot needs to be centred 28 mm inwards from the inside diameter on the rear of the bell housing.
Because every conversion is different we have been unable to produce a generic slave cylinder mounting kit. In reality mounting the slave cylinder is not hard to do, but it takes some careful measuring and calculating to get the dimensions right.
You could alternatively use a centre hydraulic release bearing, but I have yet to come across a cost effective conversion. Ford Mondeo units are probably the cheapest option for this type of set up.
Differentials
From a Toyota perspective there are probably three differentials that are up to the task behind a V8. The first is the ‘F’ series 7.5” crown wheel size. These were fitted to most of the larger late 70s/early 80s cars like Cressida, Supra, etc. There are some LSD models, but all are 2-spider design. They are good for around 300 horses, so you will most likely get away with one.
That said, we have one putting a genuine 507 horsepower to the wheels in a RWD Corolla drag car on slicks, but as it is only a 1600 cc turbo engine the torque is not that great. These diffs come in a variety of ratios, commonly ranging from 3.9 to 4.5, and in both live and IRS configuration.
I suspect there would be taller ones out there too. Note that the crown wheel & pinion and LSD units are identical irrespective of whether they are in an IRS or live housing. This seems to hold true for all diffs of a similar diameter.
The next one up is the ‘G’ series 8” unit, which tend to mostly be 4-spider, again available in LSD and open versions. They come with a similar range of ratios, but end up as short as 4.8. You can definitely buy 3.5 ratios new from 4WD equipment shops.
They also come in IRS and live variants, and are fitted to Hilux, Surf, smaller Landcruiser, 86 onwards Supra, Soarer etc. These are good for 450 odd horsepower. I am using the complete set up from a GA70 Supra in the Woodie.
There is also a 8” Torsen LSD, which is rare and I think only fitted to the JZA70 Supra (powered by a 1JZGTE 2500cc twin turbo 6 cylinder). I have a Torsen in my Supra behind the V8 and it is excellent. I have another for the Woodie, and will never sell the head in the Supra.
They are very progressive and actually feed the power to the wheel that has the slowest rotational speed, in proportion to the speed differential. In this manner they are torque-sensing (hence ‘torsen’) and probably the best thing short of an active diff. By all accounts they are not as strong as a standard LSD, but seem to be fine for normal use. The nice thing is there are no clutches in them to wear.
The final diff type is around 8.5” (possibly even bigger) and comes fitted to the V8 Soarer, Lexus etc. These tend to be 2-spider open or Torsen LSD. I suspect the 8” unit is actually stronger.
Cooling System
In stock form the LS400 utilises a two-row radiator with a core size of 400 x 780 mm. Apart from being a little hard to get hold of, they are also an awkward size for most transplants. We have been using radiators from early to mid 80s turbo diesel Pajero and the odd Isuzu Trooper.
These are a good fit in Hilux and Surf (the Isuzu radiator is slightly taller and fouls some later model bonnet lines). These work fine for normal road use, but are inadequate for serious off-roading.
V8 Commodore radiators can be used, but these are cross flow and are apparently prone to splitting. Alloy radiators work well, but cost may be a factor against you using one. That said, some new alloy radiators are actually quite cheap.
Fitting the under bumper valence panel off a Surf onto a Hilux significantly improves cooling as it deflects air into the radiator as opposed to under the vehicle.
The V8 water pump is driven off the cam belt and is generally very reliable – we had one fail, but it is the only one the engine importer had ever heard of. I would not normally bother to change the pump unless it appeared stiff or worn when changing the cam belt. That said, they are readily available for $220 or so.
Some engines (LS400 and Soarers) run a computer controlled variable speed hydraulic fan. I wired up one of these set ups into a couple of 4WDs and they work very effectively. I also have one in the Supra as the 1JZGTE engine that came out had one, so the radiator etc was all set up with the fan. It basically senses radiator temperature and varies fan speed accordingly.
The fan is attached to the radiator. The system can be set up to run, and is very effective provided you have all the parts – pump, fan ECU, fan, reservoir, oil cooler, lines, solenoid valve and radiator temperature sensor. The system uses auto trans fluid, and so normal power steer/auto trans components such as coolers and reservoirs can be used.
If you do not use this system you will need to either remove the on-engine pump unit completely or gut it and fit some bearings, as it will otherwise seize.
The good news is that if you do not run aircon you can remove both units and fit a shorter belt. The bad news is the unit is otherwise required as an idler for the full-length belt, and if you remove it you end up with a hole in the front of the engine.
The Crown uses a thematic fan, but as it is fitted to an idler that runs on the reverse side of the belt the fan rotates backwards. The blades are prone to breakage when the engines are stacked in containers for delivery to NZ, and the reverse blade pitch severely limits the use of fans from another vehicle.
Most of the installations we have done require the use of electric fans due to the lack of space in the engine bay following the shoehorning of the V8 into where a 4 cylinder one sat.
My advice is to run the biggest diameter fan you can fit (we often run two 10 inch units due to space limitations, but a single 16” unit is way more efficient) and go for multi-blade, as they tend to move much more air than 4 blade designs. I used to liberate fans from wrecking yards, but now just buy them from Supercheap Auto for around $80 each for a 10” unit.
I suspect one of the major reasons the V8 can have a cooling problem in Hiluxes and Surfs is that the engine quite literally fills the entire engine bay, presenting a virtually solid, flat wall less than 50 mm behind the radiator that blocks almost all airflow out of the engine bay to boot.
I hark back to an article I read years ago that said most cooling problems were due more to the inability to get hot air out of the engine bay than too small a radiator…
Raising the rear of the bonnet can alleviate this, but if you hit deep water the steam that comes out of the engine bay from the exhaust manifolds will fog up your window. Be warned that the area in front of the windscreen is also a high-pressure zone – this is why the inlets for the ventilation system are at the base of the window.
Air Conditioning
All engines come with an air conditioning pump mounted low on the left hand side. There are some variations in compressor, but most have variable output. We have only done one transplant into a vehicle with air conditioning, and they merely had the V8 compressor plumbed into their original vehicle system.
They had the compressor running at low output only, as it was more than enough for the twin cab Ute. Be warned that generally the space the air conditioning condenser sits in Utes becomes snaffled for radiator cooling fans; fitting aircon can be a major challenge from a space perspective.
Stock Cars
The V8 is very popular among the stock car fraternity, who run them carburetted due to their class rules – so if you need any peripheral bits, try chasing up your local stock car club.
Cost
The most important thing I can say about cost is to fully appreciate that the engine is by far the cheap bit – making it fit is what gets expensive. You also need to understand that for the majority of conversion you end up replacing a significant portion of the original vehicle.
We work on a simple drive in-drive out conversion of a Hilux costing in the vicinity of $10,000, but it is very easy to spend $14,000 if you start to up spec things.
Effectively there is roughly $5K in bits and $5K in labour – it tends to take Jono 2 very solid weeks to do a conversion. The following table of minimums for a Hilux shows why:
| Item |
Cost |
| Remove old engine | $250 |
| Handbrake relocation | $100 |
| Engine complete with AFM, ECU, Igniters etc | $1800 |
| Cam Belt Replacement | $250 |
| Custom Engine/Gearbox Mounts including minor sump modifications plus engine install | $1000 |
| Conversion to manual transmission with billet flywheel and HD clutch (not including gearbox) | $1400 |
| Wiring (Manual Trans) | $1000 |
| New mandrel bent high performance exhaust system (but using Factory Headers) | $1200 |
| Modified Fuel System, Pump and Lines | $500 |
| Cooling System including Fans and heater connection (Existing Radiator) | $500 |
| Oil Filter remote mount | $600 |
| Oil, Oil Filter, Antifreeze, Trans Fluid etc | $200 |
| Drive shaft Modifications | $250 |
| Misc Items (AFM Hose, Air Filter, ISC hose, fittings) | $350 |
| Power Steering Hoses | $250 |
| New Platinum Spark plugs | $120 |
| Accelerator Cable/modifications | $100 |
| Certification | $350 |
| Total | =SUM(ABOVE) $10220 |
Note that this does not allow for a LSD unless already fitted, brake pad or brake system upgrades, replacement of clutch master or slave cylinder. It also assumes that items such as flexible engine and gearbox mounts are reusable.
The exhaust system is custom fabricated from mandrel bends. Even if you do it yourself, you will spend at least $5k on a conversion, maybe more like $6-7k.
What to Look For
Generally the V8 is indestructible provided it has not run out of oil or been cooked. A simple check is to remove the oil filler cap and check the colour of the inside of the cam cover and look for any build up. Most of the engines I have looked at have actually been very clean with a light honey colour and an absence of black varnish.
I also give the oil filler a quick sniff to see if the oil smells burnt. Likewise check the engine and transmission dipsticks for oil colour and smell. The trans is also a good indicator of engine health – the one engine we had that was rattly and a bit smoky was very black internally and the oil smelled bad, as did the trans. The importer subsequently replaced it.
The vast majority have been in good condition internally and have run very well. Some are a little rattly, but it is not worth the time, effort and cost to re-shim the valve clearances. My supra is probably the rattliest one so far, and it still runs great.
Look to make sure the engine is complete, including alternator, aircon pump, dipstick etc with no broken covers or missing bits (otherwise see if you can drive the price down).
Various bits of trim can get broken in transit, especially if it has been just thrown into a container with a lot of others. If you get lucky you can choose from more than one engine. Check for sump dents and damage, and make sure you get a bell housing – many are sold without the trans but with the bell housing.
A parting shot on perspective
I freely admit to being very Toyota biased, but with good reason (I believe). V8s tend to become a very emotive subject, particularly among those who prefer the iron-blocked pushrod offerings from Uncle Sam or the Land of Oz. These people often tend to look at things Japanese from a very derogatory perspective.
Whilst I fully support everyone’s right to an opinion, here is a parting perspective (I have used a Commodore V8 as a comparison as the Ford items are way less common):
- The 1UZ debuted in 1989.
- It made 200 kW back then (now, when did the 215 kW Commodore debut?).
- It displaces 4 litres (I seem to recall the 215kW was 5.8 litres).
- It was sold new in cars costing over $160,000 (the extra money over a V8 Commodore had to go somewhere. Hmm, just maybe some went into engine design?!).
- It has 6 bolt mains.
- It is all alloy construction.
- If you don’t cook it or run it out of oil you pretty much can’t kill it – apparently they will rev to 9000 rpm on stock internals if your aftermarket EFI system lets them).
- BMW copied a lot of the design features for their V8.
- You can buy a long motor for around a grand if you get lucky.
- Jono’s 4WD Hilux weights 1560 kg and does a ¼ mile in 15.0 seconds on mud tyres with a lot of wheel spin. He has subsequently replaced the water temperature sensor and picked up some reasonable power too.
To quote Ferris Bueller: “If you have the means, I strongly recommend buying one”.
Toyota 1UZFE 4 Litre Quadcam V8 Identification Guide & Erratum
The following tables summarise the main differences between engines and transmissions that may be of use to you. I will try to complete the tables as more information comes to hand, but hopefully they are still of use in the current form.
The transmission data was gained by studying a number of tables in Japanese and trying to logically work out the information…
| Item | Crown | LS 400/Lexus | SC 400 | Ambulance |
| Inlet manifold badge | V8 4 Cam 32 | Toyota/Lexus symbol | Toyota symbol | Toyota symbol |
| LH Cam cover badge | Toyota | V8 4 Cam 32 | V8 4 Cam 32 | V8 4 Cam 32 |
| Cooling Fan | Viscous | Hydraulic | Hydraulic | Hydraulic |
| Sump | Centre | Front | Rear | Rear |
| Loom # (on rear of block) | 84 | 72 | ||
| Exhaust Headers | Log style (no runners) | short runners (~ 70mm) | short runners (~ 70mm) | short runners (~ 70mm) |
| Fuel Inlet | Top near rear LHS inlet manifold | Low LHS near sump | Low LHS near sump | |
| Fuel Outlet | Rear LH cam bank | Low LHS near sump | Low LHS near sump | |
| Oil Filter | Rear via remote | Front | Front | Further forward front |
| Dipstick | Into head | Into sump | Into sump | |
| Trans Output | Yoke | Donut | Donut | |
| Alternator Output Stud | 6 mm | 8 mm | 8 mm | 8 mm |
| Alternator Output | 120A | 160A | 160A | 160A |
| Air inlet resonator box | Short RHS | Long RHS | Long RHS | |
| ECU | Standard 16/22/26 Pin. Separate ECT ECU. | Pre 1992 16/22/26/26 Pin | Pre 1992 16/22/26/26 Pin | |
| 1992-1994 40/80 pin with bolt | 1992-1994 40/80 pin with bolt | |||
| 1994-1997 4-row plugs. | 1994-1997 4 row plugs. | |||
| Air Flow Meter | Optical Kaman Vortex | <94 Optical Kaman Vortex | <94 Optical Kaman Vortex | |
| >94 Hot Wire | >94 Hot Wire | |||
| Injectors | Paired | <94 Paired | <94 Paired | |
| >94 Sequential | >94 Sequential | |||
| Engine Mounts | Steel with shock absorber | Alloy with liquid filled rubber mount | Alloy with liquid filled rubber mount |
| Trans | A342E | A341E | A340E | A42DE | W55 | W57 | W58 | R154 | V160 |
| Engine | 1JZGTE | 1UZFE | 7MGTE, 1GGTE, 2JZGTE, 2JZGE, 1GGE | 1GEU | 1GGEU | 1GEU | 1GGTEU | 2JZGTE | |
| Power (PS) | ~280 | ~260 | 7MGTEU 230@5600 | 105@5200 | 140 @ 6400 | 105@5200 | 185@6200 | >300 | |
| Torque (kg.m) | 7MGTEU 33.0@4000 | 16.0@4000 | 16.5@4600 | 16.0@4000 | 24.5@3200 | ||||
| Vehicle | JZA70 | LS400 | GA70 | JZA80 | |||||
| Year | |||||||||
| 1st | 2.531 | 2.531 | 2.804 | 2.450 | 3.566 | 3.285 | 3.285 | 3.251 | 3.827 |
| 2nd | 1.531 | 1.531 | 1.531 | 1.450 | 2.056 | 1.894 | 1.894 | 1.955 | 2.360 |
| 3rd | 1.000 | 1.000 | 1.000 | 1.000 | 1.384 | 1.275 | 1.275 | 1.310 | 1.685 |
| 4th | 0.753 | 0.705 | 0.705 | 0.688 | 1.000 | 1.000 | 1.000 | 1.000 | 1.312 |
| 5th | 0.850 | 0.86 | 0.783 | 0.753 | 1.000 | ||||
| 6th | 0.793 | ||||||||
| Reverse | 1.88 | 1.88 | 2.393 | 2.222 | 4.091 | 3.768 | 3.768 | 3.18 | 3.280 |
| Speedo Drive Gear | 6 | 6 | 6 | 9 | 10 | 9 | 11 | ||
| Speedo Driven Gear | 19/6 | 19/9 | 7MGTE 18/6, 7MGTE 18/6, 1GGTE 22/6 | 21/6 | 33/9 | 32/10 | 33/9 | 33/11 |
All content in this site is copy right by Lextreme.com. Please respect our hard work and don’t copy texts or pictures from this site. However, links will be highly encouraged. If you feel our articles worth while, please feel free to donate to support our site. Thank you.
Article By: Phil Bradshaw
Gday that is an absolutely awesome write up but i am gutted that yi uh live in NZ. I would feel very comfortable leaving my vehicle with you for an engine conversion however as I live in Australia have been unable to find anyone as yet that I would trust for the conversion. If you know of anyone in Australia that is knowledgable on this conversion i would love to know. Cheers and keep up the good work.
Great write up! I’m in the USA and own a 1996 SC400. I’ve done quite a bit of work on improving the performance without opening the engine, ie. custom intake, headers, port matching (upper/lower intake) hydo fan delete, EGR delete, ABS, TRAC delete, complete open exaust w/H pipe and factory mufflers; water meth inj. welded diff, solid subframe bushings, bars, steering rack and LCA, also battery relocation and lowered suspension w/wheel spacers on 18’s and finally, reducing overall weight to 3,290 lbs. w/ no fuel. I have had many performance vehicles over my lifetime and used to have an 11 second street car and I’ll just concur, that in almost stock form, this engine has my full attention and respect! Very glad to find your write up. PS. My only disappointment is my 1996 1UZFE doesn’t have the sintered rods, as I would like to add boost
Hi. great write up. I have found your info extremely useful THANK YOU. I have a question, on a 95 LS400. Mine is stock, US model, and I was wondering if there is a way to change/modify the driveshaft, to a conventional type with 2 universal joints, and deleting the carrier/support bearing. I am familiar with that type having changed plenty of universal joints in my lifetime. started fixing car at 9yrs, I’m 60yrs now. Thank You for your response in advance.
Gday that is an absolutely awesome write up. Im in the Mozambique and i own 1 Mitsubishi colt L200 2002 with lexus conversion.
Using Mitsubishi gear box with adapter plate.
Since am using it for offroading, mud and sand dunes, for 3 times now im facing same problem. every time i climb the sand dune i come out with the clutch damaged.
Most of the people say that if i use HD clutch this problem can be solved. I have been unable to find anyone as yet that I would trust. As i already change for 3 times the clutch am a bit warried about that.
Can you help me with some tips,….
Cheers and keep up the good work.
For best results, please post this on the forums here for help. https://www.lextreme.com/forums/index.php
thanks very helpful reading i have no power to my fuel relay or air flow meter i shorted out a switch on the dash when i was putting it back together its in a double cab hilux has been wired up professionaly and it has spark but no fuel pressure i have checked all fuses i could find around the car but only found one that was blown i replaced that but still doesn’t go can you help
Paul, please post this on the forums for best results.
Wow.. incredible write up. Didnt know why my 1uz was so different … now i know i have crown engine and yet i have asked around.. Thank you
i have lexus 1uzFE V8 but the problem is the acceralater how can i get assistance