Initially I have fear working on it because the complexity of cams and its association with timing. However recently I had some problems with my head gaskets so I have no other choice but changing it.
I was quoted $1,500 for changing my head gaskets. Ouch! In order for me to change my head gaskets, I have to take the heads out and in order to take the heads out, the cams must be remove.
So here we go.
· Remove the intake pipes and throttle body
· Remove the plastic spark plug cover (4 10 mm bolts). Once you remove the plastic cover you will see the cam gear and timing belt.
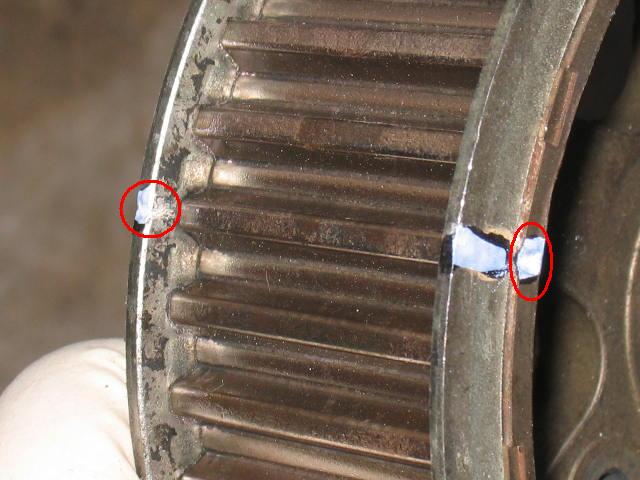
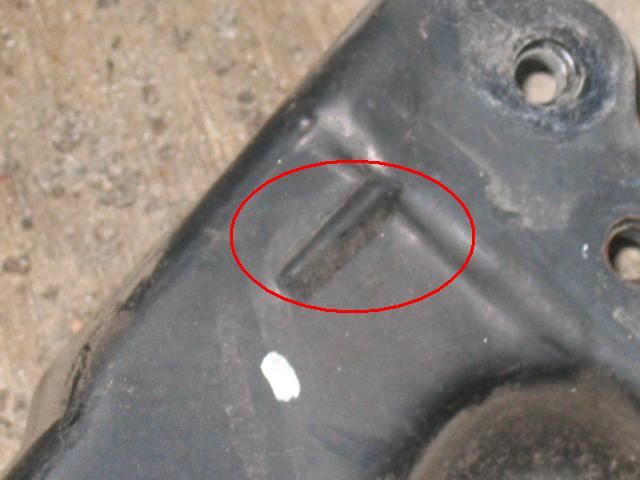
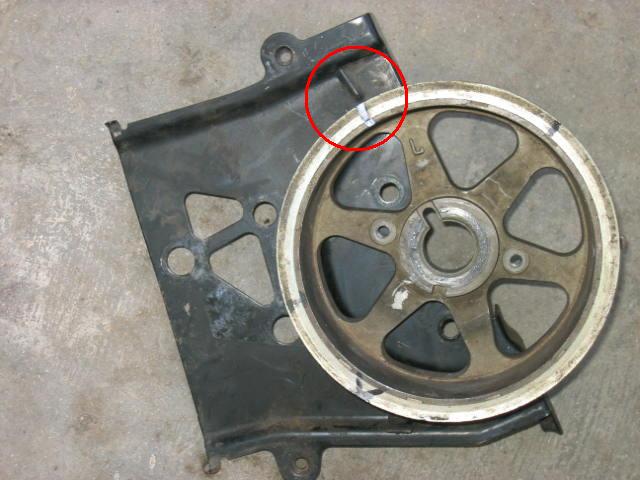
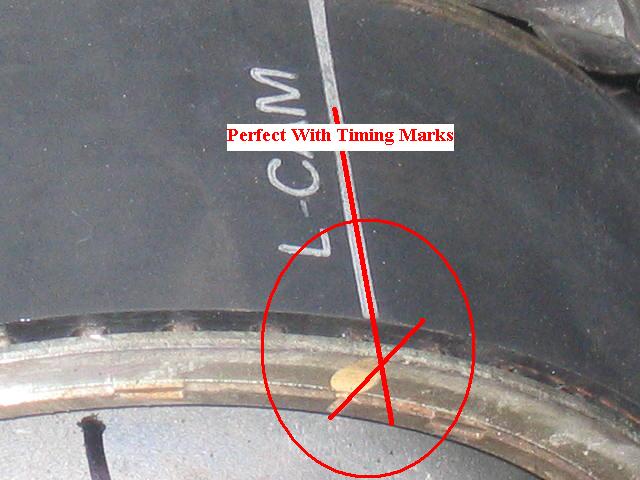
· Using 22 mm wrench and turn the crank pulley to “0”. The ratio of crack pulley vs. cam pulley is 2:1. That means it will take the crank cycle twice before the cam pulley fully cycle once. The optimal timing marks are: Crank to pulley to “zero” the cam gear facing in the direction 1 pm (right gear) and left gear should face into 11 am. If you look very closely to the cam gear, there is a sesame size dot in front of the crank pulley. There is also a secondary mark on the rear portion of the cam pulley. To reference the cam pulley position. The rear black metal plate behind the cam pulleys have a raised mark. The cam pulley mark should align with the rear plate mark. Remember 1 pm and 11 am position.
· When turning the crank pulley Lexus suggest you only turn the pulley clockwise. If you pass the mark, you have to turn the crank pulley twice (2 cycles) in order to get back to the proper position in relationship with the cam pulleys.
· Once you got the cam pulleys and crank pulley align to “Zero” then I suggest you get a white paint type of marker from Michael’s. You should mark the belt align with the cam pulley mark.
· Now its time to remove the valve cover. The cover is stabilized by 8-10 10 mm bolts. They should come out pretty easy with out major difficulty. Once the cover if off, you will see the cams. Don’t be scare! Fun just started.
· Before anything else, you should use a 6mm short screw to lock the exhaust cam secondary gear before loosen anything. Once you screw a 6 mm crew in then later you don’t have to muscle the secondary gear back in position. Its a spring loaded gear.
· The next step is to remove the two plastic cover in front of the cam gear. You will also need to unplug the cam sensor wires.
· Next will be the distributor caps. Use 8 mm socket to remove the three screws. At the same time you will continue to remove the distributor rotors. Now its also a good time to remove the cam sensor bracket.
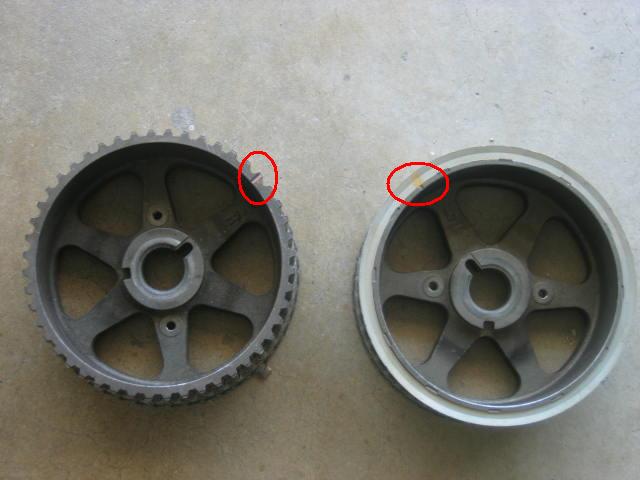
· Now before removing anything further, you should use the white paint marker and mark the two cam gears. Mark the contact teeth of the two cams. So when you install the cams back make sure the two cam teeth line up in its original position.
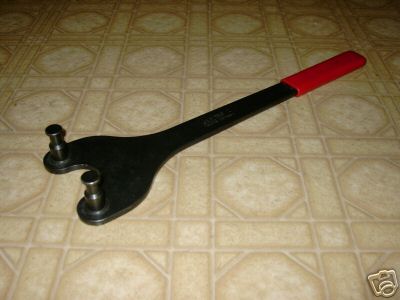
· Now its the movement of truth. Using a cam holder on the cam gear and use a 17 mm socket to loosen the cam pulley. Once both of the cam gear bolts are removed.
· Its time to remove the timing belt tensioner located on the bottom of the engine near the crack pulley. Its a flash light size stabilized by two 12 mm bolts. Once the tensioner is removed, now you can remove the cam gears.
Inspect camshaft journals
Using a micrometer, measure the journal diameter.
Journal diameter:
Exhaust camshaft thrust portion (A)
23.959–23.975 mm (0.9433–0.9439 in.)
Others 26.954–26.970 mm (1.0612–1.0618 in.)
If the journal diameter is not as specified, check the oil clearance.
Inspect cam lobes
Using a micrometer, measure the cam lobe height.
Standard cam lobe height:
Intake 41.710–41.810 mm (1.6421–1.6461 in.)
RIGHT CAMS:
Lets start with the right cams first. Before removing the cam caps. Take a look at the caps. It should say on the Intake cam: I1, I2, I3, I4, I5. On the exhaust cam should state as: E1, E2, E3, E4, E5. As you might know by now I stands for Intake and E stands for Exhaust. You will also noticed there will be an arrow on every cap. On the right cams the arrow will be facing toward the rear of the car.
You will also notice on the first cap (I1 and E1) there is a cross oil bridge. When moving the screws make sure you move them slowly and rotate them in a zig-zag method. For best result remove the exhaust cam first then the intake cam. Once the right cams are removed, now you can replace the new or aftermarket cams.
LEFT CAMS:
The left cams will be very similar as the right. However, the caps will be facing forward instead of rear. Otherwise its just straight forward as the right.
INSTALLING CAMS:
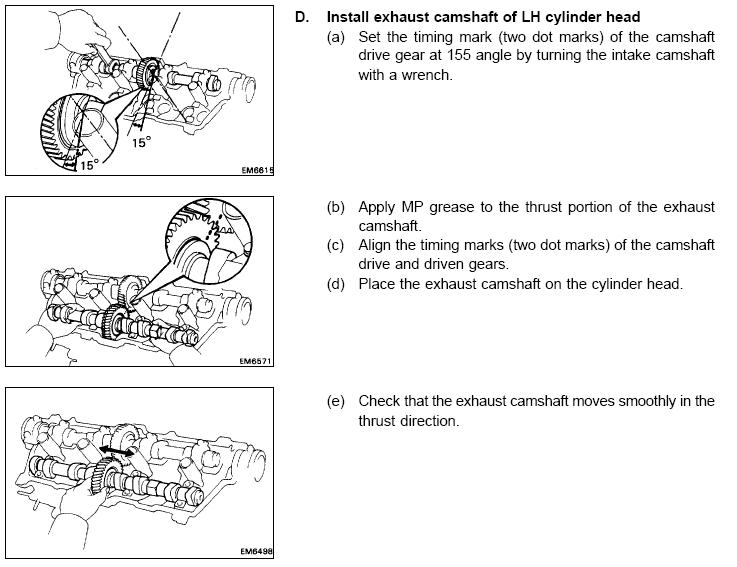
Before installing the cams back. Its also best time to change out the cam seals. Lexus recommend using silicon on the two cams above the cam seals. Its recommended that you install the intake cams first then exhaust cam. Once the intake cams are installed. The next step would be installing the cam gear. Make sure the cam gear fit into the cam groove before tightening the 17 mm bolt. Once the cam gear is installed, alight the cam gear mark to the back black plate mark. Make sure you use some grease on the caps and the cams where they mate. Now put the intake caps back in the order as they were and hand tight the bolts. Make sure the cross oil bridge install properly and in the right position. Tighten the bolts in a zig-zag pattern. The next thing would be the exhaust cam. Make sure you align the marked position of the cam gears. Double check the mark alignment. If everything is ok, then you should install the exhaust cam caps similar to the intake cams. Remember the 6 mm screw? Its time to take it out. Otherwise this little crew will cost destruction. REMOVE IT!
TIMING BELT:
Now its very important you get. By now your cam gears are alignment along with the crank. You can put the timing belt on the left cam gear first. The marked timing belt should be in the right spot. If not, now worry too much about it. Next would be the right cam. You can slide the belt into the open grooves of the right cam gear. There will be some slack on the timing belt. However once the timing belt tensioner install the slack will greatly decrease. On the other hand, the slack will solely taken on the right cam.
TENSIONER:
You need to compress the tensioner and slide a small pin into it. Once installed you can remove the pin. After the tensioner is installed the right cam gear will move counterclockwise about one tooth so make sure all the marks are align after the tensioner installed.
CHECK AND ADJUST VALVE CLEARANCE
Turn the camshaft, and position the cam lobe upward, and
check and adjust the valve clearance.
Valve clearance:
Intake 0.15–0.25 mm (0.006–0.010 in.)
Exhaust 0.25–0.35 mm (0.010–0.014 in.)
Exhaust 41.910–42.010 mm (1.6500–1.6539 in.)
Minimum cam lobe height:
Intake 41.56 mm (1.6362 in.)
Exhaust 41.76 mm (1.6441 in.) (An article on how to adjust valve clearance)
DOUBLE CHECK:
Once the timing is fully installed. You need to double check all the marks. Best is to turn the crank pulley in two complete cycles and recheck the timing mark of the cam pulley and crank pulley. If all the marks align then you are almost there. Now you need to recheck the cam gears. There are two small (size of sesame) marks on each cam gear. Its located on the rear of the gear. As you turn the crank pulley and look for the four marks alignment. They should align. This is just a confirmatory test. If the 4 marks (two from the intake cam and two from exhaust cam)
CONCLUSION:
If all the marks are align, then its time to put back everything. This process is much easier now. I must admit, this is the most time intensive article I have ever written. Good luck and enjoy.