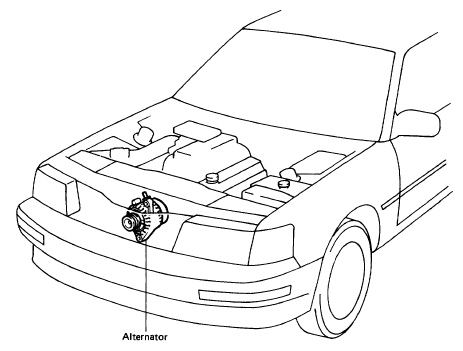
The main purpose on an alternator is to recharge current back to the battery. One of the most common problems with the Lexus LS400 and SC400 is that power steering pump seal leak. Right below the power steering pump is the alternator. The power steering fluid will drip down and cause many electrical problems for the alternator.
Therefore, its very common to have the alternator goes bad along with the power steering pump. If this is the case, it is wise to replace both at the same time. Power steering pump might be little hard, but not impossible.
In this article we will focus on replacing the alternator. Before we can actually talk about the process, we must talk about its function first. Here are some diagrams of the alternator.
Location of the Alternator is in the front left of the engine. Before taking parts out of your car, you should try to diagnosis the problem by:
1. CHECK BATTERY TERMINALS, FUSIBLE LINKS AND FUSES
(a) Check that the battery terminals are not loose or corroded.
(b) Check the fusible links and fuses for continuity.
Fusible link: ALT 120 A, AM1 40A
Fuse: ENG 7.5, IGN 7.5 A
2. INSPECT DRIVE BELT
3. VISUALLY CHECK ALTERNATOR WIRING AND LISTEN FOR ABNORMAL NOISES
(a) Check that the wiring is in good condition.
(b) Check that there are no abnormal noises from the alternator while the engine is running.
4. CHECK DISCHARGE WARNING LIGHT CIRCUIT
(a) Warm up the engine and turn it off.
(b) Turn off all accessories.
(c) Turn the ignition switch ”ON”. Check that the discharge light comes on.
(d) Start the engine. Check that the light goes out. If the light does not operate as specified, troubleshoot the discharge warning light circuit.
5. INSPECT CHARGING CIRCUIT WITHOUT LOAD HINT: If a battery/ alternator tester is available, connect the tester to the charging circuit according to the manufacture’s
instructions.
(a) If a tester is not available, connect a voltmeter and ammeter to the charged circuit as follows:
• Disconnect the wire from terminal B of the alternator and connect the wire to the negative (–)
terminal of the ammeter.
• Connect the test lead from the positive (+) terminal of the ammeter to terminal B of the alternator.
• Connect the positive (+) lead of the voltmeter to terminal B of the alternator.
• Ground the negative (–) lead of the voltmeter.
(b) Check the charging circuit as follows:
With the engine running from idling to 2,000 rpm, check the reading on the ammeter and voltmeter.
Standard amperage: 10 A or less Standard voltage: 14.0–15.0 V at 25°C (77°F)
13.5–14.3 V at 115°C (239°F) If the voltage reading is more than standard voltage, replace
the IC regulator. If the voltage reading is less than standard voltage, check the IC regulator and alternator as follows:
• With terminal F grounded, start the engine and check the voltage reading of terminal B.
• If the voltage reading is more than standard voltage, replace the IC regulator.
• If the voltage reading is less than standard voltage, check the alternator.
6. INSPECT CHARGING CIRCUIT WITH LOAD
(a) With the engine running at 2,000 rpm, turn on the high beam headlights and place the heater blower switch at ”HI”.
(b) Check the reading on the ammeter. Standard amperage: 30 A or more. If the ammeter reading is less than standard amperage, repair the alternator.
HINT: If the battery is fully charged, the indication will sometimes
be less than standard amperage.
However, if above fail, the you should follow instructions below:
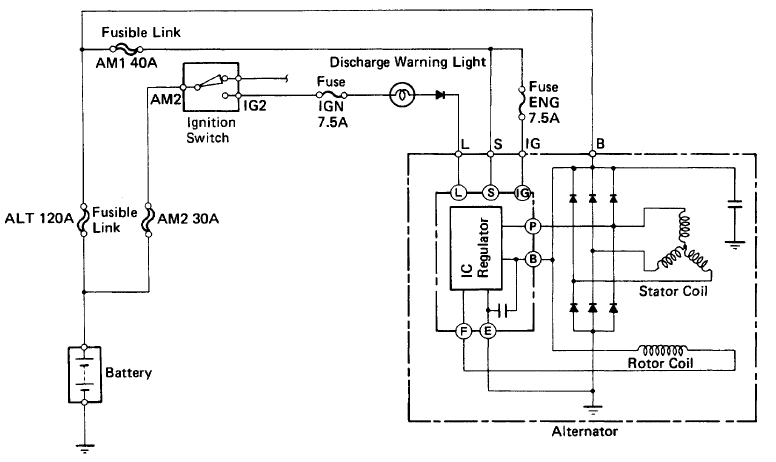
When the ignition switch is turned ON, current from the battery flows from terminal L of the alternator through the IC regulator to terminal E, causing the discharge warning light to light up.
Then when the engine is started, the voltage output increases as the alternator rpm increases. When the voltage output becomes greater than the battery voltage, current for recharging flows from terminal B. Simultaneously, voltage at terminal L increases and the potential difference between battery and terminal L disappears, causing the discharge warning light to go out. When the voltage output exceeds the regulator adjustment voltage, the transistor inside the IC regulator regulates the voltage so that the voltage from the alternator remains constant.
Removing the Fan Belt:
The belt is very easy to remove. You will need a 14 mm socket with a 2-4″ extension. The belt tension 14 mm bolt is loosen (reduced belt tension) by rotation the wrench counterclockwise meanwhile using your right hand and pull the belt of the top pulley.
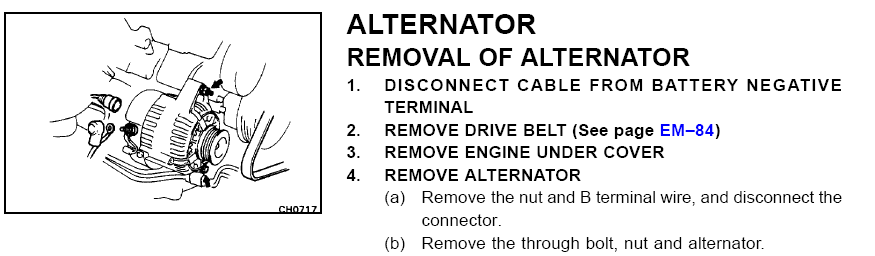
Removing the Alternator:
The alternator is stabilized by one stud and one bolt. Both are 14mm. You can attach the above 14 mm nut by using a 14 mm ratrechet or regular wrench. The lower bolt is best accomplish by using a 14 mm socket with 2-4″ extension. Both the nut and bolt can be loosen from the top of the engine. The second part you will need to jack up your car on the passenger side. You need to get under the car and uninstall the engine under cover along with a 12 mm from the alternator (B Terminal Wire). The nut is somewhat above the alternator and attacking this from the bottom is the easiest. After the B Terminal is out, there is a clip behind the alternator. This clip needs to come out too.
Once everything is loosen and unattached, you can move the alternator forward to clear the top stud and lower the alternator down.
Installing alternator back is much easier and the process is reverse. This project should not take more than 2 hours and I would rate this project as a 5/10 in difficulty.
David
i have a lexus ls400 94. the alternator went out and the battery. so i replaced both. and now when i turn the car on it starts and everything but as soon as i push on the break the dash light and radio ligh turn off and when i put it into drive it won’t move but all the other gears work what should i do?