Torsen LSD w/4.27 ring into SC400 (many photos)

The 1UZFE EGR Delete Kit is available for sale here.

Blizzy

New Member
Messages
91
Location
Fort Wayne, IN
Everyone-

I am rarely one this forum. But, when I am, I am reminded of the gear-head mentality that is not present on the Club Lexus forums that I frequent daily.

I own a 96 SC400 with 69k miles. The original owner babied the car. I am looking to push it a bit.

My build is intended to include three stages:
(1) 4.27 ring on a Torsen diff
(2) R154 swap using Neil's kit from down under
(3) Powerdyne centrifugal supercharger for 6lbs of boost (to dial up to 12psi)

I am half way through step one. I felt compelled to share my results as I know LSD's and gearing is a strong topic of discussion on Lextreme. Ultimately, I wanted the 4.27 gears for that added whip off the line. Likely never to hit the speed limiter, I would rather have my power available on the street. The Torsen diff should be perfect for so many reasons.

I was told by a Toyota tech that the 4.27 n/a Supra differentials which included the factory LSD option utilized a clutch-type differential that has been proven to be prone to failure. This Toyota tech, a Supraforums guru that put together a hell of a drag car, cautioned me to not use the Supra n/a diff, but rather to piece together the diff myself.

Here is my progress to this point...

This is the starting point: a 97 SC300 a/t differential 50k miles new with 4.27 gears from the factory.
CIMG2560.jpg

It took me a day of trials and a few emails to Brad Pyle from Supraforums (a Toyota tech) to realize just how rough you could get with the axle stubs on the diff. The advice was to wedge in a pry bar or two and bludgen it with everything you've got:
diff.jpg
(I would be nowhere right now without Brad's LSD and Brad's advice. The guy is a class act)

The stubs were literally out fifteen minutes after reading Brad's email that came attched with the above photo:
CIMG2577.jpg

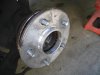
The next cylindrical piece inward, the carrier retainers, needed to be removed:
CIMG2578.jpg

A gear/pulley remover would have been nice to have, but some ambidexterity was equally effective at removing the carrier retainers:
CIMG2579.jpg

A reinactment to show just how high-tech this stuff really is:
CIMG2581.jpg

All told, these four units -two each side- hold the differential unit itself in place. Removing them was key for the LSD surgery:
CIMG2582.jpg

Now, the back plate needs to be removed to allow the differential unit to be accessed.
CIMG2583.jpg

After draining the oil, this is what you are left with:
CIMG2584.jpg
 
Notice the ring on the input shaft that spins with the driveshaft. Perhaps it is now more obvious to see just how the differential is able to apply force perpendicularly.
CIMG2585.jpg

The greasy open differential is junk. The ring gear, however, is gold for my purposes. The 4.27 gear ratio will yield great starts both with my auto now and the R154 soon. The Torsen LSD in the background has been itching to get a ring gear for weeks.
CIMG2588.jpg

Once the perimeter bolts are removed, the ring takes some gentle coercion to remove itself from the donor diff. I have the towel to apsorb the blows. I babied that ring off slowly with a towel under the ring to prevent any chipping when it did let loose.
CIMG2590.jpg

So close to construction...
CIMG2591.jpg

Here is where it gets weird. The ring gear needs to be boiled for ~90 seconds to allow it to expand sufficiently to slide safely over the LSD. Certainly, pounding the gear into place by the teeth is not an option. I got a $4 chili pot from Meijer's and used an old phone cord to allow me to fish the ring out without burning my hands or damaging the ring.
CIMG2593.jpg

The speed at which I was cutting the phone cord off the ring is not accurately captured in this photo. The ring will only remain inflated a few microns for a few moments before the air temperature returns it to size.
CIMG2598.jpg

The ring should be pulled up to the LSD to ensure that the bolt holes align properly. I wish I could say I was clever enough to think of this the first time. My ring saw the boiling water twice because I was neither fast enough nor acurate enough with my placement on the first trial.
CIMG2599.jpg

Before the ring cools sufficiently, two oppossing bolts must be secured to 47 ft*lbs. Again, I was working fast here. But, care is key since cross-threading the ring gear bolts would be the end of this project.
CIMG2600.jpg

Once the two bolts are secured, the ring must come to room temperature to ensure no deformation of the ring occurs as bolts are torqued. The two bolts in play here got another quarter turn once the diff cooled.
CIMG2602.jpg

This LSD is a pair of ruby red slippers away from being home. I would really like to know the number of times that a 4.27 ring was placed on a Supra Torsen differential. The n/a Supras with 4.27 gears that received an LSD were given a weaker clutch-type differential, and the SC300 a/t never got an LSD. I would guess the 4.27 Torsen combination is rare to very rare, but it is ideal for SC400 sprinting.
CIMG2603.jpg
 
Great writeup; please let us know how you like the end product & what it's done for your launches, 0-60 times, etc.
 
Lextreme said:
Nice..... You should do a tutorial on this.... What is final gear for the SC400?

This is half of the job. I need to get a bigger vise (the torsen's base exceeds my 4.5" vise's maximum width) so that I can torque down the ring bolts. I also need to get a couple metal rings from Toyota that were damaged during my first trials at removing the axle stubs. The final pictorial walkthough for construction and alignment will likely occur midweek.

The final ring gear on the 92-97 SC400 is 3.92. This 4.27 gearing makes gears about 10% shorter. Personally, the canonical mod of a Supra Auto TT Diff is somewhat counter productive. While the Torsen diff of the Auto TT unit will increase traction and allow for better launches, turning, and braking, the 3.76 gearing of the Auto TT makes the SC4's gears taller: not a good thing.

The R154 received 3.7-4.1 gearing from the factory, so the 4.27 gears should be an excellent upgrade for snappy starts once I am manual also.

cribbj said:
Great writeup; please let us know how you like the end product & what it's done for your launches, 0-60 times, etc.

Thank you. I did take the liberty of running baseline figures for both 0-60 and 45-65 acceleration.

A couple nights ago, I warmed the car up and took it out on some empty country highways for testing at 2am. I used the video function on a digital camera as my stopwatch, trimming the videos appropriately with a video editor to achieve accurate times once I got back home.

I ran three trials of 0-60mph acceleration...
Trial 1: 7.07s
Trial 2: 6.55s
Trial 3: 6.73s

I also ran three trials of 45-65mph passing speed...
Trail 1: 3.33s
Trail 2: 3.77s
Trail 3: 3.60s

My baseline averages are 6.78s for 0-60 and 3.57s for 45-65.

Relevant modifications include a BFI w/newer OEM air filter, fresh Mobil 1 5w30 oil, Supra TT wheels with 285/245 tires. I have the 260hp variant of the 1UZ with 69k miles on the clock.

Compared to stock, the wide rear tires help me launch hard with a little brake boost off the line. However, the larger wheels and heavier tires hold me back a little 45-65 as compared to stock 16's with 225 tires.

The 285 rears are 26.1" in diameter which throws of the speedo off about 1.05%, but I am neglecting this and reading the speedo as fact. When the 4.27 gears are installed, I will thusly factor only the gear ratio alteration from the diff swap itself. This should make calculations easy.

I hope to run three trials for each of these two tests every significant step of the way. This should supply a good frame of reference for the effectiveness of each modification (gears/LSD, R154, and supercharger).
 
Nice methodology Blizzy. Any idea what your 0-60 times were before the mod?

those are my times before the mod.

the 4.27 LSD is still sitting on the work bench.

I will take photos and captions when I put it back into the differential housing and install it onto the car. I hope to run in the vicinity of six flat.
 
You should also document RPM at certain speed. For example stock rpm at 65 mph vs. RPM at 65 mph with new gear. That is a very important for other members especially when it comes to gas expenditure.

I would do this: RPM for 30, 60 and 90 mph for both gears.
 
You should also document RPM at certain speed. For example stock rpm at 65 mph vs. RPM at 65 mph with new gear. That is a very important for other members especially when it comes to gas expenditure.

I would do this: RPM for 30, 60 and 90 mph for both gears.

These numbers can be calculated. For ease of handling, I am assuming the stock four speed auto and tire diameter of 25.7".

Stock 3.92 Gearing...
30: 4375 in 1st, 2391 in 2nd, 1562 in 3rd, 1109 in 4th
60: 4781 in 2nd, 3125 in 3rd, 2219 in 4th
90: 4687 in 3rd, 3328 in 4th

New 4.27 Gearing...
30: 4766 in 1st, 2604 in 2nd, 1702 in 3rd, 1208 in 4th
60: 5208 in 2nd, 3404 in 3rd, 2417 in 4th
90: 5106 in 3rd, 3625 in 4th

Another common frame of reference is the speed at which the car will be traveling with the engine turning at 3000rpm on the highway. Generally, economy really takes a hit anywhere north of 3k.

Stock 3.92 Gearing...
81.1mph @ 3000rpm

New 4.27 Gearing...
74.5mph @ 3000rpm

Needless to say, overall fuel economy should not get killed with this adjustment.

Do notice that the new ratio will yield 5200rpm in 2nd gear at 60mph as compared to 4780rpm in stock form. From my experience, those 400+ engine revs are very powerful ones. Adding those to the 0-60 arsenal should help signifnicantly.

When I go to the R154, I will be hitting the redline in 2nd gear at 60mph. Given the power curve yielded by a centrifugal supercharger, this should yield superb 0-60 times. But, with a 5th gear at a similar ratio to the 4th gear in the stock tranny, I will still retain very reasonable highway economy.
 
those are my times before the mod.

the 4.27 LSD is still sitting on the work bench.

I will take photos and captions when I put it back into the differential housing and install it onto the car. I hope to run in the vicinity of six flat.

Whoops, sorry about that - missed that line in your post. Senility setting in ......:) I'm at the "hereafter" stage in life. I walk into a room and wonder what I'm here after.

Thought those times were a bit high, so am looking forward to hearing what your new times are.
 
Blizzy, he doesn't even buy green banana's these days!!:umbrella:

Another member of the "hereafter" club :boggled:

Erol probably told me that hereafter joke in the first place, but I'm doing well to remember what I had for breakfast this morning, much less who told me what joke a month ago, or was that just yesterday, Erol? Hehe
 
Update:

I got the eight remaining ring bolts installed, torqued, and threadlocked thanks to the 6" vise that I forked over the money for.

Tomorrow, I will get the parts from Toyota and reassemble the unit, perhaps with time to do the actual axle swap.

I took photos tonight and will take photos tomorrow to share.
 
The differential has been fully reassembled.

If you missed the deconstruction, these posts: #52 and #53 include a pictorial account of the steps taken.

Recall where we were last time. The ring was placed on the LSD, and two oppossing bolts were tightened to 47 ft*lbs. Later, once the ring returned to room temperature, the bolts were given an extra quarter turn.
CIMG2603.jpg

The remaining 8 bolts on the ring get tightened to the same torque specs, 47 ft*lbs plus one quarter turn, but these bolts received thread locker. I used Loctite Red.
CIMG2607.jpg

I started the bolts by hand to prevent cross-threading and continued to tighten as opposing pairs to prevent warping the ring. With all ten bolts torqued, this is what remained.
CIMG2609.jpg

This shot includes the fully assembled LSD and ring with a torque wrench to emphasize how important torque specifications are on drivetrain parts. These ring bolts should not be simply tightened to your own satisfaction.
CIMG2610.jpg

Returning the LSD to the differential housing involves starting it at the proper angle to get the carrier bearing opposite the ring (left in this photo) to clear the opening on the side of the housing. This is very intuitive.
CIMG2613.jpg

The carrier retainers get installed next. I was very gentle. You do not want to harm the ring of bearings on either side of the LSD. Also, I made certain that the retainer bolts line up.
CIMG2616.jpg

The retainer bolts get tightened to 16 ft*lb. I am starting these bolts by hand as well. Cross-threading a bolt at this phase of the game would have been heartbreaking.
CIMG2617.jpg

Applying Prussian Blue to a few teeth on different parts of the ring allows the contact pattern of the ring and pinion gears to be viewed. Make sure to coat both sides of the ring to assure you are aligned in both directions.
CIMG2619.jpg
 
The companion flange was spun both forward and backward at least one full rotation to allow the Prussian Blue to do its magic. In my case, I needed to spin the companion flange 4.27 times in each direction.
CIMG2620.jpg

I wish I had noticed the camera had taken a poor photo here. You want the ring-pinion contact to be oval in shape and slightly inside of center on the ring. If the ring is out of alignment, the contact pattern will look triangular. I was good to go. The differential Gazi sent me was really in perfect shape.
CIMG2621.jpg

The axle shafts go in next. When installing, I was careful to make certain that the threading on the axle shafts meshed with the threading inside the LSD. At that point, I hammered away. I heard "thud", "thud", "thud", "thud", "ping". The ping signifies that you are all the way in.
CIMG2623.jpg

Obviously, the rear plate needs to be installed. But, this is one beast of a differential: 4.27 gears and a Torsen LSD.
CIMG2624.jpg

The rear plate needs to be cleaned of any accumulated old sealant. I installed a bead of 500*F Silicon Gasket Maker along the perimeter of the rear plate, going around the inner half of the bolt holes.
CIMG2625.jpg

I was officially compulsive about cross-threading at this point. I would have been furious of a mishap. Torque these bolts to 34 ft*lb.
CIMG2627.jpg

Notice the drain plug and fill plug below and to the right of the axle stub, respectively. Also notice the "breather plug" facing upward on the rear plate. This orientation is critical when you install the rear plate, or else your breather plug (15 ft*lb) will become an escape for the gear oil.
CIMG2629.jpg

In this and the previous picture, you can notice the gasket oozing out slightly around the perimeter of the rear plate. This is reassurance that you did your job while sealing it up. The thread locker and gasket maker need 24 hours to cure. Installation is scheduled for tomorrow.
CIMG2631.jpg
 

Attachments

  • Spacer.JPG
    Spacer.JPG
    51.6 KB · Views: 4
I got around to installing the differential today (finally). By yourself with only jack stands, expect the operation to take the better part of a day. Fortunately, the weather was perfect and the assembly went pretty much to plan.

The car needs to be jacked up. S10 suspension and 26's anyone?
CIMG2668.jpg

Use the parking brake to allow yourself to break free the 10mm hex bolts around the circumference of the axle stubs. My car has only seen half of a winter in its life. There is no oxidation whatsoever: I love it.
CIMG2664.jpg

Unbolt the exhaust from the midpipe back to the mufflers. There are two 14mm bolts at the midpipe, two 12mm bolts on each side near the resonators (mine are deleted), and four 17mm bolts on the muffler mounting bracket.
CIMG2665.jpg

Get a 12mm allen wrench and an 18-24" piece of 1/2" steel pipe.
CIMG2666.jpg

The 12mm allen wrench is for the three bolts that secure the differential to the rear cross member. The steel pipe section is for extra leverage. These bolts are TIGHT.
CIMG2662.jpg
A special thanks to Scott for giving me this tip. Tightly secured 12mm hex bolts are the definition of akward and unneccessary: "Thank you Toyota."

Before removing the ears (19mm) and the companion flange bolts that connect to the driveshaft (17mm), secure the differential with a jack to prevent a greasy mess as the iron housing is sure to break upon meeting the concrete.
CIMG2663.jpg

I used a piece of wood to help balance the diff, and I used top soil (fertilized no less) to surround the jack and break a fall in the event the diff got a mine of its own and fell off.
CIMG2671.jpg

As the diff drops, the male ends on the axle stubs will become loose by way of geometry. I went down VERY slowly so as not to damage my pristine stock diff. Once the stock diff was out, I set it aside.
CIMG2672.jpg

Moving a 90lb differential is not easy...unless you pawn a skateboard of a neighbor kid. I shimmed the diff at an upward angle with a sweatshirt to better accept the driveshaft. I used a small piece of wood to not damage the skateboard and subsequently ruin the neighbor kid's day.
CIMG2674.jpg
 
Feeling connected to the car after allowing me to borrow their skateboard to mate the diff to the driveshaft, the neighbor kids put their stuffed animals on my trunk hood. If this is not JDM tyte, I don't know what is.
CIMG2675.jpg

Getting the 90lb diff from the skateboard to the jack was tricky and required a little strength, but I just sucked it up. I reinstalled some of the axle stub bolts now to make sure that the ascent was a clean one.
CIMG2676.jpg

The diff is well more than half way home at this point. The cross-member bolts are the next to get reinstalled.
CIMG2677.jpg

With the cross-member bolts installed, the jack and jackstands are useless. The 4.27 Torsen differential is home.
CIMG2678.jpg

Make sure you put 75w90 or 80w90 gear oil in the differential before driving away. On level ground, the higher of the two 10mm hex plugs should be removed and the diff should be filled until the oil starts evacuating through the hole. At that point, the oil level is sufficiently high.
CIMG2629.jpg


Since my Torsen diff center is BRAND NEW, I am going to go through with a 300 mile break-in period. I drove for 20 miles tonight for the first phase. My initial concern was to get to a vacant parking lot to do a dozen or so figure eights at full wheel lock both forwards and backwards at idle speed to wake the LSD up. During the entire break in period: the tach stays under 3k, the speedo stays under 55mph, no hard launches, no sudden stops, and no sharp corners.

Given the limited time with the diff tonight, I am very pleased. The operation is whisper quiet. Turning is more true from the Torsen unit. The car feels 200lbs lighter from the gearing, and the diff is buttery smooth from the new gear oil.

After my 300mi of hell are over (I set the trip to know just when I can punch it), I will definitely do 0-60 and 45-65 runs to monitor the progress of the car.


Top