Reincarnation: 1uzfe reanimates 4runner with impending flatline

The 1UZFE EGR Delete Kit is available for sale here.
I like the orange. Looks very Lambo.

Personally I prefer paint to powercoat, probably because its cheaper and you do it yourself. Which means when it flakes off/chips you really don't care that much.
 
I think you may be right. Rather than pay $$$$ for another powder coat that may or may not last, I think just I'll paint them instead. Is engine paint the best thing to use for this?
 
I normally use a coating of high temp paint, and then a coating of paint of my colour choice.

Not sure if it makes any difference having the high temp underneath, but it seems to have worked so far.
 
PRE-CONVERSION WORK ON ENGINE: Plugs, Distributors and Leads​

While the engine was sitting on the floor I took off the accessory belt then replaced the distributor caps and rotors, installed new spark plugs (NGK BKR6E-11). I replaced the rather long accessory belt with one that cost me about $60.00 from an Auto store.

Replaced the spark plug leads with new ones. I am glad I did this while the engine was out of the car as the long solid section of the spark plug lead on cylinder 8 comes very close to the brake booster cylinder when the engine is installed. May take a bit of work to get at the plug. Has anyone else with a 1uz in a 4runner/surf/hilux had this problem?
 
PRE-CONVERSION WORK ON ENGINE: Timing Belt and Hydraulic Fan Idler Pulley Replacement​

Timing Belt: I replaced the timing belt while the engine was out of the car. I won't go into it as you can see various forum entries on Lextreme or the engine manual for this procedure. I set aside a whole day for this procedure. Probably a good idea to replace the water pump on the front of the engine at this stage too, as the only way to replace it is to replace the timing belt. Here are two very handy Lextreme resources on this:

http://www.lextreme.com/timing.htm
http://www.lextreme.com/timing2.html

Fan Idler Pulley: While reassembling the front of the engine after the timing belt replacement, I replaced the Hydraulic Fan bracket with an Idler Pulley bracket. I was not going to use the Hydraulic fan but install a thermo fan instead. I didn’t need the hydraulic fan paraphernalia cluttering the front of the engine. I got the bracket from Lextreme.com for about US$80. It unfortunately uses a pulley with different bolt spacing to the hydraulic bracket pulley. I had to go and get a suitable pulley from a 100 series V8 Landcruiser from the Toyota stealership: (Australian) Part Number 16371 – 50040. This cost AUD$78. I think I first read about the cross compatibility of these pullies from Cebby’s posts.

Due to the lack of precious space between the engine and the radiator, I ground about a centimetre and a half off the new fan idler pulley bracket and the bolts before I attached it.

When the timing belt was on the crank bolt was tightened up to spec torque.
 

Attachments

  • DSCF5561.jpg
    DSCF5561.jpg
    101 KB · Views: 10
  • DSCF5554.JPG
    DSCF5554.JPG
    173.9 KB · Views: 10
  • DSCF5552.JPG
    DSCF5552.JPG
    190.4 KB · Views: 14
Last edited:
That's dumb that your powder coat orange started coming off!! What the heck! My guys guarantee perfection, even on my oily parts that I bring in. They let me inspect them and I have asked them to redo some parts in the past. They just agree when I show them my concern and they process it again without a problem. That's too bad your guys did a crap job. I REALLY liked that orange too. :grumble: I sorry you had to redo it.

Keep up the good work. Too bad we are too far apart to go wheeling together when out trucks are done. :banghead:
 
G'day Smitherz, I think the guy I took it to is used to doing garden furniture and stuff, I don't think engine parts are his forte'. He has done a few other things for me like satin black on my aluminium side bars and the coating on those is rock hard, and a really nice satin finish. There has been no drama's with the sidebars at all. He couldn't tell me what went wrong and offered to do then again for free but I said no thanks. I might try the peewee method next: a coating of high temp paint then a coating of auto paint.

BTW, I'd love to be as close as you are to the vast 4wd theaters of Baja and those great south western desert states (Utah, AZ, Nevada etc). Some nice country through there.
 
Hey nice to see you here Earthman. I think he didn't heat the materials up enough. You really got to bake them for a while in a big oven. I would talk to him about this and get it done in that orange! :fingersx:

Here is a pic of the ovens in the business that does my stuff:
hot_like_fire_00.jpg

Pic of my trailer that I stripped and had them do the whole thing in krinkly black and the fenders in a burgundy metallic.

Maybe you might have to get someone to media blast them really really good and then use a metal etching prep. They would be good to go for sure. There are companies that sell engine paints that practically look like dip. I wouldn't use a high-temp and then paint over it. It's not a good idea to use it like primer. Always stick to the same mfg if you do use a two-part process of course. I have had insanely good luck Rust-Oleum Hammered finishes. It would hold up but I'm not sure if you can buy it down there. http://www.rustoleum.com/Product.asp?frm_product_id=21&SBL=1

There is this stuff by Kilz as well: http://www.kilz.com/pages/default.aspx?NavID=43 They have brighter colors but it might not be down there as well... dunno. I've used them on automotive metals without one problem. We actually use them for roll-cages in race cars as well and they are they work great and take a lot more abuse than any other spray can paint I have ever seen. You don't even need to prime. Just do a decent prep job and spray on. If you are doing your engine covers in any paint make sure and fire up the oven to warm up the parts. Grab the oven mitts, paint them outside and then bring them back in on a cookie sheet and bake them at a warm temp for a while, not too hot at all though. This will help the paint cure MUCH better and it will work much better on engine parts without a doubt.

Keep up the good work that truck is going to be awesome! You should post a picture of your truck too to give us the big picture. You did replace that water pump right? They do wear out and by the time we get these engines the pumps are wore out. EZ to replace before engine goes back in. I am just waiting on the day I can slap some Lexus emblems on my truck grill, mwuahahahaaa.
 
Hey man, that is all great info, thanks! I have a couple of questions though, is media blasting the best way to get the stuff off or is there a decent chemical/solvent alternative to get rid of powder coat? Also, would treating parts with a heat gun pre and post application be enough to effectively cure the engine or high temp paint? Would it hot hot enough?

I'll post up a pic of my vehicle when I can, I am mot at home at the moment so don't have access to my pics.
 
RedPhoenix: Thanks man. I'll be sticking with the Husqvarna Chainsaw look and be keeping the orange.

Bushwhacker: That is a very tidy installation. Wish mine was that clean! Is that a Perma-cool oil filter relocation kit you used? How did it go clearing the chassis rails? Did you incorporate an oil cooler?

By the way, here is what you are missing out on keeping all that aluminium bare :
 

Attachments

  • engine red.jpg
    engine red.jpg
    91 KB · Views: 7
  • engine yellow.jpg
    engine yellow.jpg
    91.6 KB · Views: 5
  • engine purple.jpg
    engine purple.jpg
    91.1 KB · Views: 4
  • engine orange.jpg
    engine orange.jpg
    91.7 KB · Views: 5
  • engine green.jpg
    engine green.jpg
    91.2 KB · Views: 3
  • engine blue.jpg
    engine blue.jpg
    91.1 KB · Views: 9
Last edited:
Smitherz: This is what I am dumping the 1uzi into. Do you think I should give the engine bay a clean and a re-spray before I put the new engine in? :p
 

Attachments

  • DSCF7094.jpg
    DSCF7094.jpg
    202.3 KB · Views: 16
Last edited:
PRE-CONVERSION WORK ON ENGINE: Oil Pressure Sensor and the water temperature sensor

I replaced the Oil Pressure Sensor and the water temperature sensor with ones from a V6 4runner so that outputs are compatible with the gauges on the 4runner dash. I will probably get a more accurate water temp gauge at some stage.

I had to solder on an old lead plug for the older 4runner water temperature sensor, then re-taped the wire and reinstalled at the front of the engine.
 
RedPhoenix: Thanks man. I'll be sticking with the Husqvarna Chainsaw look and be keeping the orange.

Bushwhacker: That is a very tidy installation. Wish mine was that clean! Is that a Perma-cool oil filter relocation kit you used? How did it go clearing the chassis rails? Did you incorporate an oil cooler?

By the way, here is what you are missing out on keeping all that aluminium bare:nana: :


Hahaha!! you've got me thinking now!
his is the oil filter relocation kit I used...
http://store.summitracing.com/partd...rt=TRD-1113&N=700+4294907647+115&autoview=sku

...with this filter....http://store.summitracing.com/partdetail.asp?part=SUM-231001

I had to get an extra threaded brass nipple to attatch the filter to the relocation adapter though as the kit only has one.
I removed and by-passed the coolant hoses on the stock oil cooler to fit the adapter plate as the enige sat too close to the chassis rails.
 
here is the donor patient.
 

Attachments

  • Car 07.jpg
    Car 07.jpg
    126.9 KB · Views: 14
  • Car 08.jpg
    Car 08.jpg
    149.3 KB · Views: 11
Last edited:
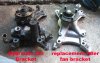
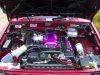
PRE- CONVERSION WORK ON ENGINE: Plenum Reverse and Valve Covers​

I picked up the Powder Coated parts and replaced them on the engine, using new valve cover gaskets, spark plug gaskets, and intake manifold gaskets. Then went and bought various hoses needed due to the plenum reverse. Thankfully there is no EGR system on the plenum which would have complicated the plenum reverse. This later 1996-97 Celsior engine also does not have a cold start injector (CSI) which normally is attached to the bottom centre of the plenum. The absence of the CSI made it the plumbing much simpler.


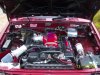
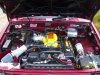
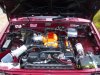
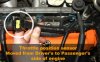
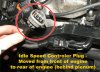
PRE-CONVERSION WORK ON ENGINE: TPS, ISC and AFM Wiring​

I am swapping/reversing the plenum around to the passenger (left) side to rig the snorkel and LPG system back up, so I re-routed the wires for the AFM (air flow metre), ISC (idle speed controller) and TPS (throttle position sensor) from the driver’s (right) side to the passenger (left) side so that they terminated at their new respective positions.

This involved removing a lot of the tape on the loom, (much of which was cracked from heat and time) and separating wires out, then re-routing them through parts of the plastic loom covers around the back of the engine. Some of them had to be teased out of the mass of wires in the loom then cut and resoldered so that they were neat. I covered the lot with conduit cover and then re-taped them.

Parts of the plastic loom covers had to be pared back to accommodate space.

Because a transfer case was being added to the back of the 1uzfe auto transmission the dash speedo sensor wires had to be lengthened about another 15cm so that they would reach to the back of the transfer case where the speed sensor is.
 

Attachments

  • Wiring 02.jpg
    Wiring 02.jpg
    172.9 KB · Views: 19
  • Wiring 03.JPG
    Wiring 03.JPG
    195 KB · Views: 15
  • Wiring 01.jpg
    Wiring 01.jpg
    93 KB · Views: 12
  • Wiring 04.jpg
    Wiring 04.jpg
    109.8 KB · Views: 14
Last edited:


Top