Reincarnation: 1uzfe reanimates 4runner with impending flatline

The 1UZFE EGR Delete Kit is available for sale here.

earthman

New Member
Messages
149
Location
Australia
PART 1: INTRODUCTION AND PLANNING

After absorbing so much of the vast accumulation of knowledge and expertise from this forum (and several others like it) I thought it was about time I give something back to it rather than just reaping the benefits of others contributions and discoveries. I had always planned to contribute but decided to wait until I had pretty much finished my project so I could gather all my thoughts and processes and organise them into a logical sequence.

Anyhow, the project details were:


THE VEHICLE

What I started with was:
• 1993 Toyota 4runner RV6 VZN130 (RHD)
• Bodylift: No
• Engine: 3vze V6
• Transmission: A343H – 4 speed automatic integrated with transfer case
• Transfer case: A343H – integrated with gearbox
• 4.56 dif gearing

What I wanted was:
• A 1993 Toyota 4runner RV6 VZN130 (RHD)
• Bodylift: Yes
• Engine: 1997 Toyota Celsior 1uzfe V8 :)biggthumpup:)
• Transmission: A341E
• Transfer case: VF1AM (electronic shift) later changed to VF1A manual shift.
 

Attachments

  • Car 04.JPG
    Car 04.JPG
    182 KB · Views: 14
  • Car 03.jpg
    Car 03.jpg
    190.1 KB · Views: 10
  • Car 02.jpg
    Car 02.jpg
    101.8 KB · Views: 15
  • Car 01.jpg
    Car 01.jpg
    163.8 KB · Views: 23
Last edited:
PLANNING

My vehicle had done almost 300000 kms and there would soon be a time to bite the bullet: Either sell the old mule and get a new vehicle or choose the road less travelled and get a new motor. Getting a new vehicle meant starting from scratch and rebuilding it with all the accessories (bullbar, lights, tyres, suspension etc etc etc). Getting a new motor meant I kept old faithful for a while longer.

So in a pre-emptive strike on the tired old asthmatic V6 3vze donkey plonker, I decided to replace it before one of it’s rubber bands broke and stranded me in the middle of nowhere with a $4000 recovery bill. And thus I embarked on a 2 year adventure of research research research and research intermittently interspersed with chasing down parts at the wreckers, ebay, talking to mechanics and sitting on these forums for hours on end.

During the research phase of the build I managed to harvest almost all the information that I needed off the net from very excellent sites like the following, which all have heaps of info on the 1uz swap if you run a search:

http://lextreme.com/forums/index.php?
http://www.uzswap.com/forum/index.php
http://www.toyotasurf.asn.au/forum/index.php
http://www.4wdmonthly.com.au/forum/index.php
http://www.yotatech.com/forumindex.php

Since I started planning this swap a few years ago these conversions have become pretty common in 4runners and Hiluxs but in the beginning there were a few names that were synonymous with 1uz and 4runner (or hilux). I would never have attempted this build if it had not been for the following guys posting stuff about swaps into their 4runners/surfs/Hiluxs. If it was not for these guys and others like them generously posting all their experiments, research, pictures and hard won knowledge on the internet I would not have the formidable vehicle that I do today. Look them up on the above forums for some great info (they are in no particular order of importance).

Cebby, Madmont, Mudman, Duza, Clownboy, Gutz,

There are others but this is all I can think of off the top of my head at the moment.

Others without 4runners but who are mechanics, sparkies or ordinary guys who had just acquired a lot of knowledge about the 1uzfe and also rate with high honours are:

Sideshow, Lextreme, Zuffen, Smitherz, Gloverman, Shuey, Cribbj

Again, there are plenty of others but this is all my lethargic brain can think of off the top of my head. Check them out on the above mentioned forums, especially on Lextreme.
 
Last edited:
TIMELINE

• R&D and parts acquisition started in about February 2007 and has been ongoing until today.
• Engine bought in October 2007 mods on uninstalled engine continued off and on to Jan 2008
• Vehicle and parts handed over to mechanics in late Jan 2008 for the conversion proper
• Mechanics handed back vehicle in mid may 2008
• R&D, tweaks and modifications have been ongoing since May 2008
 
MATERIALS, PARTS, TOOLS AND SUNDRIES

After conducting months of research I spent up to a year obtaining the following materials:
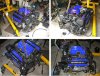
PARTS

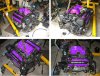
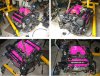
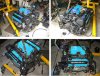
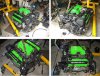
• 1UZFE engine from a Toyota Celsior, 100,000 Km approx, gearbox, wiring harness and ECU from SSS Automotive (an engine importer in Girraween, Sydney, NSW). It was originally a Japanese Domestic market (JDM) motor. Its advantages were it didn’t have the EGR system (which would have complicated the plenum reverse I was hoping to do), and no Trac Control butterfly in the throttle (simpler).
• A complete Toyota Surf gear box with transfer, adapter/extension housing, levers, control box and loom.
• A SC400 throttle from the USA (ebay is your friend and ally), without the Trac Control. I reversed the intake plenum to fit the snorkel and LPG gas system, so this US spec SC400 throttle would pull the throttle and kick-down cables from the correct (right) direction. This throttle also did not have the Trac Control butterfly in its throat and was therefore simpler.
• Rancho 4runner steering damper and damper relocator kit (product numbers RS5402 and 5573 respectively) 4wd1, Castle Hill, NSW, Australia. This relocator clears the sump of the 1uzfe. The original factory setup does not.
• 1uzfe Toyota Crown exhaust manifolds – needed in this swap due to the restricted space in the 4runner engine bay. The crown manifolds are a simple (if restrictive) log design that hugs the motor closely and gives clearance to accommodate the steering column. There are reports of some guys fitting other manifold types to a 1uzfe in their Hiluxs and 4runners, and there are even some reports of guys fitting after markets extractors with various degrees of success (I think the intrepid – Nemesis – has done this successfully). But at this stage I was trying to keep things as simple as possible and just get the motor in.
• Modified alloy Afco radiator from Venom Cobras, QLD, Australia. This radiator had the input and outputs modified by Scott at venom. He is great to deal with and apparently has done heaps of 1uzfe 4runner conversions. This radiator had the brackets fixed half way along the tanks so it could actually be recessed forward into the radiator support panel. This created an extra few centimetres of precious room in the engine bay.
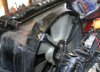
• Fan idler bracket off 3uzfe motor (this bracket has no hydraulic fan mechanism). I got this from the Lextreme website and these are also commonly available on E-Bay. This replaces the hydraulic setup on the Celsior motor, which I did not need due to the installation of thermo fans.
• V8 Landcruiser fan bracket idler pulley to suit the above mentioned bracket: (Australian) Toyota Part Number 16371–50040 (AUD$78). The pulley was the same size as the original hydraulic one but bolt pattern was different so this new pulley was needed (a revenue raising exercise?). I read this swapping pulleys trick from Cebby’s posts on Lextreme.
• Accessory belt - $60 from an auto parts store.
• New 1uzfe distributor caps and rotors and leads.
• Timing belt and timing idler pulleys
• Oil pressure sensor off V6 4runner – so that the oil pressure gauge in the dash is compatible with the new motor.
• Water temperature sensor off V6 4runner – so that the water temperature gauge in the dash is compatible with the new motor.
• Rubber hoses of various types for rerouting coolant and air intake hoses.
• PCV valve grommet in the valve cover, Australian Toyota part number 90480 – 18001 (AUD$6.95). The original one was hard and cracked.
• Fibre glass resin
• 1 x 1mm spacer washer for speed sensor
• 4 x 6mm grub screws for speed sensor rotor on transmission output shaft
• 8x Spark plugs: NGK BKR6E-11
• Battery leads from alternator
• 2 x VN V6 Commodore air boxes
• 2 x VN V6 Commodore intake hoses
• New Thermostat
• Transmission cooler
• Transmission cooler hoses
• Vacuum line hoses
• Various wires for patching wiring loom
• Kick down cable from LN hilux
• Tacho from sr5 2.4 litre Hilux or 4runner

There is probably other stuff too but I have forgotten about them at this stage.


TOOLS

10mm coarse thread hole tapper
14mm spark plug socket
15mm drill bit to drill speed sensor hole in transfer case adapter
4.5mm drill bit
6mm hole tapper for grub screws on speed sensor rotor
8.5mm drill bit
Alan keys (including a 10mm key)
Angle grinder – Something for cutting the metal output shaft
breather / mask and filters
Drill press
Ear Muffs
Engine crane
hand drill
Jigsaw
Jigsaw bits
pliers
Safety glasses
Soldering iron
Screwdrivers
Sockets
Spanners
Stanley knife,
Torque wrench
Vice
wrenches

Again, this is not an exhaustive list and is all I can think of at the moment.


SUNDRIES

Bolts
Electrical tape
FIPG or three bond 1281 sealant
Gumption and steel wool
Never-seize
Small screws and washers
Tarps
solder
Thread lock red
Copious amounts of WD40
 
Part 2: WORK COMPLETED BEFORE THE ENGINE WENT INTO THE VEHICLE​


PRE- CONVERSION WORK ON ENGINE: Body Lift

2 inch body lift completed – aluminium blocks used
2 inch ARB Bull Bar lift completed
Engineering compliance certificate obtained


PRE- CONVERSION WORK ON ENGINE: bonnet scoop

Due to the anticipated cooling issues of stuffing such a large engine into such a small engine bay I installed a Nissan Patrol bonnet scoop. Even before the 1uzfe was installed I noticed a difference in the cooling levels with the old 3vze donkey plonker: There was not as much heat gathering around my feet and the beginning of the transmission tunnel. I think the scoop helps push cooler air down between the engine and the firewall forcing out the hot air.
 

Attachments

  • Scoop 01.jpg
    Scoop 01.jpg
    123.9 KB · Views: 76
Last edited:
Sorry about the info dump. I’ll stop here for the moment to give you guys a chance to read and make sense of all my cr@p. If you are interested stay tuned, I have loads more. Thanks for reading.
 
Earthman,

This is the sort of information that's make Forums what they should be.

Please keep it up and tell us more on your own swap.
 
Good stuff, Earthman. I too have those same people to thank for supplying all that vital hands on info and like you, I did feel obligated to document some of my conversion, hoping it could help someone else.

I'm interested in your bonnet scoop. I fitted twin scoops further forward after reading alot about airflow etc, but engine bay temps have not declined all that much. I wonder if you have monitored the actual temps at various parts of the engine Bay? I bought a temp probe for my digital multimeter after feeling the igniters which are mounted just to the right of the brake master cylinder. Temps there were up to 83 deg at times idling at the traffic lights on a hot day and after fitting the scoops only dropped about 10 degrees. I don't now have overheating problems after much experimenting with radiators and fans, but it would be nice to lower the under bonnet temps a little if possible.
Duza

Turn the scoops around so the hot air can escape.
Or do what I did and modify the bonnet, it works very well, good airflow through the radiator when driving and the heat can escape when stationary.
DSC00322.jpg
truck2.jpg

p.s. Awesome job Earthman.:wavey:
 
Any forward facing scoop will reduce the amount of air cooling the radiator, and inturn can increase coolant temps (if your radiator is on the limit).

With a 1UZ in there the stock cooling system will probably be on the limit, so a more efficient radiator will probably be required.

A rear facing scoop is a much better idea, however the base of the windscreen is actually a high pressure zone, so at high speeds that scoop is probably sucking air in, and as such reducing the air going through the radiator. At low/4WD'ing speeds it would work though. However then you have hot air over the windscreen and into the air vent (and inturn into the car) which makes the cabin a lot hotter.

A lot of thought goes into the air flow characteristics of a car during the design phase, and for the most part its better not to tinker with it (because there is a large chance you'll go backwards overall)
 
Zuffen: no worries. Writing some stuff and taking some pictures was the least I could do in return for all the good info on this forum. It’s the best possible public education system!

Duza: all the stuff you posed both here and on other forums helped heaps. There are other guys too but I can’t remember them all.

My temps seem to be not too bad compared to what other guys have gone through. I guess this is because they posted all the results of their experiments on line and I was able to see what worked and what didn’t and copied them. Sorry I didn’t take hard readings for engine bay temps but the scoop is pretty far back and there was a noticeable difference in temps around my feet once it was installed. I installed it because the hurricane extractors I had installed on the V6 were making it a bit warm around the foot-well/firewall region. There was a notable before and after difference, no more hot feet. Don’t know if it made a difference to engine temps. Note though this was while the old V6 plus extractors was in the vehicle.

As the scoop was installed before the V8 I am not able to make a before and after comparison. I guess there are so many variations that come into play with this, as Peewee states, it makes it a real black art. One thing I did do was take out the flappy rubber edging hanging off the wheel arches between the engine and the wheels (hope I described this OK) so that the exhaust manifolds could release the heat to the open air a bit more. This leaves the brake lines and things like oxy sensor wires a little exposed to the elements (water, rocks, mud) though.

Also forgot to mention for anyone else doing a bonnet scoop like this to not do a half azz job by just cutting a hole and plonking one on top. When I went for my engineering cert the engineer (rightly) knocked it back because he said it weakened the support structure of the bonnet. And I had put aluminium reinforcing around it. So I reinforced it with some more aluminium extrusion. he was happy the second time.

With the current setup it has gotten hot twice in the 9 months I have been driving it. I have driven it in most conditions you would expect to drive a 4wd (except in the summer heat on sand and on and off road towing). All other times it has pretty much behaved temp wise. The first overheat was cause the air con guy reinstalled the thermo-fan with the wrong polarity and it was sucking air back through the radiator. The second time was on the last Australia day weekend where temperatures were about 43C degrees. I was doing some slow windy driving up NSW state forest tracks and the motor was laboring a bit. For a wile I had to keep stopping for a cool down. I was not using the air con at the time. Going down hill was fine! Having said that on the same trip I did stop to help a bloke in a land rover disco (diesel I think) that had overheated and blown a hose, so I was not the only one with heating problems, and his was a stock standard, and not a Frankenstein like mine.

I have got an alloy radiator with no shroud and a 12in fan but am about to get a bigger fan, 16in, hopefully it will fit between the radiator and motor. More on this further in the build. I was also planning on getting a remote oil filter attachment and putting a Davies Craig oil cooler in the line too, much like this one Mudman has done:

http://www.lextreme.com/forums/showthread.php?t=4719&page=5

I figured keeping the engine oil temp down may also help in the quest for cool. I don’t know what you guys think of this idea.

Bushwhacker: Mate, that bonnet is a work of art, and your vehicle isn’t bad either. Did it make a big difference to temps? Are temps an issue in Wales? Is it a common swap in the UK?

Peewee: You are spot on with planning and air flow characteristics, it seems to be a real black art! Unfortunately the scoop was installed before the V8 so I didn’t have and option! There was a definite difference to under bonnet temps with the V6/extractors. I am unable to determine how it affects the V8 – if any. A rear facing scoop makes a bit more sense as it would relieve air pressure under the bonnet of a moving vehicle rather than contribute to it. As mentioned I did take out the flappy rubber guards in the wheel arches to release a bit more hot air. Do you think a remote engine oil filter with cooler would make much of a difference in the scheme of things? I have to apologize that I forgot to mention you in post number 2, is there a way I can edit it as I realize there are a few other names I really should have mentioned too?
 
PRE- CONVERSION WORK ON ENGINE: Inspection of freshly acquired motor​

I received the engine and gearbox from SSS Auomotive (Girraween, Sydney) and went over them carefully to see if there were any parts missing or damaged. SSS Automotive a couple of little things with zero hassle. I also got them to undo the big bolt at the centre of the tail shaft on the 1uzfe gear box with a rattle gun so that I could get the gear box tail piece off. I could then fit the transfer adapter from the Toyota Surf on the end.

When I took the valve covers off I was amazed at how clean the cams and internals were. ~100,000kms and they almost glowed in the late afternoon light. They looked like had just rolled out the factory door. They were only a tiny bit dirty at the rear of the left (passenger) side. I have since found that this was due to a faulty PCV valve that goes on the top of the valve cover. All fixed now though.
 

Attachments

  • 4wda - Engine uninstalled 01.jpg
    4wda - Engine uninstalled 01.jpg
    111 KB · Views: 51
  • 4wda - Engine cams 01.jpg
    4wda - Engine cams 01.jpg
    105.2 KB · Views: 48
Last edited:
PRE- CONVERSION WORK ON ENGINE: Engine Bay Layout

Before I began I had made plans on how the engine bay should look. Things that I did include:

• I put the winch solenoid box in near the brake master cylinder to move it from the top of the bull bar and therefore create more airflow through the radiator and also to protect it from the elements.
• Reverse the plenum from the left side to the right side so that I could run the snorkel without having to run a 80mm hose over the engine bay. This also would have a minimum impact on components of the LPG setup already on the vehicle from the V6 motor.
• The plenum reverse would mean that the battery and all associated wiring could stay where it was.
• Create a new air filter box for the new setup to fit with the snorkel. This was done with an old commodore airbox chopped up and fibreglassed back together. This is temporary as I hope to eventually make or have made a stronger metal one in the future.

As far as I could remember everything else was not disturbed. The final layout came pretty close to this:
 

Attachments

  • Engine layout 01.jpg
    Engine layout 01.jpg
    101.7 KB · Views: 24
Last edited:
Thanks Peewee, I did ask the guys who installed the extractors about this and they said it would not be a problem. And me, bing a vehicular numpty, I believed them. I guess it pays to ask around. I can't remember whether they were ceramic coated or not. They were hurricanes and they weren't too bad. Made that asthmatic V6 go a bit better and sound a lot better.

I just have the log manifolds now with the V8 and think I will leave it at that for the time being.

hey, with ceramic coating is there a problem with the metal corroding or oxidizing underneath with all that heat? does it eventually flake off?
 
PRE- CONVERSION WORK ON ENGINE: Powder Coating​

Inspired by Cebby’s royal-ish blue and Smitherz slapped ass red engine detailing, I took off the plenum and valve covers, cleaned them and took them to the powder coaters for an orange coat. The plan was that the orange coat was going to give me at least another 20-30 horsepower simply by looking good (yeah, right!).

Unfortunately that did not transpire as the coating has since started flaking off. :banghead: Even though I gave them a decent scrub, I don’t think the powder coater dipped and cleaned them properly before applying the coat. This has since been redone with a better powder coater and no problems at all.
 

Attachments

  • Engine powder coat 01.jpg
    Engine powder coat 01.jpg
    210.8 KB · Views: 15
Last edited:
If you are interested in what other colours would look like, here is a few. In case you were wondering a purple, pink or green powder coat was never in the mix for my vehicle. The others don’t look too bad though.
 

Attachments

  • Engine powder coat yellow.jpg
    Engine powder coat yellow.jpg
    164.7 KB · Views: 11
  • Engine powder coat red.jpg
    Engine powder coat red.jpg
    161.8 KB · Views: 12
  • Engine powder coat Purple.jpg
    Engine powder coat Purple.jpg
    162.9 KB · Views: 8
  • Engine powder coat pink.jpg
    Engine powder coat pink.jpg
    163.1 KB · Views: 10
  • Engine powder coat light blue.jpg
    Engine powder coat light blue.jpg
    164.8 KB · Views: 7
  • Engine powder coat green.jpg
    Engine powder coat green.jpg
    164.3 KB · Views: 11
  • Engine powder coat dark blue.jpg
    Engine powder coat dark blue.jpg
    162.7 KB · Views: 16
Last edited:


Top