scotturnot
Member
Project: 97 6-speed, SC400 supercharged 4.7L V8
OK, finally the answer to the long awaited question. What are the specifics of the new engine for my SC400. I figured I would start a new thread and link it from the old one just to not get it lost in the prior supercharger build. If you don’t like to read then this lengthy post is not for you,. I will get pictures as the thread progresses.
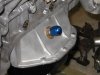
Let’s start with the Motor; David, here at Lextreme hooked me a great deal on a built 4.7 liter engine for the starting point of the build. Here were the specifications of the motor when I bought it. Please note, me being me I couldn’t just leave it as it was so change is in order.
Block- The block is a modified 2uzfe iron block, converted from 2 bolt main to 4 bolt main by using 1uzfe 6 bolt main caps.
Crank- Stock 1UZFE forged steel crank
Mains- Stock 1UZFE 6 bolt mains but only 4 used (no side bolts) and 2UZFE ARP Main Studs
Bearings- Clevite 77 H series performance rod bearing, Main, and Thrust bearings from Federal Mogul Bearings.
Rods- Modified Chevy 5.7 H-Beam Rods Forged H-Beam Rods with ARP L19 bolts
Pistons- Custom Ross Forged Pistons with Chevy rods pin size 8.8:1 compression
Pins- Chevy Race piston pins
Rings- chrome molly rings
Heads- Moderately Ported 1UZFE heads
Valves- Lextreme stainless steel oversize valves
Springs- Lextreme Performance Valve springs
Cams- Lextreme Stage II Cams
Studs & Bolts- Custom ARP 7/16"studs are used on the heads along with ARP Rod bolts
Gaskets- Cometic Multi-Layer Steel Gaskets
Just as this motor sat it is a serious build but not quite what I wanted. My first major focus was on the cams. These cams are great cams that boast 274 duration and 370 lift. I was really concerned about overlap of the valve opening between the intake and exhaust (this is a personal hang up with me). Really the cams would probally be great as they were but I cant leave well enough alone. What can happen with excessive overlap is boost will be pump out the exhaust when it occurs. More as a matter of doing things how I want them and not redoing them later I decided to start my research on cams.
What I found is this overlap is something you just can’t compensate for. The intake and exhaust cam are essentially married by the gears between them so you can alter the timing between them. That being said a custom grind is in order.
The cams in the motor as with pretty much all cams for this motor available in the US are what they call “Re-grinds”. Re-grinds are basically a stock cam shaft that is welded up with hard facing rod and then re ground to a new lift and duration. One side effect of this process is the base circle diameter of the camshaft will become undersized which must be compensated for in the valve train. The other down side to this process is the lack of the ability to modify the cams timing thus reducing overlap. (trust me guy’s I am far from a expert in camshaft’s, I know just enough to be dangerous).
All this pretty much leaves me no option but to get New custom ground camshafts from a manufacturer that has the ability to cast new billet blanks. The only one I know of is Kelford Cams in New Zealand. I got in touch with Kevin at Kelford and they went to work for me. They pulled all of my engine data, boost goals ect. and came back with a cam that fit the build. They really went the extra mile to work with me through all the revisions along the way.
So with the camshafts settled I’m good, right? Wrong! The motor was set up for the smaller base circle of the re-grinds so stock base circle cams won’t drop in. I must admit the motor was set up right in the valve train; David actually had longer valves installed to take up the extra .050” gap and then used stock buckets and shims. Nice way to do it but it really makes it hard for me. Next option, I could have Kelford grind the new cams to the smaller base circle, this sounds good on the surface but has its drawbacks. According to Kelford they don’t like that option due to the climb angle they have to make it to do the cams like that so we are back to step one.
I then spent a considerable amount of time studying John Cribs build here on Lextreme. He has done a massive amount of research and investigating trying to improve the 1uz’s valve train. I really like John’s solution of using a shim under bucket design. The 1uz has a shim on top of bucket design stock that works well but not at high RPM’s with high lift cams. John’s solution was to use a Prius lifter and an aftermarket retainer that accepts shims and shim under the bucket. So here are 3 solutions.
1. Stock 1uz buckets and shims (wont work on mine, I don’t have enough gap to fit)
2. Prius Buckets with a aftermarket retainer and shims under them. ( this also wont work due to some of my shims required would need to be as thin as .030”)
3. Use stock Prius lifters and shim by using their variable thicknesses. This would be the ultimate high RPM valve train due to no shims(unfortunately, the prius lifters alone cant quite make up the gap)
So what to do? I felt like I was going to have to buy a completely new set of oversized stainless valves with a new custom length stem to fix it. Then, all the sudden it came to me, What if I slightly oversized the base circle of the Cams to take up that extra .018” gap that the Prius lifters cant fill? I contacted Kevin at Kelford to see what the odds would be of a slightly oversized base circle, SCORE! They said no problem! So option 3 appears a go. At this point I am awaiting my new cams and springs, I will keep you posted if it all works out. Additionally I have ordered a set of adjustable cam sprockets from Andrew At Richwood Automotive to allow me to degree the cams in the motor, Sweeeet!
Next on the motor’s agenda is ignition. The factory distributor/coils are barley satisfactory for 15lbs+ boost so I decided to put some focus on this. I considered a set of Nology wires and was nearly to pull the trigger when John Cribb once again came to my rescue. John has be experimenting with COP’s on his engine and convinced me this is the way to go. Thus far I have picked up a set of Tundra COP’s and am working on the install details. This decision really had a big affect on my engine management choice.
So that brings me to the next avenue, Engine management. Well I thought I had this all sewn up. I purchased an Adaptronics system From Neil Griffiths, posted him a 120 pin jumper harness, had him wire up a 100% plug and play set up. Not only did he make me a plug and play system but he also loaded me a 10 and 15 lb map to get me close so I could get it to a dyno. This seemed like a super solution and Neil really delivered and then Guess what? Yep, I changed my mind. In light of the decision I made above to run COP’s I have decided to not use the Adaptronics, Not that COP’s cant be done with it but the set up is simpler and proven by John Cribb with a AEM. So I purchased a Supra TT AEM and shipped it off to Mitch Pederson for modification for the V-8. Once everything is complete I will be flying Mitch into Kansas to tune the beast.
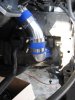
For Fuel I am considering dual Walbros, I have a purchased 550cc injectors to fuel it. These should be good for some big HP numbers. I also will be running a Nissan Q45 Throttle body it measures about 85mm which is a big improvement over the stock SC TB. I have a Methonal injection set up but am hoping to not have to use it.
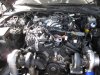
Well, now you have a nice snap shot of the Motor lets move on to the FI adder. As much as we all know a turbo would throw this motor into orbit I am a supercharger guy at heart so supercharger it is. I Contacted Andrew at Richwood Auto to see what my options were. Andrew has been an absolute awesome guy on this whole project and my parts are on the way. Here is a summery of what I ordered.
Whipple 2.3 Twin screw supercharger – this baby will make some serious boost and much more efficiently than my old M90
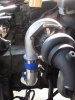
New intake with an air over water intercooler integrated into it. This was important to me to get the boost temperatures down. Air over water intercoolers are extremely efficient so this should do the trick.
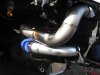
Completely separate 8-rib belt drive- I didn’t want to take a chance on the belt slipping and this will let me keep all the accessories on there stock belt. This set up gives me 8 ribs and a 180° of belt wrap. It is a super set up, I will post some pictures when it arrives.
I have ordered a 15lb and 20lb pulley for the supercharger so now you see where my boost goals are headed.
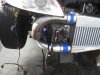
Additional stuff I have acquired includes: A nice large Aluminum Water cooler for the front, this will fill the opening in my JIC front nicly plus offer a lot of cooling for the intercooler. I bought a high end dual pass unit that not only looks nice but functions well too. I also bought a Spearco high flow pump to keep the cool water moving in the cooler. I am currently working on a custom aluminum reservoir to house the extra water.
I have a lot more details of the build that I will add as it develops; this is just getting way to long, if you read to here, congratulations, Stay tuned, this car should be a beast.
OK, finally the answer to the long awaited question. What are the specifics of the new engine for my SC400. I figured I would start a new thread and link it from the old one just to not get it lost in the prior supercharger build. If you don’t like to read then this lengthy post is not for you,. I will get pictures as the thread progresses.
Let’s start with the Motor; David, here at Lextreme hooked me a great deal on a built 4.7 liter engine for the starting point of the build. Here were the specifications of the motor when I bought it. Please note, me being me I couldn’t just leave it as it was so change is in order.
Block- The block is a modified 2uzfe iron block, converted from 2 bolt main to 4 bolt main by using 1uzfe 6 bolt main caps.
Crank- Stock 1UZFE forged steel crank
Mains- Stock 1UZFE 6 bolt mains but only 4 used (no side bolts) and 2UZFE ARP Main Studs
Bearings- Clevite 77 H series performance rod bearing, Main, and Thrust bearings from Federal Mogul Bearings.
Rods- Modified Chevy 5.7 H-Beam Rods Forged H-Beam Rods with ARP L19 bolts
Pistons- Custom Ross Forged Pistons with Chevy rods pin size 8.8:1 compression
Pins- Chevy Race piston pins
Rings- chrome molly rings
Heads- Moderately Ported 1UZFE heads
Valves- Lextreme stainless steel oversize valves
Springs- Lextreme Performance Valve springs
Cams- Lextreme Stage II Cams
Studs & Bolts- Custom ARP 7/16"studs are used on the heads along with ARP Rod bolts
Gaskets- Cometic Multi-Layer Steel Gaskets
Just as this motor sat it is a serious build but not quite what I wanted. My first major focus was on the cams. These cams are great cams that boast 274 duration and 370 lift. I was really concerned about overlap of the valve opening between the intake and exhaust (this is a personal hang up with me). Really the cams would probally be great as they were but I cant leave well enough alone. What can happen with excessive overlap is boost will be pump out the exhaust when it occurs. More as a matter of doing things how I want them and not redoing them later I decided to start my research on cams.
What I found is this overlap is something you just can’t compensate for. The intake and exhaust cam are essentially married by the gears between them so you can alter the timing between them. That being said a custom grind is in order.
The cams in the motor as with pretty much all cams for this motor available in the US are what they call “Re-grinds”. Re-grinds are basically a stock cam shaft that is welded up with hard facing rod and then re ground to a new lift and duration. One side effect of this process is the base circle diameter of the camshaft will become undersized which must be compensated for in the valve train. The other down side to this process is the lack of the ability to modify the cams timing thus reducing overlap. (trust me guy’s I am far from a expert in camshaft’s, I know just enough to be dangerous).
All this pretty much leaves me no option but to get New custom ground camshafts from a manufacturer that has the ability to cast new billet blanks. The only one I know of is Kelford Cams in New Zealand. I got in touch with Kevin at Kelford and they went to work for me. They pulled all of my engine data, boost goals ect. and came back with a cam that fit the build. They really went the extra mile to work with me through all the revisions along the way.
So with the camshafts settled I’m good, right? Wrong! The motor was set up for the smaller base circle of the re-grinds so stock base circle cams won’t drop in. I must admit the motor was set up right in the valve train; David actually had longer valves installed to take up the extra .050” gap and then used stock buckets and shims. Nice way to do it but it really makes it hard for me. Next option, I could have Kelford grind the new cams to the smaller base circle, this sounds good on the surface but has its drawbacks. According to Kelford they don’t like that option due to the climb angle they have to make it to do the cams like that so we are back to step one.
I then spent a considerable amount of time studying John Cribs build here on Lextreme. He has done a massive amount of research and investigating trying to improve the 1uz’s valve train. I really like John’s solution of using a shim under bucket design. The 1uz has a shim on top of bucket design stock that works well but not at high RPM’s with high lift cams. John’s solution was to use a Prius lifter and an aftermarket retainer that accepts shims and shim under the bucket. So here are 3 solutions.
1. Stock 1uz buckets and shims (wont work on mine, I don’t have enough gap to fit)
2. Prius Buckets with a aftermarket retainer and shims under them. ( this also wont work due to some of my shims required would need to be as thin as .030”)
3. Use stock Prius lifters and shim by using their variable thicknesses. This would be the ultimate high RPM valve train due to no shims(unfortunately, the prius lifters alone cant quite make up the gap)
So what to do? I felt like I was going to have to buy a completely new set of oversized stainless valves with a new custom length stem to fix it. Then, all the sudden it came to me, What if I slightly oversized the base circle of the Cams to take up that extra .018” gap that the Prius lifters cant fill? I contacted Kevin at Kelford to see what the odds would be of a slightly oversized base circle, SCORE! They said no problem! So option 3 appears a go. At this point I am awaiting my new cams and springs, I will keep you posted if it all works out. Additionally I have ordered a set of adjustable cam sprockets from Andrew At Richwood Automotive to allow me to degree the cams in the motor, Sweeeet!
Next on the motor’s agenda is ignition. The factory distributor/coils are barley satisfactory for 15lbs+ boost so I decided to put some focus on this. I considered a set of Nology wires and was nearly to pull the trigger when John Cribb once again came to my rescue. John has be experimenting with COP’s on his engine and convinced me this is the way to go. Thus far I have picked up a set of Tundra COP’s and am working on the install details. This decision really had a big affect on my engine management choice.
So that brings me to the next avenue, Engine management. Well I thought I had this all sewn up. I purchased an Adaptronics system From Neil Griffiths, posted him a 120 pin jumper harness, had him wire up a 100% plug and play set up. Not only did he make me a plug and play system but he also loaded me a 10 and 15 lb map to get me close so I could get it to a dyno. This seemed like a super solution and Neil really delivered and then Guess what? Yep, I changed my mind. In light of the decision I made above to run COP’s I have decided to not use the Adaptronics, Not that COP’s cant be done with it but the set up is simpler and proven by John Cribb with a AEM. So I purchased a Supra TT AEM and shipped it off to Mitch Pederson for modification for the V-8. Once everything is complete I will be flying Mitch into Kansas to tune the beast.
For Fuel I am considering dual Walbros, I have a purchased 550cc injectors to fuel it. These should be good for some big HP numbers. I also will be running a Nissan Q45 Throttle body it measures about 85mm which is a big improvement over the stock SC TB. I have a Methonal injection set up but am hoping to not have to use it.
Well, now you have a nice snap shot of the Motor lets move on to the FI adder. As much as we all know a turbo would throw this motor into orbit I am a supercharger guy at heart so supercharger it is. I Contacted Andrew at Richwood Auto to see what my options were. Andrew has been an absolute awesome guy on this whole project and my parts are on the way. Here is a summery of what I ordered.
Whipple 2.3 Twin screw supercharger – this baby will make some serious boost and much more efficiently than my old M90
New intake with an air over water intercooler integrated into it. This was important to me to get the boost temperatures down. Air over water intercoolers are extremely efficient so this should do the trick.
Completely separate 8-rib belt drive- I didn’t want to take a chance on the belt slipping and this will let me keep all the accessories on there stock belt. This set up gives me 8 ribs and a 180° of belt wrap. It is a super set up, I will post some pictures when it arrives.
I have ordered a 15lb and 20lb pulley for the supercharger so now you see where my boost goals are headed.
Additional stuff I have acquired includes: A nice large Aluminum Water cooler for the front, this will fill the opening in my JIC front nicly plus offer a lot of cooling for the intercooler. I bought a high end dual pass unit that not only looks nice but functions well too. I also bought a Spearco high flow pump to keep the cool water moving in the cooler. I am currently working on a custom aluminum reservoir to house the extra water.
I have a lot more details of the build that I will add as it develops; this is just getting way to long, if you read to here, congratulations, Stay tuned, this car should be a beast.