Getting started on my Ra65 swap

The 1UZFE EGR Delete Kit is available for sale here.

rwdfreak

New Member
Messages
67
Location
Montreal, Canada
Hi there,

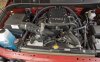
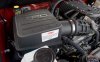
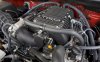
The donor is an 1991 LS400 with 190 k miles on the clock. I got the entire car in running order about a month ago.

I'm pulling the engine tomorow an basicaly I'd like to know what to take care of when removing the engine. What should I try not to break and what should be spare. I'm asking this because I know most of the members here that swaped the engine probably got only the engine and tranny with most of the needed accessories. Was there some parts that you'd have liked to have in hand.

The main thing about my project:

-It's going in a 1985 Celica
-No A/C (too much work, temperature is only over 90deg F 2or 3 month a year.
-I'm going to use the factory Celica W58
-I'd like to use the Stock 1UZ ECU, but I know I'd need to do something for the transmission input (might go for a megasquirt or other standalone if I need to).
-For now I'm trying to keep the cost as low as possible until the engine is in the car and is properly working. Then next winter I'll go for a performance rebuild an other goodies.

So asside from the obvious parts like MAF, igniter and EFI loom, what should I look for?

BTW I'm in Canada so it's al USDM spec. Also most of the other parts on the LS are useless to me. If anyone want anything it's in the part-out section.

All comments, informations are welcomed. Thanks
 
  • Full loom, ecu, AFM, ignitors.
  • Keep both sides of all the plugs.
  • No need to go aftermarket ecu, just wire up the speedo output from the dash to the LS400 ecu and it will work fine with no codes (your 22RE ecu *may* already have this signal into it, its called SPD or SP2 or SP1, only some older ecu's had it, failing that it also goes to the cruise control computer, so just tap it off that).
  • If your alternator is on the opposite side compared to the 1uz you might find it easier to keep the 1uz's alternator wiring. If its in the same spot it'll just be plug'n'play
  • If you can keep the LS400 radiator and hydro fan, cooling won't be an issue. Not sure how easy it will fit. It might be easier to triple core your radiator.
  • Aircon is no problem, just needs a couple of custom lines, a bit of wiring and a regas.
  • Get some power steering lines off an MA61 Supra as they will bolt on (both ends).
  • Rebuild the ps pump if it looks like its been leaking.
  • Decide whether you want to speed $500USD now on new plugs/leads/rotors/dizzy caps/timing belt/tensioner/bearings/etc. Its easier to change this with the motor outside the car.
 
190K miles is too much... get a JDM 1UZ no more than 70K miles.

I do prefer to cahnge Pugs/leads/rotors/dizzy caps/timing belt/tensioner/bearings and oil seals
 
Thanks for this helpfull reply peewee.

mshawari1 I prefer to have an engine I already know it's working properly (as I was driving the LS400 until Firday and I know the previous owner that had it for more than 2 years).

It's in my plan to rebuild next year and go for upgrades at the same time. Since the car was not designed for high torque I'll keep it N/A but go for higher compression and more aggresive cams. The car is light so no need for high torque

Thanks
 
I'm recycling this tread since I got enough work done to worth it. I still need to sort all kind of stuff, but I'm amazed how well the engine fit. Form my Experience with the LS400 chassis I even think there's more room to play around the engine.

DSC08472.jpg

It's tight on that pic, but by removing the rear plate there's enough play so the head doesn't hit the firewall.
DSC08481.jpg


To my big suprise the trany bolted to the factory support and the shifter is dead on. The only thing I had to relocate is the proportionning valve and some heater plumbing.

DSC08492.jpg

This is the part I'm using
HPIM3719.jpg

The howe trow out bearing is a bitch to play with and finding a proper way to make it work was a PITA. If I had to redo it again I would buy a custom bellhousing. I just don't like the idea of "loose" oil lines near a clutch cover spinning at 6000rpm.

HPIM3733.jpg

Now I need to weld the motor mounts, start the plumbing, wire the fuse box and alt and then wire the ECU.

Can't wait to fire this bitch and go make donnuts.
 
Also I removed the A/C compressor by finding the apropriate belt lenght (Dayco 5060635 for anyone interested).
HPIM3743.jpg

However you won't be able to use the clutch fan since there isn't enough strap lenght touching the pulley. I could not use the fan anyway due to the lenght of the RA65 chassis.
 
Looks great in there!

Which tranny are you using, and where did you source the adapter, flywheel, clutch, etc.?
 
Tranny is the factory W58 I only have a hp goal of 250-300whp (probably gonna keep it N/A). If I blow it I have a spare and if this one goes out too I'll make an hybrid (shorter input shaft) out of my father's "spare" R154. I know it would have been best to start with the R154 straight away, but I already have enough things to figure out without starting to fabricate stuff for the R154 (driveshaft, tranny mount, etc). Also it would have add at least $600 for the custom driveshaft and the price of the tranny. Anyway the adapter plate is the only thing that change from one model to the other.

Flywheel is a secret (as I might replicate few set and sell conversion kit)

Clutch is a 6 puck feramic disc with factory 7M-GE pressure plate I bought from Raptorracing. This thing is supposed to hold up to 450lb/in of torque and still feel like a stock clutch. I know it's overkilled, but it was cheaper than any other respectable aftermarket clutch.

The adapter was made according to Ed Oats plans, but modified to my own specs. I had access to a machine shop so it only cost me the plans and 70$ in raw material. I could get more done, but I need at least 5 set to get a good price since I no longer work in a shop and would have an other shop fabricate them.

I know I could have done a rebuild and add some minor upgrades, but right now I just want to get it done.
 
I finaly bolted that sucker to the custom made engine mount. Doing them was a pain since I could not weld in the warehouse (insurance). Engine is centered and only a 1/4inch away from the crossmember and steering rack.

DSC08688.jpg

I need to customise the power steering plumbing to get more space. So far I can fit a 2.5inch can between the frame and the shaft but no room for play. I plan to use 2 inch piping anyway, 1/4" on each side should be enough.
DSC08705.jpg

Now I fear for hood clearance. Next week I'll do a test fit with the hood on.
DSC08730.jpg

If the hood doesn't clear I'll buy an other one (probably not as clean) to modify and go extreme with vent and all that kind of stuff.

I solved the proportionning valve, by untwisting and rebending two of them and cuting/flaring the 2 other. Now I need to make some sort of bracket to hold it stiff.
DSC08678.jpg

There's still a lot to do, but most pieces of the puzzle are falling into place.
 
Well I towed the car last week end and spent a lot of time on it this week. Progress are slow but steady. I'm almost done with component relocation and hooking all of the hose/vaccum to the car.

I still need to buy/figure
-Front (rear Camaro) sway bar (I have not been able to find one in any junker/classified)
-Oil filter, by it's location I stronly beleive I'll have no choice but to use a relocating kit.
-Rad hose, somehow the hose are bigger on the 1UZ than on the Celica rad (yes I'm planing to keep it and soon upgrading to a 2 row). I don't realy know where I could get prebent rad hose except asking to go in the back store at the local part store. Space is tight.
-Freaking power steering hose (pressure). Everytime I screw up on those custom line I have a 50miles trip back and forth to have it modified. I screwed up on the lenght of the back portion of the Celica power steering line. It's 6 inch too long
-Exhaust. I think it's gonna be a hell of a lot easier than I thought. Since I don't have a good mig and my skill are limited I will probably tack portion of the exhaust together and have it professionaly welded after.
-I won't be able to use the strut tower bar in its actual form. I will need to bend it in two direction in order to clear the hood and the engine and maybe add more stifness (as the bend will take away some). I've almost found one yesterday from my friend's 95 Corolla, but the bar is lined up with the trottle body vacuum lines.

When I'll be done with the back of the engine I'll put the engine harness on and reconnect everything. Then it will be a matter of sourcing the wires on the car to make the engine run.

I can already hear the sweet melody of a 1UZ burning rubber

LS400 pusher fans and the silver tube is the return of the power steering that I fixed with factory holes and clamps.
DSCN0228.jpg

Heater hose, heater valve, EGR pipe, fuel lines, Brake lines, porportionning valve and many more. The firewall is crowded but everything seem to be ok. The hot stuff is far enough from the fuel lines and EGR pipe is far enough from anything that could melt or burn.

DSCN0241.jpg
Exhaust on passenger side (need to be modified in order to make more clearence for the clutch hose , fuel line and speedo cable). This shoul be done simply by cutting the flang and put a pipe (smooth S bend) about 12inch long.
DSCN0237.jpg


Driver side manifold. This will require more work as the pipe was made to go between the engine and the steering box, but in my case I want it between the steering box and the frame. However there's more room than I expected.
DSCN0238.jpg

Air flow meter is bolted (and polished). I had to swap exchange my K&N filter for a unknown Reactive like Air filter that I had on my truck because the K&N was too long. I will get a better filter eventualy.


How things are comming alone. The more I think of it the more I beleive this engine was made to go there (and what Toyota should have done from factory)
DSCN0229.jpg
 
Rad is done, wiring is 95% done, power steering is done, exhaust is being professional welded at the moment ( I did all the cuting, shaping and routing, but only tack welded the pipes together because my skills are limited). I agree that the exhaust system is far from being perfect, but I think it should not be any worst than the factory one. I'm proud of what I've accomplished there because this is the fist exhaust system I've ever made and I think it look pretty damn good. It's budget exhaust using what I already had on the car and parts I took of the LS donor. Mainly it's stock diameter from the manifolds to the stock cats and then it's 1 7/8" ID up to the Y. After the Y it's a 2.5" OD pipe up to a matching Dynomax exhaust.

I'm almost done but I have a clutch leak that might force me to remove either the transmission alone OR the entire engine assembly (since it's tight in there). This is a big bummer, but I don't think I have a choice.

DSCN0317.jpg

DSCN0318.jpg

Speed bump and parking entry will become my worst enemy
DSCN0319.jpg

DSCN0320.jpg


DSCN0260.jpg
 
IT STARTED!!!

It started on the second try (yesterday I tryed, but I could not get fire). It turned up to be a missing +12V from the EFI fuse I forgot to wire. It ran for a good minute. I've checked for code and there was none. I could not make it run because I did not put the radiator back and I beleive there's a fuel leak around the damper. I also need to fix comple of things to the chassis or away of the exhaust manifolds.

Vid is crappy, but this is the very first start of this engine in that car. (Ignore the french comment). Whit no catback and multiple exhaust leak it sounds like a freaking Nascar.

th_UZle8mai2010.jpg

For more details on that project go to: http://www.celica-gts.com/forums/index.php?topic=15345.0
 

Attachments

  • 163_0811_08z+2008_toyota_tundra_trd_supercharged+front_passenger_three_quarters_view.jpg
    163_0811_08z+2008_toyota_tundra_trd_supercharged+front_passenger_three_quarters_view.jpg
    66.9 KB · Views: 13
  • 163_0811_10z+2008_toyota_tundra_trd_supercharged+engine_bay.jpg
    163_0811_10z+2008_toyota_tundra_trd_supercharged+engine_bay.jpg
    116.5 KB · Views: 15
  • 163_0811_12z+2008_toyota_tundra_trd_supercharged+airbox.jpg
    163_0811_12z+2008_toyota_tundra_trd_supercharged+airbox.jpg
    92.7 KB · Views: 12
  • 163_0811_13z+2008_toyota_tundra_trd_supercharged+supercharger_view.jpg
    163_0811_13z+2008_toyota_tundra_trd_supercharged+supercharger_view.jpg
    112.2 KB · Views: 12
  • 163_0811_11z+2008_toyota_tundra_trd_supercharged+interior_cabin.jpg
    163_0811_11z+2008_toyota_tundra_trd_supercharged+interior_cabin.jpg
    88.7 KB · Views: 13


Top