Time for a little upkeep on the ol Taco. I did a whole bunch of welding around the body where it had been stressed from some very hard offroad duty. I thought this was a neat picture.
Over the weekend I tore down the whole interior for a cleaning. It always smelled like dirt but it won't anymore. I completely cleaned the whole AC system inside and out. It's like new now and I painted a lot of bare metal while the dash was out. I got some more parts I was needing and the engine work will continue in the morning tomorrow.
Hiya,
Mate would you mind getting me some product code details of that krinkle coat finish? None of the local powder coaters have heard of it? could be it's called something different locally but any info would be helpful to track it down
My dash is all back in place and smelling like new. My adapter plate is also coming along quite smoothly. It should be machined down just in time for the weekend.
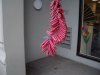
Hmm not sure of the difference. I'll ask em when I pop in there next time. Black is really sweet looking to. Definitely custom and makes people look closer. Here is my ol' 3RZ in the black color krinkle:
Still making progress. While I wait for a little more machining on my adapter: A little steering shaft modification this late afternoon. Instead of an extension block for the body lift I will have much better piece of mind with a welded in extension and universal type steering flex joint. I could have cleared the steering shaft with the extension alone but a flex joint is a great thing to have when things get crazy offroad. I might as well do it now and not worry about it ever again.
Smithers, your buildup is great and very helpful. Thanks for the documentation. I am getting the parts together to do this swap in my 95 Tacoma. Keep up the good work.
I'll keep up the work, you keep saving your $$. I am pretty resourceful and I have a lot of help from friends helping me with cheap parts and stuff. But it just keeps costing more and more money. :hypnotized:
I've been smart enough to continually collect parts over the past couple of years but if I didn't I would be flat broke and project on hold.
:alcoholic:
Whatever you think you're going to spend on your swap, double that amount.
LOL!!!!! Ain't that the truth!!! As unavoidable as gravity. Mostly because of the knock on effect and the old adage "For every one thing you modify you will have to then modify another three".
I was being modest too, but I went a little overboard with a computer and the head work. For the price that these engines can be had they are an extreme bargain. The fact that you can rev the engine to redline while balancing a coin on it's side on the intake it a testament to it's engineering and smoothness. If you haven't seen this video check it out: http://www.youtube.com/watch?v=AHsx9G_oQ0U
I have a tube bender in my garage on standby for when I finish installing the engine. Time to put some tubing to connect the chassis from front to back up through the cab. This will keep my frame from being stressed so much in the middle and provide a solid mount for the whole cab. Tubing from one side of the other will also give my seats a much more solid foundation and a strong mount for a utility rack I'm going to make for the extended cab. Forget seats, the stereo and storage compartment are much more important. :laugh2: Once you start driving off road so much in these Toyotas the cab starts to bend and flex. Nothing we can't fix though.
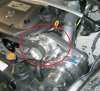
Bell housing machining - Making room for the starter pinion gear when it pops out to engage the flywheel ring gear. Transmission is mated to the engine. Engine mounts nearly done. More dirty work happening tomorrow.
Engine mounts will be powder coated tomorrow. I chopped the header section just after the collector to put a couple radius'd sections in there and give me a whole lot more room around the steering shaft. Might as well get it right while I have all the fab tools out. :amish: This thing will be built as well as an Amish wood stove.
Is it going in or out? My neighbors are getting really nervous! Engine mounts are all done and I'll be picking them up from the poweder coater in the early morning. I'll have the tranny mount relocated and welded up tomorrow for sure. Header should be modded up for steering clearance as well.
Engine mounts in the making (now finished). Stock 3rz mounts are removable as well. I'll fab some frame mounts later on that use aftermarket poly bushings instead of these Toyota rubbers.


")