Started our dual intake setup on the weekend.
I have to start by saying a HUGE thanks to Zuffen who supplied a second plenum chamber we could use to cut up to get the snout off. Thanks thanks thanks!!!
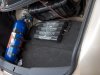
Basic Setup: Dual stock TBs setup vertically at each end of the plenum, directly over the intake runners. Second TB will be activated by heim and rod type setup linked to the first. Custom belmouth rams from TB's to air filter, air filtering done by old school type oval filter such as below on a base plate we'll make ourselves.
Throttle bodies will be either cut below traction contrl butterfly or that system removed and welded up.

Advantages: (That we think exist anyway!) More air (obviously!), more direct pathway for air to pass into runners at bottom, belmouth inside of air filter at top for smoother flow and better velocity.
Disadvantages: With the air cleaner setup on top it is going to use up some space... not a disadvantage with our buggy, but you'd need holes punched through the bonnet for a street car!
Please feel free to throw stones! Preferrable suggestions though!
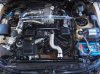
Progress so far: Picked up second plenum and stripped off plenum from our engine. Found it had less casting dags etc internally on runners so we used that one to modify.
Carefully cut Snout off good plenum using dremel and cutting discs basically copying the other sides dimensions so we can weld a flat plate into that cavity. Cut snout off the other plenum with a 9" angle grinder in approx 1/100 of the time of the first one! haha!
Milled off the fins on the top of the plenum at one end to have a square surface to mount snout to. Bit different on the other end due to the tapered section where the badge goes on. We milled off the corners of the fins to the same angle as the tapered section.
Milled the snount bases; square for the non tapered side then on an angle for the tapered side so that the end result is that they are both perfectly square and at the same height.
Dropped the snouts into the right spot then marked internally to mill out the holes. Centreline of the TB is on the centreline between runners at each end. Note that as the snout is more square than round at the plenum end you cant just push a hole saw through it! Also because of the taper on one end the two shapes cut into the plenum are not the same. Result: an hour on the mill very carefully cutting out the holes then cleaning it up with a dremel.
Next step: Our tig guy will be welding the plate on over the cavity and welding on the snouts next week (too busy at the moment) as well as welding up all unessary cavities in the plenum, IE cold start injector, EGR etc.
Total cost:
$0 2nd Plenum (thanks again zuffen!)
?? 2nd TB
$25 Material to make rams with belmouths
?? Air Cleaner (which we would have to have bought one anyway)
$Case for using mates lathe/mill and getting him to do the tig work.
Pics will be up tomorrow (forgot to bring in flash card)
I have to start by saying a HUGE thanks to Zuffen who supplied a second plenum chamber we could use to cut up to get the snout off. Thanks thanks thanks!!!
Basic Setup: Dual stock TBs setup vertically at each end of the plenum, directly over the intake runners. Second TB will be activated by heim and rod type setup linked to the first. Custom belmouth rams from TB's to air filter, air filtering done by old school type oval filter such as below on a base plate we'll make ourselves.
Throttle bodies will be either cut below traction contrl butterfly or that system removed and welded up.
Advantages: (That we think exist anyway!) More air (obviously!), more direct pathway for air to pass into runners at bottom, belmouth inside of air filter at top for smoother flow and better velocity.
Disadvantages: With the air cleaner setup on top it is going to use up some space... not a disadvantage with our buggy, but you'd need holes punched through the bonnet for a street car!
Please feel free to throw stones! Preferrable suggestions though!
Progress so far: Picked up second plenum and stripped off plenum from our engine. Found it had less casting dags etc internally on runners so we used that one to modify.
Carefully cut Snout off good plenum using dremel and cutting discs basically copying the other sides dimensions so we can weld a flat plate into that cavity. Cut snout off the other plenum with a 9" angle grinder in approx 1/100 of the time of the first one! haha!
Milled off the fins on the top of the plenum at one end to have a square surface to mount snout to. Bit different on the other end due to the tapered section where the badge goes on. We milled off the corners of the fins to the same angle as the tapered section.
Milled the snount bases; square for the non tapered side then on an angle for the tapered side so that the end result is that they are both perfectly square and at the same height.
Dropped the snouts into the right spot then marked internally to mill out the holes. Centreline of the TB is on the centreline between runners at each end. Note that as the snout is more square than round at the plenum end you cant just push a hole saw through it! Also because of the taper on one end the two shapes cut into the plenum are not the same. Result: an hour on the mill very carefully cutting out the holes then cleaning it up with a dremel.
Next step: Our tig guy will be welding the plate on over the cavity and welding on the snouts next week (too busy at the moment) as well as welding up all unessary cavities in the plenum, IE cold start injector, EGR etc.
Total cost:
$0 2nd Plenum (thanks again zuffen!)
?? 2nd TB
$25 Material to make rams with belmouths
?? Air Cleaner (which we would have to have bought one anyway)
$Case for using mates lathe/mill and getting him to do the tig work.
Pics will be up tomorrow (forgot to bring in flash card)


")