95 Pickup Race Truck 1uz swap

The 1UZFE EGR Delete Kit is available for sale here.
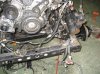
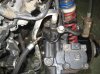
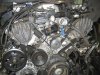
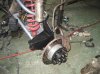
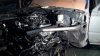
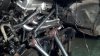
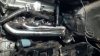
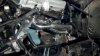
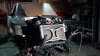
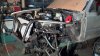
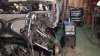
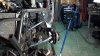
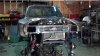
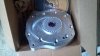
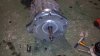
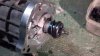
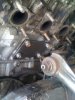
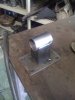
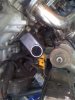
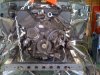
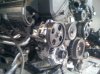
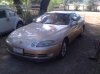
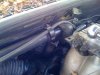
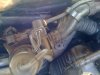
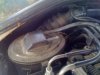
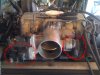
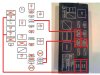
Benn a couple days but i have made some progress. I bought a 93 sc400 for $1000 185k but perfect for what i need. Today i got the motor mounts built and the motor is sitting exactly where i need it do. There is not much room with the headers and suspension. I took me a while to get it exactly positioned. I also started digging into the sc400 i picked up, stole the power steering pump and alternator. I am pretty stoked to have a reference of where everything plugs into. I ran into the first of many problems. I have to have someone splice m power steering lines together need to flare the pickup line and connect it to the sc line. ill get to that sometime but tomorrow i am working on stripping the sc and running the vacuum lines and plugs for everything i am going to run.

here are some pics from today nothing to exciting
 

Attachments

  • lexus swap 6-10-11 001.jpg
    lexus swap 6-10-11 001.jpg
    196.1 KB · Views: 47
  • lexus swap 6-10-11 003.jpg
    lexus swap 6-10-11 003.jpg
    190.7 KB · Views: 50
  • lexus swap 6-10-11 004.jpg
    lexus swap 6-10-11 004.jpg
    197.1 KB · Views: 48
  • lexus swap 6-10-11 005.jpg
    lexus swap 6-10-11 005.jpg
    197.3 KB · Views: 48
  • lexus swap 6-10-11 006.jpg
    lexus swap 6-10-11 006.jpg
    192.6 KB · Views: 50
  • lexus swap 6-10-11 011.jpg
    lexus swap 6-10-11 011.jpg
    194.3 KB · Views: 49
  • lexus swap 6-10-11 009.jpg
    lexus swap 6-10-11 009.jpg
    190.3 KB · Views: 50
for the power steering line i just welded a steel -6 to the steel tube part of the line coming out of the ps pump, then used steel braided teflon line and ends rated at 3000 psi for the rest.
 
wow. 1k is a steal, and you can send it to the wrecking yard when you're done. I might go this route just for ease. What the wrecking yard will but the rest of the car for, you can buy another JDM motor.
 
You can definately get your money back and then some from selling the rest of the parts. The interior alone will get you 1000$ if it's in good condition.
 
aight got some work done the last two days on the sc and the truck
motor mounts are welded up and painted engine is sitting pretty. I started the pluming for the motor I stole the fuel lines from the sc and put them in the truck, just danging for now, still have to purchase my fuel cell, pump and filter. Everything is now connected to the motor alternator, ps pump, throttle body and every vacuum line is accounted for. O pulled the cats from the sc this was a bitch hard to get to, those bastards. But this is all the easy part. i am starting now to get into unknown territory, wiring. So the main problem for me is i don't know everything that is needed to run the motor properly.

lets start with the questions
#1 (non wiring) on the throttle body can i delete the two front sensors and the flap in the tube? i think they have to do with cruze control and traction control i could be wrong though (pic below shows sensors i am talking about.

#2 The sc and the pickup both have this cylinder (sc's pictured below) which has something to do with the fuel return to the tank. I am not sure if it is needed and what it does?

#3 of the back of the intake manifold there is one vacuum line running to what looks line a heater control (two pictures below) is this necessary or can i just plug the vacuum line since i am not running any ac or heater units
 

Attachments

  • lexus swap 6-15-11 006.jpg
    lexus swap 6-15-11 006.jpg
    195 KB · Views: 38
  • lexus swap 6-15-11 007.jpg
    lexus swap 6-15-11 007.jpg
    194.4 KB · Views: 40
  • lexus swap 6-15-11 008.jpg
    lexus swap 6-15-11 008.jpg
    191.8 KB · Views: 39
  • lexus swap 6-15-11 0031.jpg
    lexus swap 6-15-11 0031.jpg
    193.5 KB · Views: 40
So i am starting with the wiring. The entire engine harness is there on the motor in the truck only part i had to pull was the wires to the alternator but they are combined in the large harness the wraps around the front of the car so i will be extracting tose from that harness. But just some clarification on what things are and what i think i can delete. here is a little picture i made on illistrator.

I think i can delete the abs systems, traction control, Defroster, TEL (I think for telephone), Head lights lower, Dimmer, (also i think HTR is for heater if so i can delete that as well)

I am planning on connecting the headlights from the PU to the fuse box out of the sc but using the PU fusees, I dont know what AM1 and AM2 are but are on both fuse boxes some help there would be good

so that leaves alot of questions
what are all the rest

sorry i am new to alot of this stuff its always a learning process
 

Attachments

  • wiring.jpg
    wiring.jpg
    48.8 KB · Views: 36
I'd reccomend ditching the sc fuse box and do everything through your stock fusebox. You only need 5 wires to get up and running and just a few more to do it without any codes.
I believe they're one constant power
3 switched power,
and the starter solenoid wire that you will hook up to your trucks original solenoid relay output.

btw, I have most of your parts in besides the plate.
 
Out of Town

Well it is not going as planned but i am now getting back to work on the truck. I have been out of town for three weeks doing work for people, but now finally back to my own project. I basically have everything plumbed up and now comes the mess of wiring it i feel like i am kind of in the dark cause don't have any real direction of where to start. If i somehow figure this out i am going to put a step by step thread on here of how to wire this motor to run. But have been ordering exhaust parts and getting some steel for my cage. Also 4u2quick cranked out my trans adapter plate and so that should be here any day so i can start on the trans cross member. if anybody has a copy of the 92 sc 400 computer pinout diagrams i know i am gonna need that. Want to thank everybody who has helped me so far lots of questions have been answered.
 
Here is the post from UZSwap.com. I've tried to email these guys to no avail. There's a youtube video of the motor running on a stand in a guy's backyard. If some hillbilly in Kentucky can get it to run, it can't be that hard. 5 wires get power, outside of all the standard connections to the ECU.

Now that's the easy part.

EB2 connector is a 3 pin connector and is near the igniter
EB1 connector is a 6 pin connector and is near the igniter
IJ2 connector is 17 pin connector near the ECU is dark gray, has 2 rows of pins.

You need switched power to EB2(2). This is a black and orange wire.
You need switched power to EB2(3). This is a black and red wire
You need switched power to IJ2(11). This is a black and orange wire.

You need constant power to EB1(4). This is a black and yellow wire


To start you need to supply "start" power to EB2(1) which is a black wire.

And of course you need to figure out what it takes to turn your fuel pump on. Different on every vehicle.


Now isn't that EASY!!!!

This is how you make it run!!
 
Hey thanks that will help to see if it will run. Gonna try to decipher the diagrams tonight.
Here is a little progress update:
Figured out the power steering situation. I ran a combination of pickup and sc parts. The pressurized line, I just ran the line form the SC as on the pickup originally the power steering pump was on the passenger side and power steering box was on the driver just as the SC is set up. The second return line I just used the stock pick up line. I didn't realize that the hydro fitting from the sc would fit in the bow from the pickup. All i have to do is redirect the steering shaft with u joints around the header and coilover. Not to hard.

I also pulled off the idler bracket that now i need to track down one from a tundra. I read somewhere that some uz's dont have the hydrolic driven fan and that that bracket fits much better.

If anyone has this bracket and wants to sell it let me know

Also did some maint to the front suspension pulled aprt the hubs and greased everything, Put on some slotted and drilled rotors i had sitting around.
 

Attachments

  • IMG_0805.jpg
    IMG_0805.jpg
    204 KB · Views: 51
  • IMG_0806.jpg
    IMG_0806.jpg
    181.9 KB · Views: 45
  • IMG_0808.jpg
    IMG_0808.jpg
    198.9 KB · Views: 42
  • IMG_0809.jpg
    IMG_0809.jpg
    191.9 KB · Views: 46
Last edited:
Finally making progress again

Well i feel like i am way behind. I guess that's always how these things go. After being gone for another three weeks finally made some more progress the last two days.

So most of my problems on the driver side with regard to steering and just overall fitment with coilover, header, and engine cage placement, all stemmed from the fact that the ebay tundra headers were not made for my application. So after trying to make them fit by moving steering and such I said F it and just chopped them apart and fabbed up some of my own. (Pics Below) For my first header fabrication i am actually pretty stoked. The welds are not the cleanest (dont have a TIG welder one of my next purchases) but for a mig and some stainless wire i think it came out ok.

So anyway the steering now fit perfect I just ran a strait piece of DOM and essentially welded it to the u joints.

The engine cage is started and between that and installing the adapter plate setup that 4u2quick set me up with i should stay buisy for the next couple days. i have to get this thing back on all fours, Not running but able to roll two weeks from today. got to move the truck out of the garage for a bit. the pressure is on.
 

Attachments

  • 1313643444740.jpg
    1313643444740.jpg
    25.9 KB · Views: 128
  • 1313727675142.jpg
    1313727675142.jpg
    27.8 KB · Views: 121
  • 1313727717714.jpg
    1313727717714.jpg
    28 KB · Views: 121
  • 1313727601488.jpg
    1313727601488.jpg
    26.1 KB · Views: 121
  • 1313646418473.jpg
    1313646418473.jpg
    27 KB · Views: 127
Last edited:
More Progress

Well after my tubing bender lever went missing, I finally found in in my work truck, but got to some major tube work today. alot of fittment issues with radiator but i worked it out. truck should be back on all fours tomorrow night, but still not running cause i need to wire the bitch still, doing everything else and leaving that for last.

This is the most stoked i have been on this project it is finally looking like the well built truck i have always wanted.
 

Attachments

  • 2011-08-24_02-56-54_901.jpg
    2011-08-24_02-56-54_901.jpg
    191.8 KB · Views: 42
  • 2011-08-24_02-57-21_371.jpg
    2011-08-24_02-57-21_371.jpg
    207.7 KB · Views: 37
  • 2011-08-24_02-57-58_600.jpg
    2011-08-24_02-57-58_600.jpg
    202.4 KB · Views: 35
  • 2011-08-24_03-00-20_402.jpg
    2011-08-24_03-00-20_402.jpg
    206.3 KB · Views: 35
  • 2011-08-24_03-13-39_157.jpg
    2011-08-24_03-13-39_157.jpg
    204.4 KB · Views: 35
After my two moth trip to indo surfing finally back working on the truck.

started assembling the adapter plate and flywheel setup that 4u2quick hooked me up with. Fit together perfect. Came with all the fittings and everything seamless assembly. if you are ever gonna run an r series behind a 1uz this is the easiest way to do it. Im only throwing stock horsepower at it but it is in an offroad race application so i am gonna run it through the ringer. here are some photos

first had to cut the spacer tube on the r151F so that the hydrolic throwout bearing would slide all the way to the adapter plate. Then attached the adapter plate and throwout bearing assembly. Two holes had to be drilled to allow the hydrolic lines to exit the bell housing. I am waiting for new flywheel bolts and clutch bolts but as soon as they are here that baby is going on and then i can make the trans cross member.

Also been working on minor stuff brackets and closing up the points where the cage goes through the firewall
 

Attachments

  • 2011-11-11_16-25-58_707.jpg
    2011-11-11_16-25-58_707.jpg
    195.8 KB · Views: 38
  • 2011-11-11_16-25-47_104.jpg
    2011-11-11_16-25-47_104.jpg
    195.4 KB · Views: 37
  • 2011-11-11_16-31-00_87.jpg
    2011-11-11_16-31-00_87.jpg
    188.1 KB · Views: 39
  • 2011-11-11_16-35-00_501.jpg
    2011-11-11_16-35-00_501.jpg
    198.2 KB · Views: 34
  • 2011-11-11_17-10-41_792.jpg
    2011-11-11_17-10-41_792.jpg
    200.5 KB · Views: 38
  • 2011-11-15_13-48-22_13.jpg
    2011-11-15_13-48-22_13.jpg
    195.2 KB · Views: 35
  • 2011-11-15_13-48-29_755.jpg
    2011-11-15_13-48-29_755.jpg
    195.3 KB · Views: 34
Just an update. I was able to lend a hand to get this thing fired. I ran relays to the starter and main engine power then basically spliced the wires to the 40/40/40 loom to get the engine running. Once I tested voltage to the TPS plug I knew it was good to go at that point. This was my first stock wiring loom I've made work. On my own 1UZ truck I wired an Adaptronic ECU. I can't wait to see this beast in the dirt.


Top